slackwebモジュール
Install
1 | pip install slackweb |
Getting started
1 | import slackweb |
投稿する
1 | slack.notify(text="Tako is a sushi", channel="#sushi", username="sushi-bot", icon_emoji=":sushi:") |
1 | pip install slackweb |
1 | import slackweb |
投稿する
1 | slack.notify(text="Tako is a sushi", channel="#sushi", username="sushi-bot", icon_emoji=":sushi:") |
Request early access*からベータ版に申し込んでみる。

利用する言語を選択。

sign up for the betaで申込み。

wait listに追加された。

scrapyで複数ページを巡回はCrawlSpider、ファイルのダウンロードはFilesPipelineを使うと簡潔に記述できる。
FilesPipelineはデフォルトではSha1ハッシュをファイル名にする実装なので、カスタマイズが必要。
ソースコードは簡潔で読みやすいので継承してカスタマイズするのは容易。
要約すると、ポイントは以下
rulesにLinkExtractorで抽出要約すると、ポイントは以下
FILES_STOREでFILES_STOREによるダウンロード先ディレクトリを指定ITEM_PIPELINESでFilesPipelineを有効化file_urls属性を追加し、ダウンロードするファイルのURLsを指定fiiles属性を追加するThe typical workflow, when using the FilesPipeline goes like this:
In a Spider, you scrape an item and put the URLs of the desired into a file_urls field.
The item is returned from the spider and goes to the item pipeline.
When the item reaches the FilesPipeline, the URLs in the file_urls field are scheduled for download using the standard Scrapy scheduler and downloader (which means the scheduler and downloader middlewares are reused), but with a higher priority, processing them before other pages are scraped. The item remains “locked” at that particular pipeline stage until the files have finish downloading (or fail for some reason).
When the files are downloaded, another field (files) will be populated with the results. This field will contain a list of dicts with information about the downloaded files, such as the downloaded path, the original scraped url (taken from the file_urls field) , and the file checksum. The files in the list of the files field will retain the same order of the original file_urls field. If some file failed downloading, an error will be logged and the file won’t be present in the files field.
Spiderでスクレイピングし、目的のURLをfile_urlsにセットすると、SchedulerとDownloaderを使ってスケジューリングされるが、優先度が高く他のページをスクレイピングする前に処理される。ダウンロード結果はfilesに記録する。
To enable your media pipeline you must first add it to your project ITEM_PIPELINES setting.
For Images Pipeline, use:
ITEM_PIPELINES = {‘scrapy.pipelines.images.ImagesPipeline’: 1}
For Files Pipeline, use:ITEM_PIPELINES = {‘scrapy.pipelines.files.FilesPipeline’: 1}
ITEM_PIPELINESでscrapy.pipelines.files.FilesPipeline': 1を指定して有効化する。
画像ファイルのためのImagesPipelineもある。
The files are stored using a SHA1 hash of their URLs for the file names.
ファイル名はSHA1ハッシュを使用する
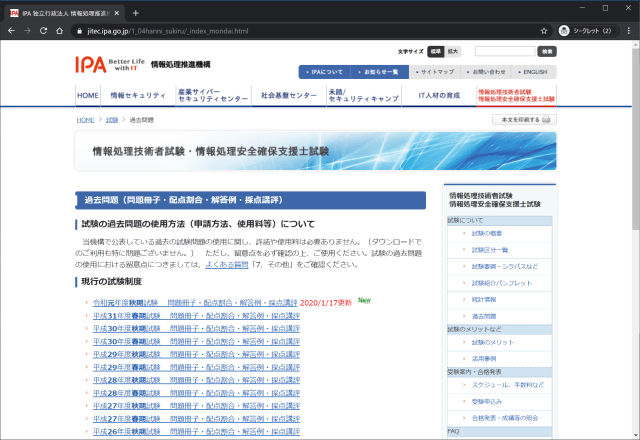
起点となるページは各年度の過去問ダウンロードページへのリンクになっている。

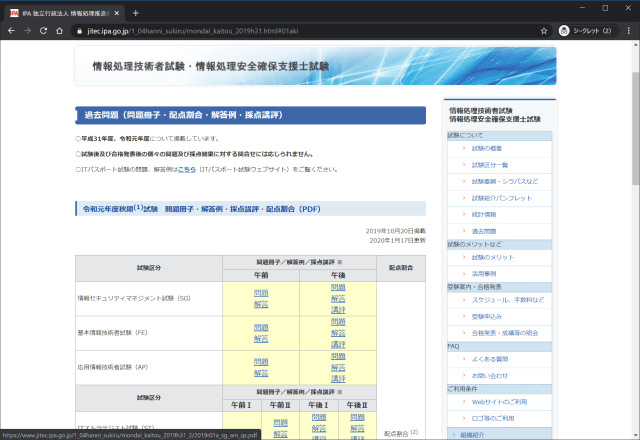
各ページは試験区分ごとに過去問のPDFへのリンクがある。

https://www.jitec.ipa.go.jp/1_04hanni_sukiru/_index_mondai.html以下のページを巡回してPDFをダウンロードするプロジェクトを作成する。
Spiderのスケルトンを作成する際に-t crawlを指定し、CrawlSpiderのスケルトンを作成する。
1 | scrapy startproject <プロジェクト名> |
rulesで各年度の過去問ダウンロードページを抽出し、各ページを解析してPDF単位でアイテム化する。file_urlsは複数指定できるが、ここでは1ファイル毎で指定している。
1 | # -*- coding: utf-8 -*- |
files_urlsとfiles属性がFilesPipelineで必要になる属性
1 | import scrapy |
FilesPipelineはデフォルトでSHA1ハッシュのファイル名を使用するので、継承したクラスでfile_path()メソッドをオーバーライドする。
存在しないディレクトリも自動生成されるので、保存したいパスを生成して返せばいい。
1 | from scrapy.pipelines.files import FilesPipeline |
1 | response.url="https://www.jitec.ipa.go.jp/1_04hanni_sukiru/mondai_kaitou_2019h31_2/2019r01a_sg_am_qs.pdf" |
FilesPipelineを有効化する。
FILES_STOREでダウンロード先ディレクトリを指定ITEM_PIPELINESでFilesPipelineを有効化デフォルト設定では多重度が高すぎるので、調整する。
1 | # Obey robots.txt rules |
scrapy crawl myspider -a category=electronicsのように-aオプションで渡す。
1 | Spiders can access arguments in their __init__ methods: |
The default init method will take any spider arguments and copy them to the spider as attributes. The above example can also be written as follows:
デフォルトでは属性値として設定される。
1 | import scrapy |
Splashのみで利用する場合はSelenium同様、内部的に動作するHeadlessブラウザ(Chromium)がセッションハンドリングを行うため、同一のLuaスクリプト内で記述する範囲では意識しなくてもステートは維持されている。
SplashはScrapyからのリクエスト毎にステートレスなので、ScrapyとLuaスクリプトの間でセッションハンドリングが必要になる。
scrapy-splashに説明がある。
Splash itself is stateless - each request starts from a clean state. In order to support sessions the following is required:
- client (Scrapy) must send current cookies to Splash;
- Splash script should make requests using these cookies and update them from HTTP response headers or JavaScript code;
- updated cookies should be sent back to the client;
- client should merge current cookies wiht the updated cookies.
For (2) and (3) Splash provides splash:get_cookies() and splash:init_cookies() methods which can be used in Splash Lua scripts.
Splashはステートレスなので、状態を維持するためのコーディングが必要。
scrapy-splash provides helpers for (1) and (4): to send current cookies in ‘cookies’ field and merge cookies back from ‘cookies’ response field set request.meta[‘splash’][‘session_id’] to the session identifier. If you only want a single session use the same session_id for all request; any value like ‘1’ or ‘foo’ is fine.
scrapy-splashが自動的にCookie情報をセッション識別子としてrequest.meta['splash']['session_id']にマージする。
For scrapy-splash session handling to work you must use /execute endpoint and a Lua script which accepts ‘cookies’ argument and returns ‘cookies’ field in the result:
このセッションハンドリングを有効にするには/executeエンドポイントを使用し、cookiesパラメーターを使用する処理をLuaスクリプトで実装する必要がある。
1 | function main(splash) |
SplashRequest sets session_id automatically for /execute endpoint, i.e. cookie handling is enabled by default if you use SplashRequest, /execute endpoint and a compatible Lua rendering script.
SplashRequestで/executeエンドポイントを使い、適切なLuaスクリプトを記述すれば、セッションハンドリングを実装することができる。
All these responses set response.url to the URL of the original request (i.e. to the URL of a website you want to render), not to the URL of the requested Splash endpoint. “True” URL is still available as response.real_url.
plashJsonResponse provide extra features:
- response.data attribute contains response data decoded from JSON; you can access it like response.data[‘html’].
- If Splash session handling is configured, you can access current cookies as response.cookiejar; it is a CookieJar instance.
- If Scrapy-Splash response magic is enabled in request (default), several response attributes (headers, body, url, status code) are set automatically from original response body:
- response.headers are filled from ‘headers’ keys;
- response.url is set to the value of ‘url’ key;
- response.body is set to the value of ‘html’ key, or to base64-decoded value of ‘body’ key;
- response.status is set from the value of ‘http_status’ key.
response.urlはレンダリングするページのURLが設定されるresponse.real_urlはSplashのURL(http://splash:8050/execute)となるresponse.dataでSplashから返却したデータにアクセスできるresponse.cookiejarでアクセスすることができる。1 | import scrapy |
重要なポイントは/executeエンドポイントを使用していること。
argsでLuaスクリプトやパラメーターをSplashに渡す。
1 | yield SplashRequest(url, self.parse_result, |
SplashRequestで渡したパラメーターを使用してCookieを初期化。
1 | splash:init_cookies(splash.args.cookies) |
最後のレスポンスのヘッダー情報やCookieを返却。
1 | local entries = splash:history() |
ログインフォームの利用を支援する。pip install loginformでインストール。
1 | $scrapy startproject scrapy_login |
1 | ├── result.json |
githubはrobots.txtでクローラーからのアクセスを拒否するので、一時的にrobots.txtを無効化する。
1 | # Obey robots.txt rules |
1 | class ScrapyLoginItem(scrapy.Item): |
1 | # -*- coding: utf-8 -*- |
実行すると以下のような内容が生成される。
1 | [ |
注目するポイントはfill_login_formの部分。fill_login_form()を実行すると、ページを解析してログインフォームの情報を返す。
1 | $python |
タプルの1つめでauthenticity_tokenが含まれていることがわかる。このようにHiddenパラメーターを送ることができる。
SplashのScrapyミドルウェア。pip install scrapy-splashでインストール。
1 | $ scrapy startproject scrapy_splash_tutorial |
1 | . |
1 | DOWNLOADER_MIDDLEWARES = { |
Order 723 is just before HttpProxyMiddleware (750) in default scrapy settings.
ミドルウェアの優先度はHttpProxyよりも優先する必要があるため、750未満にする必要がある。
SPLASH_URL =でSplashのURLを指定する。
1 | SPLASH_URL = 'http://splash:8050/' |
docker-composeで起動しているため、splashを使っている。
1 | SPIDER_MIDDLEWARES = { |
SplashDeduplicateArgsMiddlewareを有効化する。これによって重複するリクエストをSplashサーバーに送らない。
1 | DUPEFILTER_CLASS = 'scrapy_splash.SplashAwareDupeFilter' |
リクエストのフィンガープリント計算をオーバーライドできないので、DUPEFILTER_CLASSとHTTPCACHE_STORAGEを定義する。
1 | import scrapy |
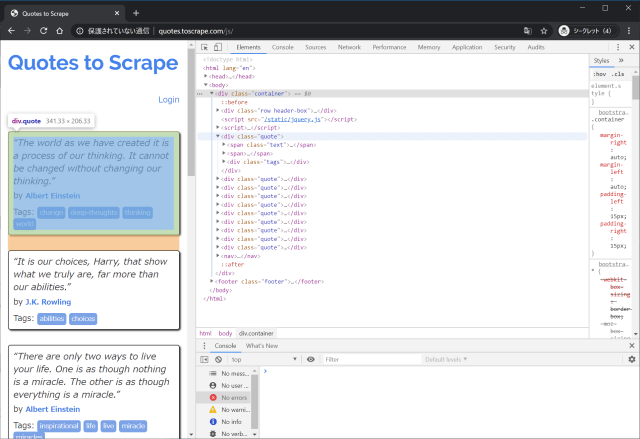
argsでSplashに引数として渡すendpointでデフォルトのエンドポイントであるrender.jsonからrender.htmlに変更JavaScriptでページを生成するhttp://quotes.toscrape.com/js/を対象にテストコードを作成する。
今回のスパイダーはquotesjsで作成。
1 | $scrapy genspider quotesjs quotes.toscrape.com |


shellはSplash経由で操作するため、scrapy shell 'http://splash:8050/render.html?url=http://<target_url>&timeout=10&wait=2'で起動する。
パラメーターのwait=2(秒数は対象にあわせて適切な値を)は重要で、指定なしではレンダリングが終わっていないHTMLが返却されることもある。
1 | $scrapy shell 'http://splash:8050/render.html?url=http://quotes.toscrape.com/js/' |
1 | >>> response.css('.container .quote').get() |
1 | class QuoteItem(scrapy.Item): |
1 | # -*- coding: utf-8 -*- |
scrapy crawl quotesjs -o result.jsonでクローラーを実行する。
1 | $scrapy crawl quotesjs -o result.json |
生成されたresult.jsonは以下。
1 | [ |
docker run -it -p 8050:8050 --rm scrapinghub/splashだが、docker-composeで操作する。
docker-compose.ymlで定義。
1 | splash: |
実行のテスト
1 | $ docker-compose run splash |
使用する際はdocker-compose up -dで。
起動したSplashにアクセスするとWebUIから操作が可能。

標準で表示されているコードでRender me!を実行する。

Splash can execute custom rendering scripts written in the Lua programming language. This allows us to use Splash as a browser automation tool similar to PhantomJS.
Lua言語で記述されたカスタムレンダリングスクリプトを実行できるPhantomJS的なもの。Lua言語はRedis, Nginx, Apache, World of Warcraft scripts,などのカスタムスクリプトの記述に使われている。
以下のチュートリアルが紹介されている。
1 | function main(splash, args) |
WebUI上でRender me!を実行すると、returnで返し多JSONオブジェトが得られる。


1 | function main(splash) |
SplashのWebGUIで実行すると以下の結果になる。
1 | Splash Response: Object |
JSON形式ではなく、文字列で返すこともできる。
1 | function main(splash) |
docker-composeでsplashというサービスなのでホスト名はsplashを使用している。
1 | $ curl 'http://splash:8050/execute?lua_source=function+main%28splash%29%0D%0A++return+%27hello%27%0D%0Aend' |
It is not doing exactly the same work - instead of saving screenshots to files we’re returning PNG data to the client via HTTP API.
スクリーンショットをPNG形式で取得しWebAPIで返却する例
1 | function main(splash, args) |
WebUI上でRender me!を実行すると、各サイトのスクリーンショットが表示される。

There are two main ways to call Lua methods in Splash scripts: using positional and named arguments. To call a method using positional arguments use parentheses splash:foo(val1, val2), to call it with named arguments use curly braces: splash:foo{name1=val1, name2=val2}:
Luaのメソッド呼び出しは位置引数(Positional arguments)によるsplash:foo(val1, val2)や名前引数(named arguments)splash:foo{name1=val1, name2=val2}によるものがある。
1 | function main(splash, args) |
このチュートリアル自体に意味はないが、コード上evaljs{source="document.title"}となっているので動作しない。
splash:evaljsのリファレンスでsnippetである事がわかる。
Splash uses the following convention:
- for developer errors (e.g. incorrect function arguments) exception is raised;
- for errors outside developer control (e.g. a non-responding remote website) status flag is returned: functions that can fail return ok, reason pairs which developer can either handle or ignore.
If main results in an unhandled exception then Splash returns HTTP 400 response with an error message.
Splashのルールでは以下のルール。
例外はerror()で明示的に発生させることができる。
1 | function main(splash, args) |
例外の場合、LuaのHTTPレスポンスHTTP 400のエラーとして返す。
1 | { |
同じコードをassert()で表現できる。
1 | function main(splash, args) |
By default Splash scripts are executed in a restricted environment: not all standard Lua modules and functions are available, Lua require is restricted, and there are resource limits (quite loose though).
デフォルトではSplashはサンドボックスで実行される。無効化するには-disable-lua-sandboxオプションを使う。
Dockerコマンドをそのまま使用するなら以下のように。
1 | `docker run -it -p 8050:8050 scrapinghub/splash --disable-lua-sandbox` |
docker-composeなら、commandでオプションを渡す。
1 | splash: |
docker-compose runでテスト実行するとLua: enabled (sandbox: disabled)を確認できる。
1 | PS C:\Users\g\OneDrive\devel\gggcat@github\python3-tutorial> docker-compose run splash |
By default Splash aborts script execution after a timeout (30s by default); it is a common problem for long scripts.
タイムアウトはデフォルトで30秒。
ap-northeast-1x86_641 | $ aws ec2 describe-images --owners amazon --filters "Name=name,Values=amzn2-ami-hvm-*" "Name=architecture,Values=x86_64" --query 'reverse(sort_by(Images, &CreationDate))[].[Name,ImageId,Architecture]' --output table --region ap-northeast-1 |
ap-northeast-1x86_64gp2ボリュームタイプでイメージが異なるので、以下はgp2(現行の汎用SSD)のボリュームで検索している。
1 | $ aws ec2 describe-images --owners amazon --filters "Name=name,Values=amzn2-ami-hvm-*-gp2" "Name=architecture,Values=x86_64" --query 'reverse(sort_by(Images, &CreationDate))[1].[Name,ImageId,Architecture]' --output table --region ap-northeast-1 |
amzn2-ami-hvm-*-x86_64-ebsはVolumeType: standardで旧世代のボリュームタイプを使用している。
1 | $ aws ec2 describe-images --owners amazon --filters "Name=name,Values=amzn2-ami-hvm-*-gp2" "Name=architecture,Values=x86_64" --query 'reverse(sort_by(Images, &CreationDate))[0]' --region ap-northeast-1 |
UbuntuLinuxの公式は099720109477なのでこれを基本に絞り込んでいく。
ap-northeast-1x86_641 | $aws ec2 describe-images --owners 099720109477 --filters "Name=name,Values=*18.04*" "Name=architecture,Values=x86_64" --query 'reverse(sort_by(Images, &CreationDate))[].[Name,ImageId,Architecture]' --output table --region ap-northeast-1 |
複合条件で以下を条件として、18.04の最新イメージの情報を取得する。
ap-northeast-1x86_64gp21 | $aws ec2 describe-images --owners 099720109477 --filters "Name=name,Values=ubuntu/images/hvm-ssd/*18.04*" "Name=architecture,Values=x86_64" --query 'reverse(sort_by(Images, &CreationDate))[0].[Name,ImageId,Architecture]' --output table --region ap-northeast-1 |
ubuntu/images/hvm-ssd/ubuntu-bionic-18.04-amd64-server-*: 現行SSDボリュームubuntu/images/hvm-instance/ubuntu-bionic-18.04-amd64-server-*: ボリュームマウントなし1 | $ aws ec2 describe-images --owners 099720109477 --filters "Name=name,Values=ubuntu/images/hvm-ssd/*18.04*" "Name=architecture,Values=x86_64" --query 'reverse(sort_by(Images, &CreationDate))[0]' --region ap-northeast-1 |
めも
募集中