Google AdSense

Google AdSenseにサイトを登録する

google-adsense width=640

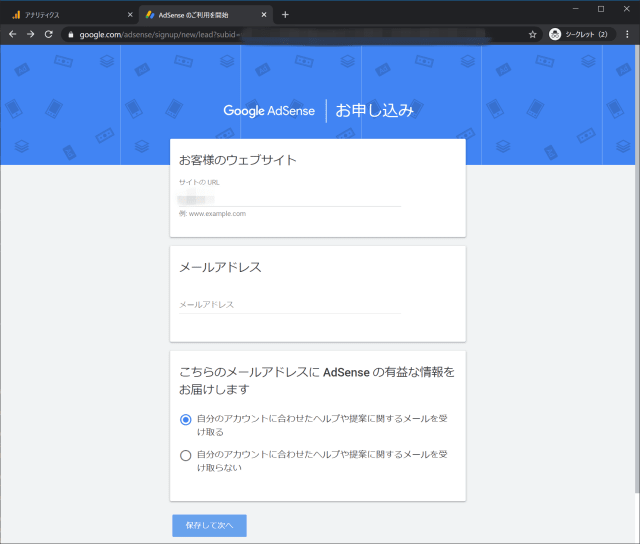
審査を受ける(失敗した例)

指定されたAdSenseコードをサイトに貼り付けて閲覧可能にする

google-adsense width=640

google-adsense width=640

サイトの修正

google-adsense width=640

コンテンツが存在しないはページがクロールされていないため。Google Search ConsoleでGoogleのクロールが完了してインデックス化されたことを確認したうえで再登録を実施する。
また、必須コンテンツとしてプライバシーポリシーの掲載が求められているので、プライバシーポリシーページを作成。

  • Google Search Consoleに登録し、Search Consoleのカバレッジが表示されるまで待つ
  • プライバシーポリシーを作成しサイトから閲覧できるようにする

再審査を受ける

google-adsense width=640

サイトを審査できません
新型コロナウイルス感染症 (COVID-19) の世界的流行の影響で、Google では現在、一部のサービスで一時的に遅延が発生しています。そのため、現時点ではお客様のサイトを審査することができません。

COVID19の影響がここまで……

審査合格

なんども同じエラーを繰り返し、6月にようやく審査完了。

google-adsense complete width=640

google-adsense complete width=640

google-adsense complete width=640

google-adsense complete width=640

google-adsense complete width=640

ads.txt

google-adsense complete width=640

ads.txtをダウンロードしてドメインのルートディレクトリに配置。警告メッセージはすぐには消えないが、ads.txt配置後しばらくすると消える。

自動広告の有効化

Google Adsense用のタグが表示されるので、サイトに貼り付ける。
内容は審査時のものと同じ。

google-adsense complete width=640

自動広告を有効化する。
サマリーのペンシルマークからサイトの広告設定が可能。

google-adsense complete width=640

google-adsense complete width=640

google-adsense complete width=640

コメント・シェア

Google Analytics

Google Analyticsにサイトを登録する

サイトを登録する

google-analytics width=640

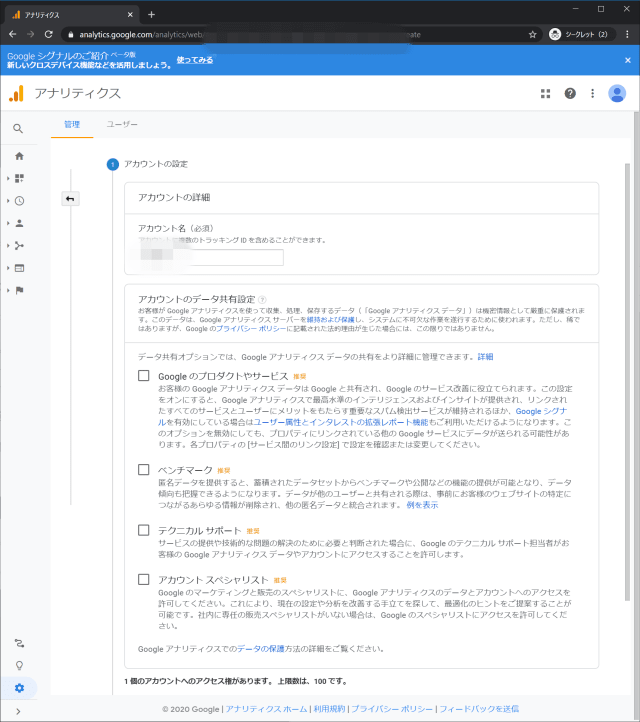
今回はWebサイトなので、ウェブを選択。

google-analytics width=640

サイトのURLを設定。

google-analytics width=640

利用規約に同意して登録完了。

google-analytics width=640

トラッキングコードを取得する

管理 -> トラッキング情報からサイトに埋め込むトラッキングコードを確認する。

google-analytics width=640

google-analytics width=640

サイトのアクセス状況を把握する

情報が収集されると、ホーム画面でトラフィック状況を確認できる。

google-analytics width=640

ロケール別の統計。

google-analytics width=640

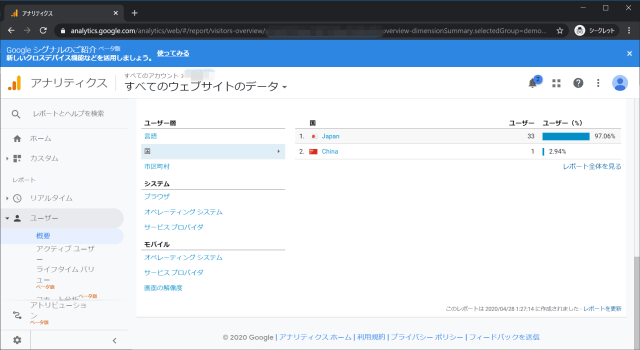
国別の統計。

google-analytics width=640

ブラウザ別の統計。

google-analytics width=640

OS別の統計。

google-analytics width=640

コメント・シェア

HexoにGoogle AdSenseを組み込む

 
カテゴリー Google SSG   タグ

審査を受ける

指定されたAdSenseコードをサイトに貼り付けて閲覧可能にする

themes/tranquilpeak/layout_partial/google_adsense.ejsを作成。

1
<script data-ad-client="ca-pub-xxxxxxxxxxxxxxxxx" async src="https://pagead2.googlesyndication.com/pagead/js/adsbygoogle.js"></script>

themes/tranquilpeak/layoutlayout.ejsを修正してトップページ(フッター部分)に指定のコードが表示されるようにする

1
2
3
4
5
6
7
8
9
10
11
12
13
14
15
16
17
18
19
20
21
<div id="blog">
<%- partial('_partial/header', {sidebarBehavior: sidebarBehavior}) %>
<%- partial('_partial/sidebar', {sidebarBehavior: sidebarBehavior}) %>
<%- partial('_partial/post/header-cover', {post: page, sidebarBehavior: sidebarBehavior}) %>
<div id="main" data-behavior="<%= sidebarBehavior %>"
class="<%= (page.coverImage ? 'hasCover' : '') %>
<%= (page.coverMeta === 'out' ? 'hasCoverMetaOut' : 'hasCoverMetaIn') %>
<%= (page.coverCaption ? 'hasCoverCaption' : '') %>">
<%- body %>
<!-- ここから -->
<%- partial('_partial/google-adsense') %>
<!-- ここまで -->
<%- partial('_partial/footer', null, {cache: !config.relative_link}) %>
</div>
<% if (is_post() && (page.actions === undefined || page.actions)) { %>
<div id="bottom-bar" class="post-bottom-bar" data-behavior="<%= sidebarBehavior %>">
<%- partial('_partial/post/actions', {post: page}) %>
</div>
<%- partial('_partial/post/share-options', {post: page, sidebarBehavior: sidebarBehavior}) %>
<% } %>
</div>

広告を表示させる

google_adsense.ejsの内容は同じなのでそのまま使用。

サイトの タグの間に AdSense コードをコピーして貼り付けます

と指定されているので、themes/tranquilpeak/layout_partial/head.ejs修正して以下のコードを追加。

1
2
3
4
5
6
7
8
9
10
11
12
13
14
15
16
…略…
<!--STYLES END-->
<%- partial('google-analytics') %>
<!-- ここから -->
<%- partial('google-adsense') %>
<!-- ここまで -->
<%- partial('baidu-analytics') %>

<% if (page.comments) { %>
<% if (theme.gitment.enable) { %>
<%- css('assets/css/gitment.css') %>
<% } else if (theme.gitalk.enable) { %>
<%- css('assets/css/gitalk.css') %>
<% } %>
<% } %>
</head>

各ページのヘッダー部とフッター部にgoogle-adsense.ejsの内容が挿入されていることを確認。

コメント・シェア

.sshフォルダーをOneDriveに置く

OneDriveの直下に.sshフォルダーを設置する場合
フォルダーのシンボリックリンクを作成

1
2
C:\WINDOWS\system32>mklink /D C:\Users\ユーザ名\.ssh C:\Users\ユーザ名\OneDrive\.ssh
C:\Users\ユーザ名\.ssh <<===>> C:\Users\ユーザ名\OneDrive\.ssh のシンボリック リンクが作成されました

ssh-keygenでキーペアを作成する

ssh-keygenでキーペアを作成

1
2
3
4
5
6
7
8
9
10
11
12
13
14
15
16
17
18
19
20
PS > ssh-keygen -t rsa -b 4096 -f host-key
Generating public/private rsa key pair.
Enter passphrase (empty for no passphrase):
Enter same passphrase again:
Your identification has been saved in host-key.
Your public key has been saved in host-key.pub.
The key fingerprint is:
SHA256:****************************************** user@host
The key's randomart image is:
+---[RSA 4096]----+
| o .. |
| o .. |
|.. E |
|. . . . |
| . + . S+. o |
|. o o *=*+= |
| . . .o+O=+. |
| =O+*= . |
| o=**+o+ |
+----[SHA256]-----+

.ssh/configのログイン設定

ssh-keygenで作成した公開鍵を接続先hostの.ssh/authorized_keysとして保存

OneDriveの.sshフォルダー内でhost.example.comフォルダーを作成しその中に秘密鍵host-keyを保存

1
2
3
4
5
6
7
8
#
# host.example.com
#
Host host host.example.com
HostName host.example.com
Port 10022
User myuser
IdentityFile ~.ssh/host.example.com/host-key

ここまで設定すればsshの基本操作は略名hostを使って、ポートやユーザ名指定なしで行える

  • shellアクセスやssh host
  • scpを使ったファイル転送scp host:~/remote_file.tst .

.ssh/configでPortforwardingを設定

host.example.comから接続可能なローカルホスト192.168.1.1と192.168.1.2に対してリモートデスクトップ接続を行う場合

LocalForwardを使ってPortforwardingを行う。
複数設定する場合は複数行設定すればいい。

1
2
3
4
5
6
7
8
9
10
#
# host.example.com
#
Host host host.example.com
HostName host.example.com
Port 10022
User myuser
LocalForward 13389 192.168.1.1:3389
LocalForward 23389 192.168.1.2:3389
IdentityFile ~.ssh/host.example.com/host-key

sshコマンドで同じことを実行するなら

1
ssh -L 13389:192.168.1.1:23389 55333:192.168.1.2:3389 myuser@host.example.com -p 10022

Portfowarding経由でリモートデスクトップに接続する

  1. ターミナル上でssh hostあるいはssh host.example.com
  2. リモートデスクトップでlocalhost:13389に接続すると192.168.1.1に接続
  3. リモートデスクトップでlocalhost:23389に接続すると192.168.1.2に接続

ただし、ターミナルを起動しておく必要があるので、sshはバックグラウンド実行する。

ssh -C -N -f host(-C:圧縮、-N:コマンド実行しない、-f:バックグラウンド)のようにオプションを組み合わせてバックグラウンドで実行するが、
Windows 10ではバックグラウンドにならないので、Start-Job { & ssh -C -N -f host }でバックグラウドジョブとして実行。

1
2
3
4
5
6
7
8
9
10
11
PS > Start-Job { & ssh -C -N -f host }

Id Name PSJobTypeName State HasMoreData Location Command
-- ---- ------------- ----- ----------- -------- -------
1 Job1 BackgroundJob Running True localhost & ssh -C -N -f host

PS > Get-Job

Id Name PSJobTypeName State HasMoreData Location Command
-- ---- ------------- ----- ----------- -------- -------
1 Job1 BackgroundJob Running True localhost & ssh -C -N -f host

このままだと長いのでエイリアスとして登録する

1
2
3
4
5
6
7
8
9
PS > New-Item -type file -force $profile

ディレクトリ: C:\Users\ユーザー名\Documents\WindowsPowerShell

Mode LastWriteTime Length Name
---- ------------- ------ ----
-a---- 2020/04/01 20:37 0 Microsoft.PowerShell_profile.ps1

PS > notepad $profile

エイリアス設定は以下。上記のジョブをctというコマンドで実行する。

1
2
function ConnectTunnel { Start-Job { & ssh -C -N -f host } }
Set-Alias ct ConnectTunnel

実行すると

1
2
3
4
5
6
7
PS > ct

Id Name PSJobTypeName State HasMoreData Location Command
-- ---- ------------- ----- ----------- -------- -------
1 Job1 BackgroundJob Running True localhost & ssh -C -N -f host

PS >

エイリアスも共有する

OneDriveに共通のエイリアス定義をおいて複数のPCで共有する。

$profileC:\Users\ユーザ名\Documents\WindowsPowerShellフォルダーに生成されるので、これをOneDrive上に置く。
現在作成されているファイルをOneDrive上に移動して、フォルダーをシンボリックリンクで置き換える。

1
2
mklink /D C:\Users\ユーザ名\Documents\WindowsPowerShell C:\Users\ユーザ名\OneDrive\WindowsPowerShell
C:\Users\ユーザ名\Documents\WindowsPowerShell <<===>> C:\Users\ユーザ名\OneDrive\WindowsPowerShell のシンボリック リンクが作成されました

コメント・シェア

GitHub ActionsによるCI/CD

 
カテゴリー AWS Azure CI/CD GCP Git   タグ

GitHub Actions

GItHubのbuilt-in CI/CDツール。

GitHub Actions では、エンドツーエンドの継続的インテグレーション (CI) と継続的デプロイメント (CD) 機能をリポジトリに直接ビルドすることができます

Containerを実行することができる。

ワークフローは、Linux、macOS、Windows、コンテナで、’ランナー’と呼ばれるGitHubがホストするマシン上で実行できます

独自ホストでも動作する。

自分が所有もしくは管理するマシン上でワークフローを実行するために、独自にランナーをホストすることもできます

アクションのエコシステムと公開リポジトリのコンテナイメージを利用することができる。

ワークフローの作成には、リポジトリで定義されているアクション、GitHubのパブリックリポジトリにあるオープンソースのアクション、または公開されているDockerコンテナイメージを使用できます。フォークされたリポジトリのワークフローは、デフォルトでは動作しません。

すべてのリポジトリでGitHub Actionsはデフォルトで有効

By default, GitHub Actions is enabled on all repositories.

課金

Public repogitory

無料!

Private repository

デフォルトでは無料枠を越えると利用できない設定になっている。

デフォルトでは料金の上限は$0になっており、この上限に達した後に追加で分やストレージが使われないようになっています

無料枠

GitHubプラン ストレージ Minutes (per month)
GitHub Free 500 MB 2,000
GitHub Pro 1 GB 3,000

同時実行制限

GitHubプラン 最大同時ジョブ 最大同時macOSジョブ
GitHub Free 20 5
GitHub Pro 40 5

ワークフロー

.github/workflowsに保存する

1つのリポジトリに複数のワークフローを作成できます。 ワークフローは、リポジトリのルートにある.github/workflowsディレクトリに保存する必要があります。

YAMLで記述する

ワークフローは YAML 構文で設定し、リポジトリ内にワークフローファイルとして保存する必要があります。

ワークフローファイルの作成

  1. .github/workflowsという名前のディレクトリを作成
  2. .github/workflowsに、ワークフローのため.ymlまたは.yamlファイルを追加
  3. YAMLファイルをカスタマイズ(トリガーイベントとアクション)
  4. ワークフローを実行するブランチにコミット

トリガーイベント

PushやPull RequestのWeb Hookをトリガーに設定できる。

GitHub 上のアクティビティから webhook イベントが作成された際にワークフローを実行するよう設定できます。 ワークフローは、ワークフローの実行をトリガーするための webhook イベントを複数使用できます。

1
2
3
4
5
6
7
8
9
10
11
12
13
14
on:
# プッシュもしくはプルリクエストでワークフローを起動する
# ただしmasterブランチに対してのみ
push:
branches:
- master
pull_request:
branches:
- master
# page_buildとリリース作成イベントでも起動
page_build:
release:
types: # この設定は上のpage_buildイベントには影響しない
- created

Pull RequestのOpen/Closeをトリガーにした記述できる。

たとえば、プルリクエストが assigned、opened、synchronize、または reopened だったときにワークフローを実行できます。

1
2
3
on:
pull_request:
types: [assigned, opened, synchronize, reopened]

同一リポジトリ内でファイルマッチを指定してトリガーできる。

push および pull_request イベントを使用する場合、1 つ以上の変更されたファイルが paths-ignore にマッチしない場合や、1 つ以上の変更されたファイルが、設定された paths にマッチする場合にワークフローを実行するように設定できます。

1
2
3
4
on:
push:
paths-ignore:
- 'docs/**'
1
2
3
4
on:
push:
paths:
- '**.js'
1
2
3
4
5
on:
push:
paths:
- 'sub-project/**'
- '!sub-project/docs/**'

タスクスケジューリングも可能。

POSIX クーロン構文を使用して、特定の UTC 時間にワークフローを実行できるようスケジュール設定できます。 スケジュールしたワークフローは、デフォルトまたはベースブランチの直近のコミットで実行されます。 スケジュールされたワークフローを実行できる最短のインターバルは5分ごとです。

1
2
3
4
on:
schedule:
# * はYAMLに置ける特殊文字なので、この文字列は引用符で囲まなければならない
- cron: '*/15 * * * *'

ランナー

ジョブの実行環境を選択できる。

Linux、Windows、macOSなど、タイプとバージョンの異なる仮想ホストマシンを選択できます。 ワークフロー内の各ジョブは仮想環境の新しいインスタンスで実行され、1つのジョブ内のステップはファイルシステムを使って情報を共有できます。

1
runs-on: ubuntu-latest

ランナーの環境は/virtual-environmentsで確認することができる。

ビルドマトリクスの設定

複数のランタイムを記述できる。

複数のオペレーティングシステム、プラットフォーム、言語バージョンにまたがって同時にテストするときは、ビルドマトリクスを設定できます。

1
2
3
4
5
runs-on: ${{ matrix.os }}
strategy:
matrix:
os: [ubuntu-16.04, ubuntu-18.04]
node: [6, 8, 10]

チェックアウトアクション

チェックアウトアクションを使ってリポジトリのコードをコピーする。

リポジトリをビルドしてテストするとき、または継続的インテグレーションを使用するとき、ワークフローにリポジトリのコードのコピーが必要な場合。

1
- uses: actions/checkout@v2

DockerHubのContainerを参照する

DockerHubで公開されているコンテナイメージを利用することができる。

Dockerハブで公開されているDockerコンテナイメージで定義されているアクションは、ワークフローファイルのdocker://{image}:{tag}構文を使用して参照する必要があります。 コードとデータを保護するには、ワークフローで使用する前にDocker HubからのDockerコンテナイメージの整合性を確認してください。

1
2
3
4
5
jobs:
my_first_job:
steps:
- name: My first step
uses: docker://alpine:3.8

アクションを定義して再利用することもできる。

ワークフローのステータスバッジをリポジトリに追加する

ワークフローがnameキーワードを使用している場合、ワークフローは名前で参照しなければなりません。 ワークフローの名前に空白文字が含まれている場合、その文字をURLエンコードした文字列「%20」に置換する必要があります。

https://github.com/<OWNER>/<REPOSITORY>/workflows/<WORKFLOW_NAME>/badge.svg

Actionによるパブリッククラウド連携

主要なパブリッククラウドプロバイダーが公式のモジュールを公開している。

AWS

Azure

Google Cloud Platform

コメント・シェア

Selenium Docker

docker-composeで公式サンプルに一部追記

appサービスとしてPython実行のシェルのためのContainerを用意。
tty: trueを忘れずに。

1
2
3
4
5
6
7
8
9
10
11
12
13
14
15
16
# To execute this docker-compose yml file use `docker-compose -f <file_name> up`
# Add the `-d` flag at the end for detached execution
version: "3"
services:
chrome:
image: selenium/standalone-chrome
volumes:
- /dev/shm:/dev/shm

app:
image: python:3-slim
working_dir: /app
command: /bin/bash
tty: true
volumes:
- ./app:/app

起動

1
2
3
4
5
6
7
8
9
10
11
12
13
14
15
16
17
18
19
20
21
22
23
24
25
26
27
PS > docker-compose up
selenium-standalone_app_1 is up-to-date
selenium-standalone_chrome_1 is up-to-date
Attaching to selenium-standalone_app_1, selenium-standalone_chrome_1
chrome_1 | 2020-04-18 03:04:17,638 INFO Included extra file "/etc/supervisor/conf.d/selenium.conf" during parsing
chrome_1 | 2020-04-18 03:04:17,639 INFO supervisord started with pid 7
chrome_1 | 2020-04-18 03:04:18,641 INFO spawned: 'xvfb' with pid 10
chrome_1 | 2020-04-18 03:04:18,642 INFO spawned: 'selenium-standalone' with pid 11
chrome_1 | 03:04:18.800 INFO [GridLauncherV3.parse] - Selenium server version: 3.141.59, revision: e82be7d358
chrome_1 | 2020-04-18 03:04:18,801 INFO success: xvfb entered RUNNING state, process has stayed up for > than 0 seconds (startsecs)
chrome_1 | 2020-04-18 03:04:18,801 INFO success: selenium-standalone entered RUNNING state, process has stayed up for > than 0 seconds (startsecs)
chrome_1 | 03:04:18.859 INFO [GridLauncherV3.lambda$buildLaunchers$3] - Launching a standalone Selenium Server on port 4444
chrome_1 | 2020-04-18 03:04:18.888:INFO::main: Logging initialized @240ms to org.seleniumhq.jetty9.util.log.StdErrLog
chrome_1 | 03:04:19.041 INFO [WebDriverServlet.<init>] - Initialising WebDriverServlet
chrome_1 | 03:04:19.122 INFO [SeleniumServer.boot] - Selenium Server is up and running on port 4444
chrome_1 | 03:05:29.991 INFO [ActiveSessionFactory.apply] - Capabilities are: {
chrome_1 | "browserName": "chrome",
chrome_1 | "version": ""
chrome_1 | }
chrome_1 | 03:05:29.993 INFO [ActiveSessionFactory.lambda$apply$11] - Matched factory org.openqa.selenium.grid.session.remote.ServicedSession$Factory (provider: org.openqa.selenium.chrome.ChromeDriverService)
chrome_1 | Starting ChromeDriver 81.0.4044.69 (6813546031a4bc83f717a2ef7cd4ac6ec1199132-refs/branch-heads/4044@{#776}) on port 27205
chrome_1 | Only local connections are allowed.
chrome_1 | Please protect ports used by ChromeDriver and related test frameworks to prevent access by malicious code.
chrome_1 | [1587179130.011][SEVERE]: bind() failed: Cannot assign requested address (99)
chrome_1 | 03:05:30.539 INFO [ProtocolHandshake.createSession] - Detected dialect: W3C
chrome_1 | 03:05:30.563 INFO [RemoteSession$Factory.lambda$performHandshake$0] - Started new session c7eb56f1ed116e861a77db2cbb3acd33 (org.openqa.selenium.chrome.ChromeDriverService)
chrome_1 | 03:05:31.362 INFO [ActiveSessions$1.onStop] - Removing session c7eb56f1ed116e861a77db2cbb3acd33 (org.openqa.selenium.chrome.ChromeDriverService)

テストスクリプト

appで実行するテストスクリプト

appで動かすこのスクリプト記述した接続先のchromeはdocker-composeによって名前解決される(docker-compose upで起動する必要がある)。

1
2
3
4
5
6
7
8
9
10
11
12
13
14
15
16
from selenium import webdriver
from selenium.webdriver.common.desired_capabilities import DesiredCapabilities

def test_access(driver):
driver.get('https://www.google.com')
driver.save_screenshot('test.png')
print(driver.title)
#driver.quit()

if __name__ == '__main__':
options = {
'command_executor': 'http://chrome:4444/wd/hub',
'desired_capabilities': DesiredCapabilities.CHROME,
}
with webdriver.Remote(**options) as driver:
test_access(driver)

テストスクリプトによるテスト

実行するapp上ではpip install seleniumでモジュールをインストール。
実行するとコンソール上にGoogleが表示され、画面キャプチャがtest.pngというファイル名で保存される。

1
2
3
4
5
6
7
8
9
10
11
12
13
14
15
16
17
18
19
PS > docker-compose up -d
Creating network "selenium_default" with the default driver
Creating selenium_app_1 ... done
Creating selenium-hub ... done
Creating selenium_firefox_1 ... done
Creating selenium_chrome_1 ... done
Creating selenium_opera_1 ... done
PS > docker-compose exec app bash
root@602dac150459:/app# pip install selenium
Collecting selenium
Downloading selenium-3.141.0-py2.py3-none-any.whl (904 kB)
|████████████████████████████████| 904 kB 2.6 MB/s
Collecting urllib3
Downloading urllib3-1.25.9-py2.py3-none-any.whl (126 kB)
|████████████████████████████████| 126 kB 11.3 MB/s
Installing collected packages: urllib3, selenium
Successfully installed selenium-3.141.0 urllib3-1.25.9
root@602dac150459:/app# python test_code.py
Google

Selenium Screenshot width=640

quit()の挙動

quit() すると、WebDriverException になる。

1
2
3
4
5
6
7
8
9
10
11
12
Traceback (most recent call last):
File "test_code.py", line 16, in <module>
test_access(driver)
File "/usr/local/lib/python3.8/site-packages/selenium/webdriver/remote/webdriver.py", line 170, in __exit__
self.quit()
File "/usr/local/lib/python3.8/site-packages/selenium/webdriver/remote/webdriver.py", line 698, in quit
self.execute(Command.QUIT)
File "/usr/local/lib/python3.8/site-packages/selenium/webdriver/remote/webdriver.py", line 321, in execute
self.error_handler.check_response(response)
File "/usr/local/lib/python3.8/site-packages/selenium/webdriver/remote/errorhandler.py", line 242, in check_response
raise exception_class(message, screen, stacktrace)
selenium.common.exceptions.WebDriverException: Message: No active session with ID d0110743cd1a9b2d4789ad493a9c805b

コメント・シェア

GitHubでダミーE-Mailアドレスを利用する

 
カテゴリー Git   タグ

GitHubのemail設定

Keep my email address private

settings -> emailsで設定を確認

ダミーE-mailアドレスを確認

Keep my email addresses privateはデフォルトで有効になっている。

1
We’ll remove your public profile email and use ID+アカウント名@users.noreply.github.com when performing web-based Git operations (e.g. edits and merges) and sending email on your behalf. If you want command line Git operations to use your private email you must set your email in Git.

ID+アカウント名@users.noreply.github.comを使うべきとなっている
このアドレスを設定するとアバターも表示される

git configで設定する

ユーザ共通

~/.gitconfigに保存される。Windowsの場合は%USERPROFILE%\.gitconfigに保存される

1
git config --global user.email "ID+アカウント名@users.noreply.github.com"

リポジトリ毎の設定(複数のGitリポジトリを使用する場合)

.git/configに保存される

1
git config --local user.email "ID+アカウント名@users.noreply.github.com"

コメント・シェア

Selenium Docker

docker-composeで公式サンプルに一部追記

appサービスとしてPython実行のシェルのためのContainerを用意。
tty: trueを忘れずに。

1
2
3
4
5
6
7
8
9
10
11
12
13
14
15
16
17
18
19
20
21
22
23
24
25
26
27
28
29
30
31
32
33
34
35
36
37
38
39
40
41
42
43
44
45
46
47
# To execute this docker-compose yml file use `docker-compose -f <file_name> up`
# Add the `-d` flag at the end for detached execution
version: "3"
services:
selenium-hub:
image: selenium/hub:3.141.59-20200326
container_name: selenium-hub
ports:
- "4444:4444"

chrome:
image: selenium/node-chrome:3.141.59-20200326
volumes:
- /dev/shm:/dev/shm
depends_on:
- selenium-hub
environment:
- HUB_HOST=selenium-hub
- HUB_PORT=4444

firefox:
image: selenium/node-firefox:3.141.59-20200326
volumes:
- /dev/shm:/dev/shm
depends_on:
- selenium-hub
environment:
- HUB_HOST=selenium-hub
- HUB_PORT=4444

opera:
image: selenium/node-opera:3.141.59-20200326
volumes:
- /dev/shm:/dev/shm
depends_on:
- selenium-hub
environment:
- HUB_HOST=selenium-hub
- HUB_PORT=4444

app:
image: python:3-slim
working_dir: /app
command: /bin/bash
tty: true
volumes:
- ./app:/app

起動

1
2
3
4
5
6
7
8
9
10
11
12
13
14
15
16
17
18
19
20
21
22
23
24
25
26
27
28
29
30
31
32
33
34
35
36
37
38
39
40
41
42
43
44
45
46
47
48
49
50
51
52
53
54
55
56
57
58
59
60
61
62
63
64
65
66
67
68
69
70
71
72
73
74
75
76
77
78
79
80
81
82
83
84
85
86
87
88
89
90
91
92
93
94
95
96
97
98
99
100
101
102
103
104
105
106
107
108
109
110
111
112
113
114
115
116
117
118
119
120
121
122
123
124
125
126
127
128
129
130
131
132
133
134
135
136
137
138
139
140
141
142
143
144
145
146
147
148
149
150
151
152
153
154
155
156
157
158
159
160
161
162
163
164
165
166
167
168
169
170
PS > docker-compose up
Creating network "selenium_default" with the default driver
Pulling selenium-hub (selenium/hub:3.141.59-20200326)...
3.141.59-20200326: Pulling from selenium/hub
7ddbc47eeb70: Pull complete
c1bbdc448b72: Pull complete
8c3b70e39044: Pull complete
45d437916d57: Pull complete
19f82ee05cd5: Pull complete
320494ffe513: Pull complete
37bf31601241: Pull complete
ff4462d9e211: Pull complete
56d14078f879: Pull complete
c524497381c0: Pull complete
713cd1a80bdc: Pull complete
f27f03ce7183: Pull complete
23c2a3478434: Pull complete
39d077d89173: Pull complete
Digest: sha256:f401d133c344a8ede3e987431224e0e565364dc8bd65204a811a4bd537c9a924
Status: Downloaded newer image for selenium/hub:3.141.59-20200326
Pulling chrome (selenium/node-chrome:3.141.59-20200326)...
3.141.59-20200326: Pulling from selenium/node-chrome
7ddbc47eeb70: Already exists
c1bbdc448b72: Already exists
8c3b70e39044: Already exists
45d437916d57: Already exists
19f82ee05cd5: Already exists
320494ffe513: Already exists
37bf31601241: Already exists
ff4462d9e211: Already exists
56d14078f879: Already exists
c524497381c0: Already exists
713cd1a80bdc: Already exists
a17229ca0b94: Pull complete
af50740d57b3: Pull complete
d765b18646a8: Pull complete
f5db115c40d5: Pull complete
56afc6231b00: Pull complete
768a071aba5c: Pull complete
1204ec367cb8: Pull complete
c54b2a66c3aa: Pull complete
8dbdd3292558: Pull complete
5154a257e987: Pull complete
412ac1592b70: Pull complete
aebae33acd52: Pull complete
Digest: sha256:eab11d28aa7d1fb5907b66168f6ba78b7ad59a28e3659707c91a07da450fb573
Status: Downloaded newer image for selenium/node-chrome:3.141.59-20200326
Pulling firefox (selenium/node-firefox:3.141.59-20200326)...
3.141.59-20200326: Pulling from selenium/node-firefox
7ddbc47eeb70: Already exists
c1bbdc448b72: Already exists
8c3b70e39044: Already exists
45d437916d57: Already exists
19f82ee05cd5: Already exists
320494ffe513: Already exists
37bf31601241: Already exists
ff4462d9e211: Already exists
56d14078f879: Already exists
c524497381c0: Already exists
713cd1a80bdc: Already exists
a17229ca0b94: Already exists
af50740d57b3: Already exists
d765b18646a8: Already exists
f5db115c40d5: Already exists
56afc6231b00: Already exists
768a071aba5c: Already exists
b1ebf7fa7db5: Pull complete
6de8b6349cdc: Pull complete
c5c4c2bb4918: Pull complete
0ad2361bb86d: Pull complete
c3ee03a93323: Pull complete
Digest: sha256:ed6dd678c4223251adaa01bd6d2e1ac99077595581065d1e55620661733f81d9
Status: Downloaded newer image for selenium/node-firefox:3.141.59-20200326
Pulling opera (selenium/node-opera:3.141.59-20200326)...
3.141.59-20200326: Pulling from selenium/node-opera
7ddbc47eeb70: Already exists
c1bbdc448b72: Already exists
8c3b70e39044: Already exists
45d437916d57: Already exists
19f82ee05cd5: Already exists
320494ffe513: Already exists
37bf31601241: Already exists
ff4462d9e211: Already exists
56d14078f879: Already exists
c524497381c0: Already exists
713cd1a80bdc: Already exists
a17229ca0b94: Already exists
af50740d57b3: Already exists
d765b18646a8: Already exists
f5db115c40d5: Already exists
56afc6231b00: Already exists
768a071aba5c: Already exists
f5936530da40: Pull complete
be9409772e25: Pull complete
f5eb1736be2c: Pull complete
984d18a0f01a: Pull complete
6ee0a766ad86: Pull complete
8c094c1d5599: Pull complete
Digest: sha256:ce92510cac73440669472f67d79ccdd2b9b6b7640f6963ad5882e6379b79426d
Status: Downloaded newer image for selenium/node-opera:3.141.59-20200326
Creating selenium-hub ... done
Creating selenium_firefox_1 ... done
Creating selenium_opera_1 ... done
Creating selenium_chrome_1 ... done
Attaching to selenium-hub, selenium_chrome_1, selenium_opera_1, selenium_firefox_1
selenium-hub | 2020-04-17 01:27:42,777 INFO Included extra file "/etc/supervisor/conf.d/selenium-hub.conf" during parsing
selenium-hub | 2020-04-17 01:27:42,779 INFO supervisord started with pid 7
chrome_1 | 2020-04-17 01:27:43,330 INFO Included extra file "/etc/supervisor/conf.d/selenium.conf" during parsing
chrome_1 | 2020-04-17 01:27:43,331 INFO supervisord started with pid 7
opera_1 | 2020-04-17 01:27:43,449 INFO Included extra file "/etc/supervisor/conf.d/selenium.conf" during parsing
opera_1 | 2020-04-17 01:27:43,451 INFO supervisord started with pid 7
firefox_1 | 2020-04-17 01:27:43,455 INFO Included extra file "/etc/supervisor/conf.d/selenium.conf" during parsing
firefox_1 | 2020-04-17 01:27:43,456 INFO supervisord started with pid 7
selenium-hub | 2020-04-17 01:27:43,781 INFO spawned: 'selenium-hub' with pid 10
selenium-hub | Starting Selenium Hub with configuration:
selenium-hub | 2020-04-17 01:27:43,791 INFO success: selenium-hub entered RUNNING state, process has stayed up for > than 0 seconds (startsecs)
selenium-hub | {
selenium-hub | "host": "0.0.0.0",
selenium-hub | "port": 4444,
selenium-hub | "role": "hub",
selenium-hub | "maxSession": 5,
selenium-hub | "newSessionWaitTimeout": -1,
selenium-hub | "capabilityMatcher": "org.openqa.grid.internal.utils.DefaultCapabilityMatcher",
selenium-hub | "throwOnCapabilityNotPresent": true,
selenium-hub | "jettyMaxThreads": -1,
selenium-hub | "cleanUpCycle": 5000,
selenium-hub | "browserTimeout": 0,
selenium-hub | "timeout": 1800,
selenium-hub | "debug": false
selenium-hub | }
selenium-hub | 01:27:43.953 INFO [GridLauncherV3.parse] - Selenium server version: 3.141.59, revision: e82be7d358
selenium-hub | 01:27:44.026 INFO [GridLauncherV3.lambda$buildLaunchers$5] - Launching Selenium Grid hub on port 4444
chrome_1 | 2020-04-17 01:27:44,333 INFO spawned: 'xvfb' with pid 10
chrome_1 | 2020-04-17 01:27:44,333 INFO spawned: 'selenium-node' with pid 11
selenium-hub | 2020-04-17 01:27:44.386:INFO::main: Logging initialized @589ms to org.seleniumhq.jetty9.util.log.StdErrLog
opera_1 | 2020-04-17 01:27:44,452 INFO spawned: 'xvfb' with pid 10
opera_1 | 2020-04-17 01:27:44,453 INFO spawned: 'selenium-node' with pid 11
firefox_1 | 2020-04-17 01:27:44,458 INFO spawned: 'xvfb' with pid 10
firefox_1 | 2020-04-17 01:27:44,459 INFO spawned: 'selenium-node' with pid 11
selenium-hub | 01:27:44.614 INFO [Hub.start] - Selenium Grid hub is up and running
selenium-hub | 01:27:44.614 INFO [Hub.start] - Nodes should register to http://172.18.0.2:4444/grid/register/
selenium-hub | 01:27:44.615 INFO [Hub.start] - Clients should connect to http://172.18.0.2:4444/wd/hub
chrome_1 | Connecting to the Hub using the host selenium-hub and port 4444
chrome_1 | 2020-04-17 01:27:44,745 INFO success: xvfb entered RUNNING state, process has stayed up for > than 0 seconds (startsecs)
chrome_1 | 2020-04-17 01:27:44,745 INFO success: selenium-node entered RUNNING state, process has stayed up for > than 0 seconds (startsecs)
opera_1 | Connecting to the Hub using the host selenium-hub and port 4444
opera_1 | 2020-04-17 01:27:44,895 INFO success: xvfb entered RUNNING state, process has stayed up for > than 0 seconds (startsecs)
opera_1 | 2020-04-17 01:27:44,895 INFO success: selenium-node entered RUNNING state, process has stayed up for > than 0 seconds (startsecs)
firefox_1 | Connecting to the Hub using the host selenium-hub and port 4444
firefox_1 | 2020-04-17 01:27:44,896 INFO success: xvfb entered RUNNING state, process has stayed up for > than 0 seconds (startsecs)
firefox_1 | 2020-04-17 01:27:44,896 INFO success: selenium-node entered RUNNING state, process has stayed up for > than 0 seconds (startsecs)
chrome_1 | 01:27:44.937 INFO [GridLauncherV3.parse] - Selenium server version: 3.141.59, revision: e82be7d358
chrome_1 | 01:27:45.092 INFO [GridLauncherV3.lambda$buildLaunchers$7] - Launching a Selenium Grid node on port 5555
opera_1 | 01:27:45.234 INFO [GridLauncherV3.parse] - Selenium server version: 3.141.59, revision: e82be7d358
chrome_1 | 2020-04-17 01:27:45.294:INFO::main: Logging initialized @545ms to org.seleniumhq.jetty9.util.log.StdErrLog
firefox_1 | 01:27:45.380 INFO [GridLauncherV3.parse] - Selenium server version: 3.141.59, revision: e82be7d358
opera_1 | 01:27:45.454 INFO [GridLauncherV3.lambda$buildLaunchers$7] - Launching a Selenium Grid node on port 5555
firefox_1 | 01:27:45.602 INFO [GridLauncherV3.lambda$buildLaunchers$7] - Launching a Selenium Grid node on port 5555
opera_1 | 2020-04-17 01:27:45.607:INFO::main: Logging initialized @708ms to org.seleniumhq.jetty9.util.log.StdErrLog
opera_1 | 01:27:46.445 INFO [SelfRegisteringRemote$1.run] - Starting auto registration thread. Will try to register every 5000 ms.
firefox_1 | 01:27:46.523 INFO [SelfRegisteringRemote$1.run] - Starting auto registration thread. Will try to register every 5000 ms.
chrome_1 | 01:27:46.582 INFO [SelfRegisteringRemote.registerToHub] - Registering the node to the hub: http://selenium-hub:4444/grid/register
chrome_1 | 01:27:46.706 INFO [SelfRegisteringRemote.registerToHub] - The node is registered to the hub and ready to use
selenium-hub | 01:27:46.707 INFO [DefaultGridRegistry.add] - Registered a node http://172.18.0.3:5555
firefox_1 | 01:27:46.831 INFO [SelfRegisteringRemote.registerToHub] - Registering the node to the hub: http://selenium-hub:4444/grid/register
firefox_1 | 01:27:46.863 INFO [SelfRegisteringRemote.registerToHub] - The node is registered to the hub and ready to use
selenium-hub | 01:27:46.863 INFO [DefaultGridRegistry.add] - Registered a node http://172.18.0.5:5555
opera_1 | 01:27:46.897 INFO [SelfRegisteringRemote.registerToHub] - Registering the node to the hub: http://selenium-hub:4444/grid/register
opera_1 | 01:27:46.913 INFO [SelfRegisteringRemote.registerToHub] - The node is registered to the hub and ready to use
selenium-hub | 01:27:46.912 INFO [DefaultGridRegistry.add] - Registered a node http://172.18.0.4:5555

Selenium Gridの管理画面

localhost:4444にアクセス。

SeleniumGridCosole width=640

SeleniumGridCosole width=640

テストスクリプト

appで実行するテストスクリプト

appで動かすこのスクリプト記述した接続先のselenium-hubはdocker-composeによって名前解決される(docker-compose upで起動する必要がある)。

1
2
3
4
5
6
7
8
9
10
11
12
13
14
15
16
17
from selenium import webdriver
from selenium.webdriver.common.desired_capabilities import DesiredCapabilities

def test_access(driver):
driver.get('https://www.google.com')
driver.save_screenshot('test.png')
print(driver.title)
#driver.quit()

if __name__ == '__main__':
options = {
'command_executor': 'http://selenium-hub:4444/wd/hub',
'desired_capabilities': DesiredCapabilities.FIREFOX,
#'desired_capabilities': DesiredCapabilities.CHROME,
}
with webdriver.Remote(**options) as driver:
test_access(driver)

テストスクリプトによるテスト

実行するapp上ではpip install seleniumでモジュールをインストール。
実行するとコンソール上にGoogleが表示され、画面キャプチャがtest.pngというファイル名で保存される。

1
2
3
4
5
6
7
8
9
10
11
12
13
14
15
16
17
PS > docker-compose up -d
Creating network "selenium_default" with the default driver
Creating selenium_app_1 ... done
Creating selenium-hub ... done
Creating selenium_firefox_1 ... done
Creating selenium_chrome_1 ... done
Creating selenium_opera_1 ... done
PS m> docker-compose exec app bash
root@9ca8831c0042:/app# pip install selenium
Collecting selenium
Downloading selenium-3.141.0-py2.py3-none-any.whl (904 kB)
|████████████████████████████████| 904 kB 2.6 MB/s
Collecting urllib3
Downloading urllib3-1.25.9-py2.py3-none-any.whl (126 kB)
|████████████████████████████████| 126 kB 11.3 MB/s
root@9ca8831c0042:/app# python test_code.py
Google

Selenium Screenshot width=640

quit()の挙動

quit() すると、WebDriverException になる。

1
2
3
4
5
6
7
8
9
10
11
12
13
14
15
16
17
18
19
20
21
22
23
24
25
26
27
28
29
30
31
32
33
34
35
36
37
38
39
40
41
42
43
44
45
46
47
48
49
50
51
Traceback (most recent call last):
File "test_code.py", line 31, in <module>
title(driver, query)
File "/usr/local/lib/python3.8/site-packages/selenium/webdriver/remote/webdriver.py", line 170, in __exit__
self.quit()
File "/usr/local/lib/python3.8/site-packages/selenium/webdriver/remote/webdriver.py", line 698, in quit
self.execute(Command.QUIT)
File "/usr/local/lib/python3.8/site-packages/selenium/webdriver/remote/webdriver.py", line 321, in execute
self.error_handler.check_response(response)
File "/usr/local/lib/python3.8/site-packages/selenium/webdriver/remote/errorhandler.py", line 242, in check_response
raise exception_class(message, screen, stacktrace)
selenium.common.exceptions.WebDriverException: Message: Session [b3855f5e070d99082bcccd2a32bd9e7c] was terminated due to CLIENT_STOPPED_SESSION
Stacktrace:
at org.openqa.grid.internal.ActiveTestSessions.getExistingSession (ActiveTestSessions.java:115)
at org.openqa.grid.internal.DefaultGridRegistry.getExistingSession (DefaultGridRegistry.java:387)
at org.openqa.grid.web.servlet.handler.RequestHandler.getSession (RequestHandler.java:241)
at org.openqa.grid.web.servlet.handler.RequestHandler.process (RequestHandler.java:123)
at org.openqa.grid.web.servlet.DriverServlet.process (DriverServlet.java:85)
at org.openqa.grid.web.servlet.DriverServlet.doDelete (DriverServlet.java:75)
at javax.servlet.http.HttpServlet.service (HttpServlet.java:713)
at javax.servlet.http.HttpServlet.service (HttpServlet.java:790)
at org.seleniumhq.jetty9.servlet.ServletHolder.handle (ServletHolder.java:865)
at org.seleniumhq.jetty9.servlet.ServletHandler.doHandle (ServletHandler.java:535)
at org.seleniumhq.jetty9.server.handler.ScopedHandler.handle (ScopedHandler.java:146)
at org.seleniumhq.jetty9.security.SecurityHandler.handle (SecurityHandler.java:548)
at org.seleniumhq.jetty9.server.handler.HandlerWrapper.handle (HandlerWrapper.java:132)
at org.seleniumhq.jetty9.server.handler.ScopedHandler.nextHandle (ScopedHandler.java:257)
at org.seleniumhq.jetty9.server.session.SessionHandler.doHandle (SessionHandler.java:1595)
at org.seleniumhq.jetty9.server.handler.ScopedHandler.nextHandle (ScopedHandler.java:255)
at org.seleniumhq.jetty9.server.handler.ContextHandler.doHandle (ContextHandler.java:1340)
at org.seleniumhq.jetty9.server.handler.ScopedHandler.nextScope (ScopedHandler.java:203)
at org.seleniumhq.jetty9.servlet.ServletHandler.doScope (ServletHandler.java:473)
at org.seleniumhq.jetty9.server.session.SessionHandler.doScope (SessionHandler.java:1564)
at org.seleniumhq.jetty9.server.handler.ScopedHandler.nextScope (ScopedHandler.java:201)
at org.seleniumhq.jetty9.server.handler.ContextHandler.doScope (ContextHandler.java:1242)
at org.seleniumhq.jetty9.server.handler.ScopedHandler.handle (ScopedHandler.java:144)
at org.seleniumhq.jetty9.server.handler.HandlerWrapper.handle (HandlerWrapper.java:132)
at org.seleniumhq.jetty9.server.Server.handle (Server.java:503)
at org.seleniumhq.jetty9.server.HttpChannel.handle (HttpChannel.java:364)
at org.seleniumhq.jetty9.server.HttpConnection.onFillable (HttpConnection.java:260)
at org.seleniumhq.jetty9.io.AbstractConnection$ReadCallback.succeeded (AbstractConnection.java:305)
at org.seleniumhq.jetty9.io.FillInterest.fillable (FillInterest.java:103)
at org.seleniumhq.jetty9.io.ChannelEndPoint$2.run (ChannelEndPoint.java:118)
at org.seleniumhq.jetty9.util.thread.strategy.EatWhatYouKill.runTask (EatWhatYouKill.java:333)
at org.seleniumhq.jetty9.util.thread.strategy.EatWhatYouKill.doProduce (EatWhatYouKill.java:310)
at org.seleniumhq.jetty9.util.thread.strategy.EatWhatYouKill.tryProduce (EatWhatYouKill.java:168)
at org.seleniumhq.jetty9.util.thread.strategy.EatWhatYouKill.run (EatWhatYouKill.java:126)
at org.seleniumhq.jetty9.util.thread.ReservedThreadExecutor$ReservedThread.run (ReservedThreadExecutor.java:366)
at org.seleniumhq.jetty9.util.thread.QueuedThreadPool.runJob (QueuedThreadPool.java:765)
at org.seleniumhq.jetty9.util.thread.QueuedThreadPool$2.run (QueuedThreadPool.java:683)
at java.lang.Thread.run (Thread.java:748)

コメント・シェア

Netlifyをnetlify-cliで管理する

 
カテゴリー SaaS   タグ

netlify-cli

GitのWebHookを使ってCI/CDパイプラインでデプロイする、netlify-cliでデプロイした方が速い。NetlifyのWeb管理画面上ではWebHookならGitHubのCommitメッセージが表示されているが、 netlify-cliでデプロイする場合は--messageオプションで指定したメッセージを表示する。

netlify-cliのインストール

以下はWindowsでのインストールの場合。事前にNodeとnpmのインストールが必要。npm install netlify-cli -gでインストールする。

1
2
3
4
5
6
7
8
9
10
11
12
13
14
15
16
17
18
19
20
21
22
PS> npm --version
6.12.1

PS> npm install netlify-cli -g

Success! Netlify CLI has been installed!

Your device is now configured to use Netlify CLI to deploy and manage your Netlify sites.

Next steps:

netlify init Connect or create a Netlify site from current directory
netlify deploy Deploy the latest changes to your Netlify site

For more information on the CLI run netlify help
Or visit the docs at https://cli.netlify.com

npm WARN optional SKIPPING OPTIONAL DEPENDENCY: fsevents@2.1.2 (node_modules\netlify-cli\node_modules\fsevents):
npm WARN notsup SKIPPING OPTIONAL DEPENDENCY: Unsupported platform for fsevents@2.1.2: wanted {"os":"darwin","arch":"any"} (current: {"os":"win32","arch":"x64"})

+ netlify-cli@2.24.0
added 965 packages from 472 contributors in 45.944s

環境変数

NetlifyのWeb管理画面からNETLIFY_AUTH_TOKENを取得し、環境変数として設定。

netlifyコマンドによる管理

コマンドの概要

1
2
3
4
5
6
7
8
9
10
11
12
13
14
15
16
17
18
19
20
21
22
23
24
25
26
$netlify --help
Netlify command line tool

VERSION
netlify-cli/2.37.0 linux-x64 node-v12.16.1

USAGE
$ netlify [COMMAND]

COMMANDS
addons (Beta) Manage Netlify Add-ons
api Run any Netlify API method
deploy Create a new deploy from the contents of a folder
dev Local dev server
functions Manage netlify functions
help display help for netlify
init Configure continuous deployment for a new or existing site
link Link a local repo or project folder to an existing site on Netlify
login Login to your Netlify account
open Open settings for the site linked to the current folder
plugins list installed plugins
sites Handle various site operations
status Print status information
switch Switch your active Netlify account
unlink Unlink a local folder from a Netlify site
watch Watch for site deploy to finish

アカウントの設定

環境変数を設定していない場合は netlify link でアカウントをリンクする。

1
2
3
4
5
6
7
8
9
10
11
12
13
14
15
16
17
$netlify link

netlify link will connect this folder to a site on Netlify

? How do you want to link this folder to a site? Search by full or partial site name
? Enter the site name (or just part of it): <NETLIFY_USERNAME>
Looking for sites with names containing '<NETLIFY_USERNAME>'...


Directory Linked

Admin url: https://app.netlify.com/sites/<NETLIFY_USERNAME>
Site url: https://<NETLIFY_USERNAME>.netlify.com

Site id saved to /netlify-work/public/.netlify/state.json

You can now run other `netlify` cli commands in this directory

対話式で入力しないために、.netlify/state.jsonを作成する。

1
2
3
{
"siteId": "XXXXXXXXXXXXXXXXXXXXXXXXXXXXXXXXXXXX"
}

サイト一覧の表示

現在リンク中のアカウントのサイト一覧は netlify sites:list で取得する。

1
2
3
4
5
6
7
8
9
10
11
12
13
14
$netlify sites:list
Loading your sites... done

────────────────────────────┐
Current Netlify Sites │
────────────────────────────┘

Count: 1

sitename-xxxxxxx - xxxxxxxx-xxxx-xxxx-xxxx-xxxxxxxxxxxxxxx
url: https://www.example.com
repo: https://github.com/xxxxxx/reporepo
account:<NETLIFY_USERNAME>
─────────────────────────────

プレビュー環境へのデプロイ

プレビュー環境へのデプロイは netlify deploy で行う。
Live Draft URL で出力されたURLにアクセスしてプレビュー。

1
2
3
4
5
6
7
8
9
10
11
12
13
$netlify deploy --message "deploy message"
Deploy path: /netlify-work/public
Deploying to draft URL...
✔ Finished hashing 126 files
✔ CDN requesting 0 files
✔ Finished uploading 0 assets
✔ Draft deploy is live!

Logs: https://app.netlify.com/sites/<NETLIFY_USERNAME>/deploys/XXXXXXXXXXXXXXXXXXXXXXX
Live Draft URL: https://XXXXXXXXXXXXXXXXXXXXXXX--<NETLIFY_USERNAME>.netlify.com

If everything looks good on your draft URL, take it live with the --prod flag.
netlify deploy --prod

本番環境へのデプロイ

本番環境へのデプロイは netlify deploy --prod で行う。
本番環境は Live URL

1
2
3
4
5
6
7
8
9
10
11
$netlify deploy --prod --message "deploy message"
Deploy path: /netlify-work/public
Deploying to live site URL...
✔ Finished hashing 126 files
✔ CDN requesting 0 files
✔ Finished uploading 0 assets
✔ Deploy is live!

Logs: https://app.netlify.com/sites/<NETLIFY_USERNAME>/deploys/XXXXXXXXXXXXXXXXXXXXXXX
Unique Deploy URL: https://XXXXXXXXXXXXXXXXXXXXXXX--<NETLIFY_USERNAME>.netlify.com
Live URL: https://<URL>

publish directoryの指定が求められる場合

Netlifyのサイト上でpublishフォルダーを指定していない場合、netlify deployで以下のプロンプトが表示され、入力を促される。

1
Please provide a publish directory (e.g. "public" or "dist" or "."):

その場合は、netlify deploy --dir=<DIR>のように指定が可能。

コメント・シェア

CloudinaryをWebAPIで操作する

 
カテゴリー Python SaaS   タグ

インストール

pip install cloudinaryでPythonモジュールをインストール。

環境変数

CloudinaryのWeb管理画面からCLOUDINARY_URLを取得し、環境変数として設定。

Upload API

1
result = cloudinary.uploader.upload(file=upload_file_path, folder=upload_folder_name, use_filename="true", unique_filename="false", overwrite="false")

file でアップロードするファイルを指定する。
アップロード先のフォルダー名はfolderで指定し、アップロード先のファイル名はuse_filename="true"で元ファイルのファイル名を使うことができる。
デフォルトではランダムなファイル名にされるので、元のファイル名を維持したい場合はunique_filename="false"とする。

Admin API

Admin APIの制限

500 call/hourの制限があるので、大量のリソースを扱う場合は一度のAPIコールで処理する数を適切な数にする必要がある。

1
2
3
4
5
6
7
result = cloudinary.api.resources()
result.rate_limit_allowed
>>>500
result.rate_limit_remaining
>>>499
result.rate_limit_reset_at
>>>(2019, 10, 3, 08, 0, 0, 0, 1, -1)

アップロード済の画像ファイルの一覧

1
res = cloudinary.api.resources(max_results=max_results, next_cursor=next_cursor)

1回のAPIコールでmax_results(デフォルト:10、最大:500)まで返される。取得したリソースにnext_cursorが含まれるので、次のAPIコールではこれを引数として渡すことで、続きのリソースを取得できる。繰り返し実行することですべてのリソースを取得することができる。
リソースは public_id で識別する。

リソースの削除

1
cloudinary.api.delete_resources(delete_resrouces)

複数のpublic_idを指定して、まとめて削除する(最大:100)。

コメント・シェア


nullpo

めも


募集中


Japan