リポジトリの作成

GitHubリポジトリ作成

Step1: Create repositoryをクリックしてリポジトリを作成

GitHub リポジトリ作成 width=640

Step2: リポジトリ名とPublic/Privateを選択Create repository
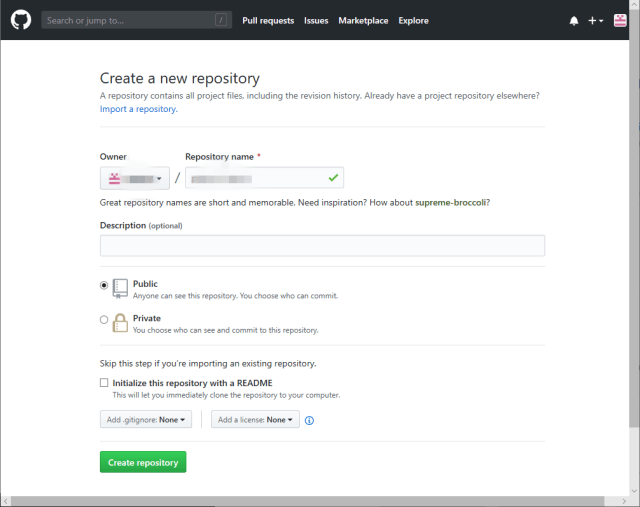
GitHub リポジトリ作成 width=640

DockerHubリポジトリ作成

  • イメージ名はdockerアカウント名/dockerリポジトリ名:タグ名になる
  • pushはdocker push dockerアカウント名/dockerリポジトリ名:タグ名
  • pullはdocker pull dockerアカウント名/リポジトリ名

Step1: DockerアカウントでDockerHUBにログイン

DockerHub ログイン width=640

Step2: Create Repositoryを選択してリポジトリを作成

DockerHub リポジトリ作成 width=640

Step3: リポジトリ名とvisibility(public or private)を選択してCreate

DockerHub リポジトリ作成 width=640

Step4: 生成されたリポジトリページ

DockerHub リポジトリ作成 width=640

GitHubへのPushをトリガーに自動ビルドする

GitHubとの連携

Step1: BuildsタブのAutomated Buildを選択

DockerHub ビルド設定 width=640

Step2: GitHubにログイン

DockerHub GitHubとの連携 width=640

Step3: Authorized Dockerを選択

DockerHub GitHubとの連携 width=640

step4: Linked Accountが設定される

DockerHub GitHubとの連携 width=640

DockerHub GitHubとの連携 width=640

GitHubに対象のDockerfileをPush

作成したリポジトリにDockerfileをPush

1
2
3
4
5
6
7
8
9
10
11
12
13
14
15
16
17
18
19
20
21
22
23
24
25
26
27
28
29
PS > git init
Initialized empty Git repository in <REPOSITORY_NAME>/.git/
PS > git add README.md
PS > git commit -m "first commit"
[master (root-commit) 0d0ba66] first commit
1 file changed, 0 insertions(+), 0 deletions(-)
create mode 100644 README.md
PS > git remote add origin https://github.com/XXXXXX/<REPOSITORY_NAME>.git
PS > git push -u origin master
Counting objects: 3, done.
Writing objects: 100% (3/3), 243 bytes | 243.00 KiB/s, done.
Total 3 (delta 0), reused 0 (delta 0)
To https://github.com/XXXXXX/<REPOSITORY_NAME>.git
* [new branch] master -> master
Branch 'master' set up to track remote branch 'master' from 'origin'.
PS > git add Dockerfile
PS > git commit -m "first Dockerfile"
[master 34db485] first Dockerfile
1 file changed, 1 insertion(+)
create mode 100644 Dockerfile
PS > git push -u origin master
Counting objects: 3, done.
Delta compression using up to 4 threads.
Compressing objects: 100% (2/2), done.
Writing objects: 100% (3/3), 306 bytes | 102.00 KiB/s, done.
Total 3 (delta 0), reused 0 (delta 0)
To https://github.com/XXXXXX/<REPOSITORY_NAME>.git
0d0ba66..34db485 master -> master
Branch 'master' set up to track remote branch 'master' from 'origin'.

DockerHubのAutomated Buildsを設定する

連携したGitHubに対するPushイベントをトリガーにDockerHubでビルドを実行する。

Step1: BuildsタブのAutomated BuildLink to GitHubを選択

DockerHub GitHubとの連携 width=640

Step2: Build ConfigurationでGitHubアカウントとGitHubリポジトリ名を選択し、Save and Build

DockerHub ビルド設定 width=640

Step3: Automated Buildsの状態を確認できる

DockerHub 自動ビルド width=640

Step4: PENDINGがSUCESSに変われば終了

DockerHub 自動ビルド width=640

Step5: Tagsタブで生成されたタグを確認

DockerHub 自動ビルド width=640

Step6: Generalタブでリポジトリの情報が確認できる

DockerHub 自動ビルド width=640

自動ビルドの動作

Step1: GitHubのリポジトリを更新する

1
2
3
4
5
6
7
8
9
10
11
12
13
PS > git add -u
PS > git commit -m "update Dockerfile"
[master e8f6211] update Dockerfile
1 file changed, 2 insertions(+)
PS > git push -u origin master
Counting objects: 3, done.
Delta compression using up to 4 threads.
Compressing objects: 100% (3/3), done.
Writing objects: 100% (3/3), 334 bytes | 83.00 KiB/s, done.
Total 3 (delta 0), reused 0 (delta 0)
To https://github.com/XXXXXX/<REPOSITORY_NAME>.git
34db485..e8f6211 master -> master
Branch 'master' set up to track remote branch 'master' from 'origin'.

Step2: 処理が開始される

DockerHub 自動ビルド width=640

Step3: SUCESSになれば終了

DockerHub 自動ビルド width=640

Gitで付与したタグを使用したAutomated Builds

Step1: GitのタグをもとにDockerのタグを付与してビルドする例
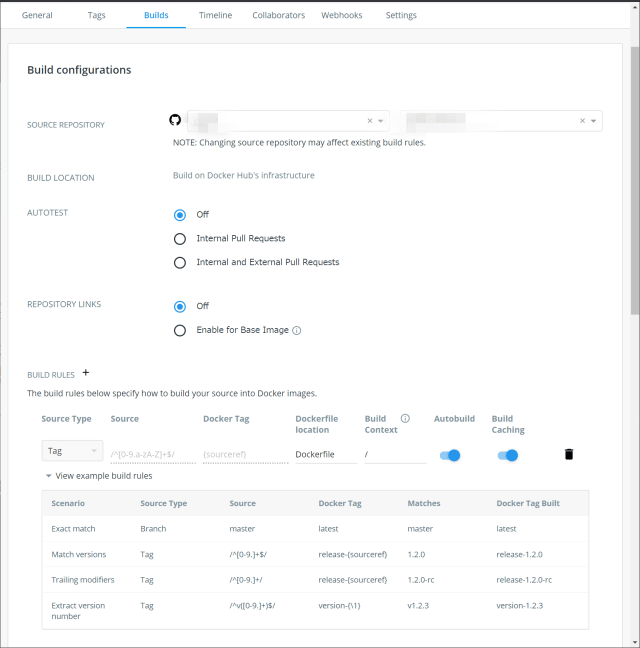
DockerHub 自動ビルド width=640

Step2: タグ名を付与してPushする。

1
2
3
4
PS > git tag -a タグ名 -m 'コメント'
PS > git tag
タグ名
PS > git push origin --tags

コメント・シェア

GitHubの複数アカウントでSSH接続を使用する

 
カテゴリー Git   タグ

OpenSSHでKey-Pairを生成

ssh-keygenコマンドでキーペアを生成する。

1
2
3
4
5
6
7
8
9
10
11
12
13
14
15
16
17
18
19
20
PS > ssh-keygen -t rsa -C XXXXXXX@XXXXXXX -f XXXXXXX.key
Generating public/private rsa key pair.
Enter passphrase (empty for no passphrase):
Enter same passphrase again:
Your identification has been saved in XXXXXXX.key.
Your public key has been saved in XXXXXXX.key.pub.
The key fingerprint is:
SHA256:XXXXXXXXXXXXXXXXXXXXXXXXXX XXXXXXX@XXXXXXX
The key's randomart image is:
+---[RSA 2048]----+
| oo ...o=+B|
| . . ox=ox*|
| o ...X+++ |
| xxxxx+ |
| oSxxx=o |
| . = =.+. |
| . .o |
| . . |
| .. |
+----[SHA256]-----+

GitHubへ公開鍵を登録

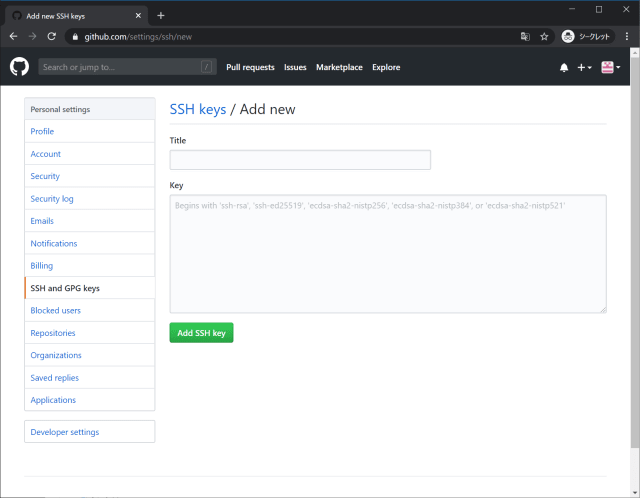
SSH and GPG keys - SSH Keys - New SSH Key
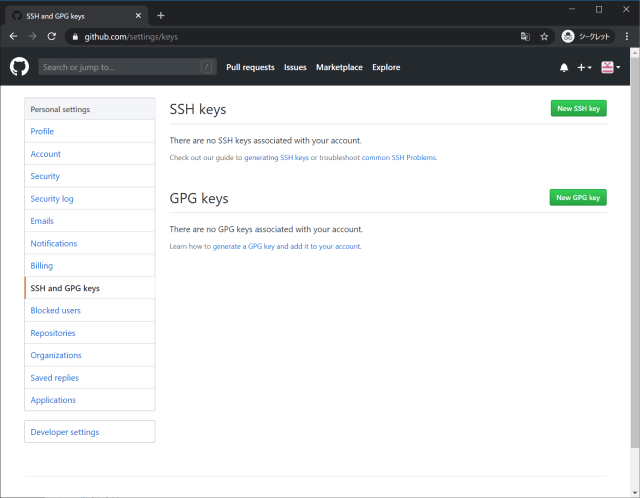
GitHub SSH-key width=640

作成した公開鍵XXXXXXX.key.pubの内容を登録する。

GitHub SSH-key width=640

ここでは他のアカウントで使用している公開鍵を登録できない。

OpenSSHで複数のGitHubに接続する設定

sshのconfigファイルを修正

Windowsの標準のssh設定フォルダー(C:\Users\ログインユーザ名\.ssh)にあるconfigファイルを以下のように構成する

1
2
3
4
5
6
7
8
9
10
11
12
13
Host github-USER_X
HostName github.com
User git
IdentityFile ~/.ssh/USER_X/priv.key
IdentitiesOnly yes
AddKeysToAgent yes

Host github-USER_Y
HostName github.com
User git
IdentityFile ~/.ssh/USER_Y/priv.key
IdentitiesOnly yes
AddKeysToAgent yes

キーペアの接続テスト

デフォルトパスで1つのみ使用する場合はssh -T git@github.comで接続確認ができるがエラーになる
デバッグはssh -vT git@github.comのようにvを付けることで詳細が出力される

1
2
PS > ssh -T git@github.com
git@github.com: Permission denied (publickey).

使用するアカウントを指定する必要があるのでconfigで指定したHostに接続する

1
2
PS > ssh -T github-USER_X
Hi USER_X! You've successfully authenticated, but GitHub does not provide shell access.

set-urlで接続先を変更

このままではgitコマンドコマンドを使用した際に接続エラーとなるため、接続先の切替を行う。

1
2
3
4
5
6
7
PS > git remote -v
origin https://github.com/XXXXXXXX/app-repo.git (fetch)
origin https://github.com/XXXXXXXX/app-repo.git (push)
PS > git remote set-url origin git@github-USER_X:USER_X/app-repo.git
PS > git remote -v
origin git@github-USER_X:USER_X/app-repo.git (fetch)
origin git@github-USER_X:USER_X/app-repo.git (push)

新しいリポジトリ作成時の初期設定

新しリポジトリ作成時は以下の設定を行う

1
2
3
4
5
6
7
8
9
10
PS > git clone https://github.com/<GIT_ACCOUNT>/<GIT_REPOSITORY_NAME>
Cloning into '<GIT_REPOSITORY_NAME>'...
remote: Enumerating objects: 3, done.
remote: Counting objects: 100% (3/3), done.
remote: Compressing objects: 100% (2/2), done.
remote: Total 3 (delta 0), reused 0 (delta 0), pack-reused 0
Unpacking objects: 100% (3/3), done.
PS <GIT_REPOSITORY_NAME>> git config --local user.name <GIT_ACCOUNT>
PS <GIT_REPOSITORY_NAME>> git config --local user.email <E-Mail>
PS <GIT_REPOSITORY_NAME>> git remote set-url origin git@github-<GIT_ACCOUNT>:<GIT_ACCOUNT>/<GIT_REPOSITORY_NAME>

コメント・シェア

aws-cliのアップデート

sudo pip install -U awscliでアップデートできるが…

1
2
3
4
5
6
7
8
9
10
11
12
13
14
15
16
17
18
19
20
21
22
23
24
25
26
27
28
29
30
31
32
33
34
35
36
37
38
39
40
41
42
43
44
45
46
47
48
49
50
51
52
53
54
55
56
57
58
59
60
61
62
63
64
65
66
67
68
$ aws --version
aws-cli/1.16.273 Python/2.7.15+ Linux/4.15.0-1058-aws botocore/1.13.17

$ sudo pip install -U awscli
The directory '/home/ubuntu/.cache/pip/http' or its parent directory is not ownd by the current user and the cache has been disabled. Please check the permissons and owner of that directory. If executing pip with sudo, you may want sudo' -H flag.
The directory '/home/ubuntu/.cache/pip' or its parent directory is not owned bythe current user and caching wheels has been disabled. check the permissions an owner of that directory. If executing pip with sudo, you may want sudo's -H flg.
Collecting awscli
Downloading https://files.pythonhosted.org/packages/fb/3b/7b5db1f1b153971fc5cbb2102547a1dd1cf21556eacd80cc6c029939b9a/awscli-1.18.2-py2.py3-none-any.whl (2.MB)
100% |????????????????????????????????| 2.9MB 395kB/s
Collecting PyYAML<5.3,>=3.10 (from awscli)
Downloading https://files.pythonhosted.org/packages/8d/c9/e5be955a117a1ac548cd31e37e8fd7b02ce987f9655f5c7563c656d5dcb/PyYAML-5.2.tar.gz (265kB)
100% |????????????????????????????????| 266kB 3.1MB/s
Collecting botocore==1.15.2 (from awscli)
Downloading https://files.pythonhosted.org/packages/0b/44/906ebd1df90c435bdee5cbca6bae7a14d94c5b33c7517fddf540dbc6823/botocore-1.15.2-py2.py3-none-any.whl (.9MB)
100% |????????????????????????????????| 5.9MB 207kB/s
Requirement already up-to-date: rsa<=3.5.0,>=3.1.2 in ./.local/lib/python2.7/sie-packages (from awscli)
Collecting s3transfer<0.4.0,>=0.3.0 (from awscli)
Downloading https://files.pythonhosted.org/packages/69/79/e6afb3d8b0b4e96cefbc690f741d7dd24547ff1f94240c997a26fa908d3/s3transfer-0.3.3-py2.py3-none-any.whl 69kB)
100% |????????????????????????????????| 71kB 10.7MB/s
Requirement already up-to-date: docutils<0.16,>=0.10 in ./.local/lib/python2.7/ite-packages (from awscli)
Collecting colorama<0.4.4,>=0.2.5; python_version != "3.4" (from awscli)
Downloading https://files.pythonhosted.org/packages/c9/dc/45cdef1b4d119eb9631b3117e6d5708a08029992b2fee2c143c7a0a5cc5/colorama-0.4.3-py2.py3-none-any.whl
Requirement already up-to-date: jmespath<1.0.0,>=0.7.1 in ./.local/lib/python2./site-packages (from botocore==1.15.2->awscli)
Collecting python-dateutil<3.0.0,>=2.1 (from botocore==1.15.2->awscli)
Downloading https://files.pythonhosted.org/packages/d4/70/d60450c3dd48ef8758624207ae8907090de0b306af2bce5d134d78615cb/python_dateutil-2.8.1-py2.py3-none-anywhl (227kB)
100% |????????????????????????????????| 235kB 5.3MB/s
Collecting urllib3<1.26,>=1.20; python_version != "3.4" (from botocore==1.15.2-awscli)
Downloading https://files.pythonhosted.org/packages/e8/74/6e4f91745020f967d0932bb2b8b9b10090957334692eb88ea4afe91b77f/urllib3-1.25.8-py2.py3-none-any.whl (15kB)
100% |????????????????????????????????| 133kB 8.6MB/s
Collecting pyasn1>=0.1.3 (from rsa<=3.5.0,>=3.1.2->awscli)
Downloading https://files.pythonhosted.org/packages/62/1e/a94a8d635fa3ce4cfc7506003548d0a2447ae76fd5ca53932970fe3053f/pyasn1-0.4.8-py2.py3-none-any.whl (77k)
100% |????????????????????????????????| 81kB 10.9MB/s
Requirement already up-to-date: futures<4.0.0,>=2.2.0; python_version == "2.7" n ./.local/lib/python2.7/site-packages (from s3transfer<0.4.0,>=0.3.0->awscli)
Collecting six>=1.5 (from python-dateutil<3.0.0,>=2.1->botocore==1.15.2->awscli
Downloading https://files.pythonhosted.org/packages/65/eb/1f97cb97bfc2390a27669c6fae16075da282f5058082d4cb10c6c5c1dba/six-1.14.0-py2.py3-none-any.whl
Installing collected packages: PyYAML, six, python-dateutil, urllib3, botocore,s3transfer, colorama, awscli, pyasn1
Found existing installation: PyYAML 5.1.2
Uninstalling PyYAML-5.1.2:
Successfully uninstalled PyYAML-5.1.2
Running setup.py install for PyYAML ... done
Found existing installation: six 1.13.0
Uninstalling six-1.13.0:
Successfully uninstalled six-1.13.0
Found existing installation: python-dateutil 2.8.0
Uninstalling python-dateutil-2.8.0:
Successfully uninstalled python-dateutil-2.8.0
Found existing installation: urllib3 1.25.7
Uninstalling urllib3-1.25.7:
Successfully uninstalled urllib3-1.25.7
Found existing installation: botocore 1.13.17
Uninstalling botocore-1.13.17:
Successfully uninstalled botocore-1.13.17
Found existing installation: s3transfer 0.2.1
Uninstalling s3transfer-0.2.1:
Successfully uninstalled s3transfer-0.2.1
Found existing installation: colorama 0.4.1
Uninstalling colorama-0.4.1:
Successfully uninstalled colorama-0.4.1
Found existing installation: awscli 1.16.273
Uninstalling awscli-1.16.273:
Successfully uninstalled awscli-1.16.273
Found existing installation: pyasn1 0.4.7
Uninstalling pyasn1-0.4.7:
Successfully uninstalled pyasn1-0.4.7
Successfully installed PyYAML-5.2 awscli-1.18.2 botocore-1.15.2 colorama-0.4.3 yasn1-0.4.8 python-dateutil-2.8.1 s3transfer-0.3.3 six-1.14.0 urllib3-1.25.8

$ /usr/local/bin/aws --version
aws-cli/1.18.2 Python/2.7.15+ Linux/4.15.0-1058-aws botocore/1.15.2

謎のエラー発生

アップデート後にaws-cliを実行するとImportError: No module named rsaが発生。

1
2
3
4
5
6
7
8
9
10
11
12
13
14
15
16
17
18
Traceback (most recent call last):
File "/usr/local/bin/aws", line 27, in <module>
sys.exit(main())
File "/usr/local/bin/aws", line 23, in main
return awscli.clidriver.main()
File "/usr/local/lib/python2.7/dist-packages/awscli/clidriver.py", line 68, in main
driver = create_clidriver()
File "/usr/local/lib/python2.7/dist-packages/awscli/clidriver.py", line 78, in create_clidriver
event_hooks=session.get_component('event_emitter'))
File "/usr/local/lib/python2.7/dist-packages/awscli/plugin.py", line 44, in load_plugins
modules = _import_plugins(plugin_mapping)
File "/usr/local/lib/python2.7/dist-packages/awscli/plugin.py", line 61, in _import_plugins
module = __import__(path, fromlist=[module])
File "/usr/local/lib/python2.7/dist-packages/awscli/handlers.py", line 28, in <module>
from awscli.customizations.cloudfront import register as register_cloudfront
File "/usr/local/lib/python2.7/dist-packages/awscli/customizations/cloudfront.py", line 17, in <module>
import rsa
ImportError: No module named rsa

対応策

Exceptions with the latest release #641を参考に、sudo pip install awscli --force-reinstall --upgradeで再インストールによって復旧

コメント・シェア

CI/CDワークフローGitOps

 
カテゴリー CI/CD   タグ

GitOps

Operations by Pull Request

GitをSingle Source of Truthとして扱い、ほぼすべての操作をGitを介して行う。

  • 宣言的なリソースプロビジョニングとデプロイ
  • システム全体が単一のGitリポジトリで管理される
  • 運用上の変更はPull Requestを介して行う
  • diffツールで差異を検知しアラートを通知。syncツールで収束することが可能
  • ロールバックや監査ログもGit経由で行う

What exactly is GitOps? By using Git as our source of truth, we can operate almost everything. For example, version control, history, peer review, and rollback happen through Git without needing to poke around with tools like kubectl.

  • Our provisioning of AWS resources and deployment of k8s is declarative
  • Our entire system state is under version control and described in a single Git repository
  • Operational changes are made by pull request (plus build & release pipelines)
  • Diff tools detect any divergence and notify us via Slack alerts; and sync tools enable convergence
  • Rollback and audit logs are also provided via Git
    GitOps width=640

Continuous Delivery and GitOps Workflows

開発者はGitを扱える前提のPull Requestベースのソフトウェアデリバリーフローになっている。

  1. 新機能のレビューのためPull RequestがGitHubにPushされる
  2. Pull Requestはレビューと承認の後、GitにMergeされる
  3. GitのMergeをトリガーにCIとBuild Pipelineが実行され、コンテナイメージがレジストリにPushされる
  4. ‘Deployment Automator’ がコンテナイメージレジストリの変更を検知し、構成リポジトリのマニフェストファイルを更新
  5. ‘Deployment Synchronizer’ がクラスター(稼働中のクラスター)が古いことを検知し、変更されたマニフェストファイルを構成リポジトリから取得し、クラスターにデプロイする
  1. A pull request for a new feature is pushed to GitHub for review.
  2. The code is reviewed and approved by a colleague. After the code is revised, and re-approved it is merged to Git.
  3. The Git merge triggers the CI and build pipeline, runs a series of tests and then eventually builds a new image and deposits to the new image to a registry.
  4. The Weave Cloud ‘Deployment Automator’ watches the image registry, notices the image, pulls the new image from the registry and updates its YAML in the config repo.
  5. The Weave Cloud ‘Deployment Synchronizer’ (installed to the cluster), detects that the cluster is out of date. It pulls the changed manifests from the config repo and deploys the new feature to production.
    GitOps width=640

Pull pipeline & Push pipleline

一般的なCI/CDツールはPushベースのモデルで、CIをトリガーにデプロイまで行う。このモデルの問題点は本番クラスターの外部に認証情報を公開する必要があるということ。一方、GitOpsではPullベースのモデルで、クラスターが変更を検知して自動的に同期するため、外部に認証情報を持つ必要がない。
(ここはWeaveWorksの宣伝ポイント)

Most CI/CD tools available today use a push-based model. A push-based pipeline means that code starts with the CI system and may continue its path through a series of encoded scripts or uses ‘kubectl’ by hand to push any changes to the Kubernetes cluster.
The reason you don’t want to use your CI system as the deployment impetus or do it manually on the command line is because of the potential to expose credentials outside of your cluster. While it is possible to secure both your CI/CD scripts and the command line, you are working outside the trust domain of your cluster. This is generally not good practice and is why CI systems can be known as attack vectors for production.
GitOps width=640
GitOps width=640

GitOps Tools

CloudGenesis

GitOps with Weave Flux

Atlantis

コメント・シェア

2020年03月WindowsUpdateでLDAP署名とLDAPチャネルバインディングが有効に

2020年3月のWindowsUpdateで2つの機能が有効化される

  • LDAP署名
    • SASLが署名されていないLDAPバインドを利用できない
    • SSL/TLSなしのLDAPシンプルバインドを利用できない
  • LDAPチャネルバインディング必須(LDAPS利用時のみ)
    • CBTを提供できないLDAPクライアントが接続に失敗する可能性がある

LDAP

LDAP認証はRFC4513で規定されてる。

バインド(bind)はLDAPサービスへのログインのこと。
ldapsarchでは-DオプションでBIND DNとしてログインユーザを指定する。

BIND Operation

RFCではBIND OperationとしてSimple Authentication MethodSASL Authentication Methodが規定されている。

SASL(Simple Authentication and Security Layer)

SASL(Simple Authentication and Security Layer)はRFC4422で規定されているプロトコルで、LDAPの他に、SMTP、IMAP、Databaseなどで利用される。

RFC4422のIntroductionで示されるように、利用するプロトコルと認証メカニズムの間の抽象化レイヤーとしてのフレームワークで、認証メカニズム自体は別のプロトコルと組み合わせて利用する。
認証メカニズムはIANAでSASL Mechanism Registryとして公開されている。

昔よく見かけたDIGEST-MD5KERBEROS_V4はすでにOBSOLETE扱いで、CRAM-MD5NTLMもLIMITED扱いになっている。

SASLが規定するのは認証(Authentication)機密性(Confidentiality)完全性(Integrity)が規定されているが、すべてを満たす必要はない。

GSS-API(Generic Security Standard Application Programming Interface)

GSS-APIはRFC5179で規定されている。
GSS-APIを使用したプログラミングについてはOracle GSS-APIのプログラミングが参考になる。
結局GSS-APIも抽象化レイヤーでしかなく、実態はKERBEROS_V5を使用する。

SASL Mechanism Registryで規定された、GSSAPIRFC4752で規定されたKERVEROS_V5(GSSAPI)を使用したSASL Mechanism。

Active DirectoryのLDAP機能

ActiveDirectoryのディレクトリサービスはLDAP v3でユーザ認証はKERBEROS_V5が使用されている。

Active DirectoryのLDAP署名

LDAP署名(LDAP Signing)はSASLの完全性(Integrity)のためのintegrity verificationの機能。
ActiveDirectoryのSASL実装は既定の設定では認証(Authentication)のみを使用するが、LDAP署名を有効化することで完全性(Integrity)も使用することとなる。

Active DirectoryのLDAPチャネルバインディング

チャネルバインディングは認証されたトランザクションと機密性(Confidentiality)が確保された通信路(セキュアチャネル)を結びつけ、man-in-the-middle攻撃から保護する機能。

チャネルバインディングはLDAPに関しての規定は見当たらないが、GSS-APIでチャネルバインディングが存在する。
セキュアチャネルにチャネルバインディングを使用する場合についてRFC5056で規定されている。セキュアチャネルとしてはSSHv2(SSH-CB)、TLS(TLS-CB)が示されている。
また、RFC6542でKERBEROS_V5のGSS-APIにおけるチャネルバインディングが規定されている。

いずれもわかりにくく、平易にチャネルバインディングについて説明されたものではないが、Microsoftの認証の拡張保護の概要がわかりやすい。

LinuxクライアントはChannel Binding Tokenを提出できないのではないか?(完全を設定した場合拒否されるのでは?)

その後

延期された。

2020 年 2 月 5 日: セキュリティ アドバイザリ ADV190023 の更新に伴い、2020 年 3 月での更新予定内容を追加し、有効化措置の予定を 2020 年後半に変更しました。

コメント・シェア


nullpo

めも


募集中


Japan