makeでコマンド実行結果を変数に入れるには

 
カテゴリー ShellScript   タグ

一度実行した結果を参照するには?

Makefile内でshellを使ってコマンド実行結果を変数に格納したいとき、=ではうまくいかない。
格納されたコマンドが参照都度実行され、実行都度結果の異なるコマンドの場合意図した結果を得られない。

一度だけ評価するには:=を使う。

=で評価した場合

1
2
3
4
5
6
7
8
9
10
11
TIME = $(shell date "+%H:%M:%S")

do: test1 test2

test1:
echo $(TIME)
sleep 2

test2:
echo $(TIME)
sleep 2
1
2
3
4
5
6
7
$make
echo 15:47:08
15:47:08
sleep 2
echo 15:47:10
15:47:10
sleep 2

:=で評価した場合

1
2
3
4
5
6
7
8
9
10
11
TIME := $(shell date "+%H:%M:%S")

do: test1 test2

test1:
echo $(TIME)
sleep 2

test2:
echo $(TIME)
sleep 2
1
2
3
4
5
6
7
$make
echo 15:48:05
15:48:05
sleep 2
echo 15:48:05
15:48:05
sleep 2

コメント・シェア

Splashのエラーをリトライさせる

 
カテゴリー Lua Python   タグ

RetryMiddleware

class scrapy.downloadermiddlewares.retry.RetryMiddleware
接続タイムアウトやHTTP 500エラーなどの一時的な問題が原因である可能性のある失敗した要求を再試行するミドルウェア。

class scrapy.downloadermiddlewares.retry.RetryMiddlewareを使えば、Scrapyは失敗したリクエストを再実行してくれる。

Request.meta の dont_retry キーがTrueに設定されている場合、リクエストはこのミドルウェアによって無視されます。

リトライさせない指示も可能。

ソースコードも比較的コンパクトで読みやすい。

Splashのエラー

If main results in an unhandled exception then Splash returns HTTP 400 response with an error message.

SplashでError Handlingされていないエラーはステータスコード400でエラーとなる。

RetryMiddlewareの設定

RetryMiddlewareで設定できる項目は以下。

1
2
3
4
RETRY_ENABLED = True
RETRY_TIMES = 2
# 400は含まれていない
RETRY_HTTP_CODES = [500, 502, 503, 504, 522, 524, 408, 429]

デフォルトではリトライするエラーコードの対象として400は含まれていない。
400を含めてリトライさせるにはRETRY_HTTP_CODESに追記する。

RetryMiddlewareの実行結果

実行時のログで有効なミドルウェアを確認

1
2
3
4
5
6
7
8
9
10
11
12
13
14
2021-05-04 10:35:18 [scrapy.middleware] INFO: Enabled downloader middlewares:
['scrapy.downloadermiddlewares.httpauth.HttpAuthMiddleware',
'scrapy.downloadermiddlewares.downloadtimeout.DownloadTimeoutMiddleware',
'scrapy.downloadermiddlewares.defaultheaders.DefaultHeadersMiddleware',
'scrapy.downloadermiddlewares.useragent.UserAgentMiddleware',
'scrapy.downloadermiddlewares.retry.RetryMiddleware',
'scrapy.downloadermiddlewares.redirect.MetaRefreshMiddleware',
'scrapy.downloadermiddlewares.redirect.RedirectMiddleware',
'scrapy.downloadermiddlewares.cookies.CookiesMiddleware',
'scrapy_splash.SplashCookiesMiddleware',
'scrapy_splash.SplashMiddleware',
'scrapy.downloadermiddlewares.httpproxy.HttpProxyMiddleware',
'scrapy.downloadermiddlewares.httpcompression.HttpCompressionMiddleware',
'scrapy.downloadermiddlewares.stats.DownloaderStats']

リトライされるとデバッグログで出力される

1
2
3
4
5
6
7
8
9
10
11
12
13
14
15
16
17
18
19
20
21
22
23
24
25
26
27
28
29
30
31
2021-05-04 10:35:22 [scrapy.downloadermiddlewares.retry] DEBUG: Retrying <GET https://xxxx.xxxxxx.xxxxx/xxxxxxxxxxxxxxx via http://splash:8050/execute> (failed 1 times): 500 Internal Server Error
2021-05-04 10:35:23 [scrapy.downloadermiddlewares.retry] DEBUG: Retrying <GET https://xxxx.xxxxxx.xxxxx/xxxxxxxxxxxxxxx via http://splash:8050/execute> (failed 2 times): 500 Internal Server Error
2021-05-04 10:35:23 [scrapy.downloadermiddlewares.retry] ERROR: Gave up retrying <GET https://xxxx.xxxxxx.xxxxx/xxxxxxxxxxxxxxx via http://splash:8050/execute> (failed 3 times): 500 Internal Server Error
2021-05-04 10:35:23 [scrapy.core.engine] DEBUG: Crawled (500) <GET https://xxxx.xxxxxx.xxxxx/xxxxxxxxxxxxxxx via http://splash:8050/execute> (referer: None)
2021-05-04 10:35:23 [xxxxxxxxxxxxxxxxxx] WARNING: <twisted.python.failure.Failure scrapy.spidermiddlewares.httperror.HttpError: Ignoring non-200 response>
2021-05-04 10:35:23 [xxxxxxxxxxxxxxxxxx] ERROR: Splash HttpError on https://xxxx.xxxxxx.xxxxx/xxxxxxxxxxxxxxx

リトライした場合、統計情報の`retry/xxxxxx`に記録される。

``` log
2021-05-04 10:35:27 [scrapy.statscollectors] INFO: Dumping Scrapy stats:
{'downloader/request_bytes': 21246,
'downloader/request_count': 4,
'downloader/request_method_count/POST': 4,
'downloader/response_bytes': 337118,
'downloader/response_count': 4,
'downloader/response_status_count/200': 4,
'elapsed_time_seconds': 8.372411,
'finish_reason': 'finished',
'finish_time': datetime.datetime(2021, 5, 4, 1, 35, 26, 930365),
'log_count/DEBUG': 6,
'log_count/ERROR': 2,
'log_count/INFO': 13,
'log_count/WARNING': 2,
'memusage/max': 66347008,
'memusage/startup': 66347008,
'request_depth_max': 1,
'response_received_count': 2,
'retry/count': 2,
'retry/max_reached': 1,
'retry/reason_count/500 Internal Server Error': 2,

コメント・シェア

bashでリトライアウト付きdo-whileル―プ

 
カテゴリー ShellScript   タグ

色々詰まったdo-whileループ

スクリプト例

1
2
3
4
5
6
7
8
9
10
11
12
13
14
15
16
17
18
19
declare -i RETRY_OUT
declare -i RETRY=0
declare -a JOBS=("job1" "job2" "job3")

for JOB_NAME in ${JOBS[@]}
do
RETRY=0
$( ${JOB_NAME} )

while [※JOB実行結果チェック※] || [ ${RETRY} -le ${RETRY_OUT} ]
do
RETRY=$(( RETRY+1 ))
$( ${JOB_NAME} )
done

if [ ${RETRY} -ge ${RETRY_OUT} ]; then
echo "RETRY OUT!!!"
fi
done

ポイント1: bashにdo-whileはない

bashにはdo-whileはない。色々書き方はあるがここではシンプルに2回書いている。

ポイント2: 変数をIntegerとして宣言する

数値として扱うためにdeclare -iでカウンタを宣言している。
数値として宣言したものは-ge-leの数値比較が可能。

ポイント3: 配列操作

複数のジョブを実行する例で配列にジョブ名を入れている。
配列はdeclare -aで宣言し、使用するときは[@]を付けて使用する。

ポイント4: 数値のインクリメント

インクリメントで変数++のような表記はできない。
RETRY=$(( RETRY+1 ))のように記述する。

コメント・シェア

DynamoDBのTTL

The item must contain the attribute specified when TTL was enabled on the table.
The TTL attribute’s value must be a timestamp in Unix epoch time format in seconds.

ポイントは以下の2点だけ。

  • アイテムにはTTLにする属性を含める
  • TTL属性の値はUNIXエポックタイムにする

DynamoDBでTTL属性名を指定する

Cloudformationでの指定は以下。属性名expire_atをTTL属性名としている。

1
2
3
TimeToLiveSpecification:
AttributeName: "expire_at"
Enabled: "True"

UNIXエポックタイムの作り方

Pythonの場合は以下のように未来のdatetimeオブジェクトを作ってtimestamp()メソッドでUNIXエポックタイムに変えればいい。
あとはアイテムにエポックタイムでexpire_atとして値を設定すればOK。

import datetime

ttl_date = datetime.datetime.now() + datetime.timedelta(days=90) # 90日後
ttl = str(ttl_date.timestamp())
...

コメント・シェア

DynamoDBのUpdate Expressions

Update Expressionsを使用することで、値で更新するだけでなく、設定したExpressionによって評価した結果で更新することができる。

DynamoDBでTTL属性名を指定する

たとえば、統計情報をカウントアップし、最終更新日やTTL属性を設定する場合の例。
この例ではキーはstats_namestats_countが加算したい値。
ExpressionAttributeValuesで定義した値を使用し、UpdateExpressionでADDとSETを使用して更新している。

1
2
3
4
5
6
7
8
9
10
11
12
13
14
15
16
17
18
19
stats_name = "namename"
stats_count = 5
last_update_time = "HH:MM:DD"
expire_at = epoc_time

table.update_item(
Key={
'stats_name': stats_name,
},
ExpressionAttributeValues={
':stats_count_up': stats_count,
':set_last_update': last_update_time,
':set_expire_at': expire_at
},
UpdateExpression="""
ADD stats_count :stats_count_up
SET last_update = :set_last_update, expire_at = :set_expire_at
"""
)

ADDとSET

ADDでは既存の型がINTEGERなら加算する。既存の値の型によって挙動が異なる。
SETは上書き保存になる。

Adds the specified value to the item, if the attribute does not already exist. If the attribute does exist, then the behavior of ADD depends on the data type of the attribute:

If the existing attribute is a number, and if Value is also a number, then Value is mathematically added to the existing attribute. If Value is a negative number, then it is subtracted from the existing attribute.

コメント・シェア

リモートブランチをマージ時に自動削除する

 
カテゴリー Git   タグ

リモートブランチを自動削除する設定

GitHubのリポジトリのSettigs -> Options -> Merge buttonにあるAutomatically delete head branchesを有効化する。

GitHub delete branch with pull request width=640

GitHub delete branch with pull request width=640

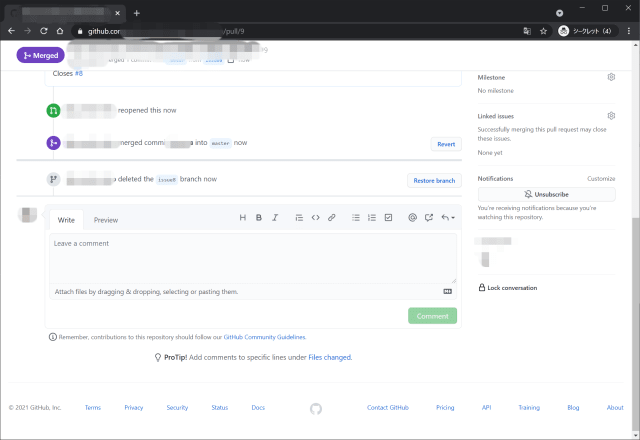
Pull Requestをマージする

プルリクエストを作成し、マージすると・・・deleted the issue8 branchとなっている。

GitHub delete branch with pull request width=640

マージされたあとの状態

ローカルは自動に削除されないが、リモートは削除された状態のはず。
ブランチの状態を確認する・・・リモートも消えていない?

1
2
3
4
5
6
PS > git branch --merged 
* issue8
master
PS > git branch --remote --merged
origin/issue8
origin/master

ローカルブランチを削除

ローカルは自動では消えないので削除する。

1
2
3
4
5
6
7
8
9
10
11
12
13
14
15
16
17
PS > git branch -d issue8
error: Cannot delete branch 'issue8' checked out at 'XXXXXXXXXXXXXXXXX'
PS > git checkout master
Switched to branch 'master'
Your branch is up to date with 'origin/master'.
PS > git pull
remote: Enumerating objects: 1, done.
remote: Counting objects: 100% (1/1), done.
remote: Total 1 (delta 0), reused 0 (delta 0), pack-reused 0
Unpacking objects: 100% (1/1), done.
From XXXXXXXXXXXXXXX:XXXXXXXXXXXXXXX/XXXXXXXXXXXXXXX
xxxxx..xxxxx master -> origin/master
Updating xxxxx..xxxxx
Fast-forward
src/XXXXXXXXXXXXXXX | 16 ++++++++++++++--
src/XXXXXXXXXXXXXXX | 2 +-
2 files changed, 15 insertions(+), 3 deletions(-)

リモートブランチを削除・・・エラー

リモートブランチを削除するとエラー。

1
2
3
4
5
6
7
8
PS > git branch --remote --merge
origin/issue8
origin/master
PS > git branch -d issue8
Deleted branch issue8 (was ccb846c).
PS > git push --delete origin issue8
error: unable to delete 'issue8': remote ref does not exist
error: failed to push some refs to 'xxxxxxxxxxxxxx/xxxxxxxxxxxxxx'

消えている。ローカルのゴミが残っているだけだ。
git remote prune originで削除できる。
git fetch --pruneでも。

1
2
3
4
5
6
7
8
9
10
11
12
13
14
15
16
17
18
19
20
21
22
23
24
PS > git branch --remote --merge
origin/issue8
origin/master
PS > git branch --remote
origin/issue8
origin/master
PS > git remote show origin
* remote origin
Fetch URL: XXXXXXXXXXXXXXX:XXXXXXXXXXXXXXX/XXXXXXXXXXXXXXX
Push URL: XXXXXXXXXXXXXXX:XXXXXXXXXXXXXXX/XXXXXXXXXXXXXXX
HEAD branch: master
Remote branches:
master tracked
refs/remotes/origin/issue8 stale (use 'git remote prune' to remove)
Local branch configured for 'git pull':
master merges with remote master
Local ref configured for 'git push':
master pushes to master (up to date)
PS > git remote prune origin
Pruning origin
URL: XXXXXXXXXXXXXXX:XXXXXXXXXXXXXXX/XXXXXXXXXXXXXXX
* [pruned] origin/issue8
PS > git branch --remote --merge
origin/master

自動的に消すには

git config --global fetch.prune trueでfetch時に自動削除できる。

設定しているとgit pullなどのfetchを含む処理で消える。

1
2
3
4
5
6
7
8
9
10
11
12
13
14
15
16
17
18
19
PS > git branch -r
origin/issue11
origin/master
PS > git pull
From XXXXXXXXXXXXXXX:XXXXXXXXXXXXXXX/XXXXXXXXXXXXXXX
- [deleted] (none) -> origin/issue11
remote: Enumerating objects: 1, done.
remote: Counting objects: 100% (1/1), done.
remote: Total 1 (delta 0), reused 0 (delta 0), pack-reused 0
Unpacking objects: 100% (1/1), done.
From XXXXXXXXXXXXXXX:XXXXXXXXXXXXXXX/XXXXXXXXXXXXXXX
xxxxx..xxxxx master -> origin/master
Updating xxxxx..xxxxx
Fast-forward
src/XXXXXXXXXXXXXXX | 16 ++++++++++++++--
src/XXXXXXXXXXXXXXX | 2 +-
2 files changed, 15 insertions(+), 3 deletions(-)
PS > git branch -r
origin/master

コメント・シェア

IssueベースのBranchを作ってPull Requestを送る

 
カテゴリー Git   タグ

Issueブランチを作る

Iissue #6用のブランチを作成する。

1
2
3
4
5
6
7
8
9
10
11
12
PS > git branch issue6
PS > git branch
issue6
* master
PS > git checkout issue6
Switched to branch 'issue6'
PS > git branch
* issue6
master
PS > git status
On branch issue6
nothing to commit, working tree clean

コード変更とCommit

必要コードを修正し、Commit/Pushまで行う。

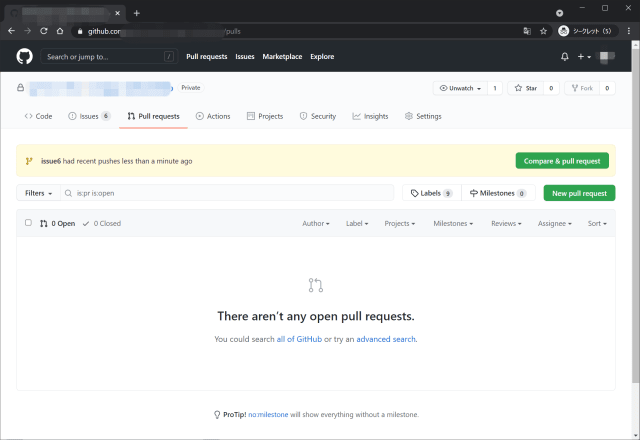
GitHub画面でPull Requestを送る

Pull Requestのタブを開くとCompare & pull requestボタンが出現しているので押す。

GitHub pull request width=640

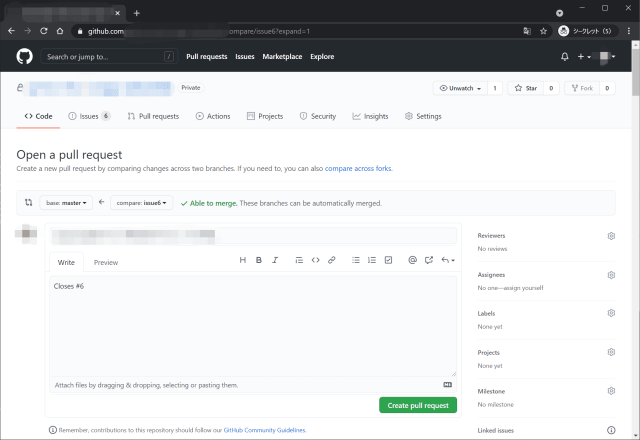
ここでPull RequestがマージされたらIssueもクローズするようにCloses #6を設定。

GitHub pull request width=640

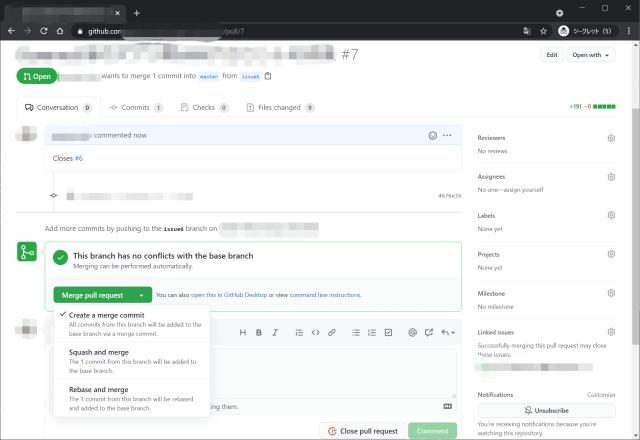
Pull Requestをマージする

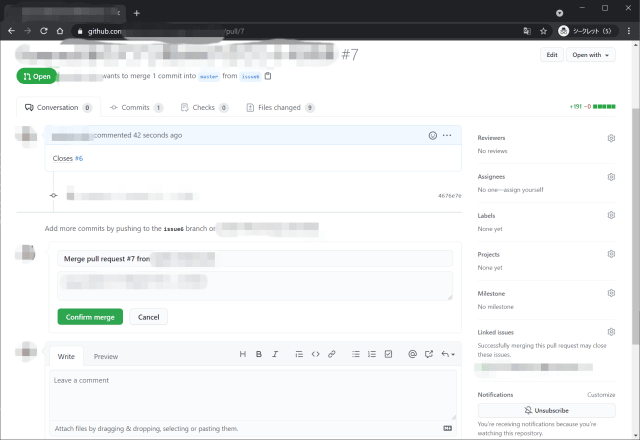
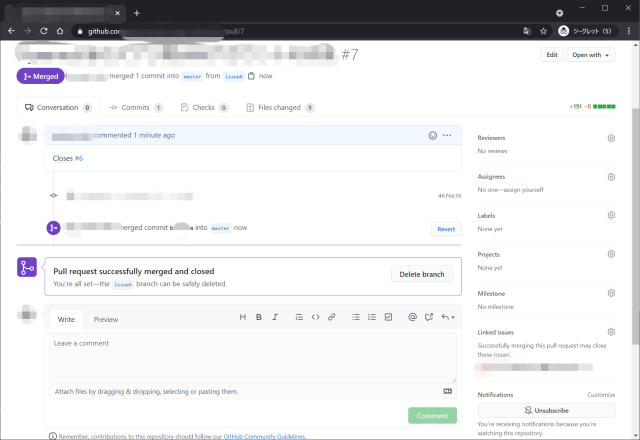
Pull Requestが送られたら権限を持つユーザでマージする。

GitHub pull request width=640

GitHub pull request width=640

GitHub pull request width=640

Issue #6は自動でクローズされる。

マージ済のIssueブランチを削除する

ローカルブランチを削除する

1
2
PS > git branch -d issue6
error: Cannot delete branch 'issue6' checked out at 'XXXXXXXXXXXXXXXXXXXXXXXXXXXXXXXXX'

そのままでは削除できない。masterに切り替えて、マージされた内容をローカルに反映。
マージされたブランチはgit branch --mergeで確認できる。

  • git branch –merged
  • git checkout master
  • git pull
1
2
3
4
5
6
7
8
9
10
11
12
13
14
15
PS > git branch --merged 
* issue6
master
PS > git checkout master
Switched to branch 'master'
Your branch is up to date with 'origin/master'.
PS > git pull
remote: Enumerating objects: 1, done.
...略...
Fast-forward
xxxxxxxxxxxx/xxxxxxxxx/Makefile | 16 +++++
xxxxxxxxxxxx/xxxxxxxxx/requirements.txt | 1 +
9 files changed, 191 insertions(+)
create mode 100644 xxxxxxxxxxxx/xxxxxxxxx/Makefile
create mode 100644 xxxxxxxxxxxx/xxxxxxxxx/requirements.txt

ブランチを削除する

  • git branch -d issue6
1
2
PS > git branch -d issue6
Deleted branch issue6 (was 4676e7e).

リモートブランチを削除する

ローカルが消えてもリモートは消えていない。
マージ済のリモートブランチはgit branch --remote --mergedで確認。

  • git branch –remote –merged
  • git push –delete origin issue6
1
2
3
4
5
6
7
8
PS > git branch --merged
* master
PS > git branch --remote --merged
origin/issue6
origin/master
PS > git push --delete origin issue6
To github-genba-neko:genba-neko/scrapy_smbcnikko
- [deleted] issue6

コメント・シェア

CloudFormationでこんなエラーがでたときに

1
An error occurred (InsufficientCapabilitiesException) when calling the CreateStack operation: Requires capabilities : [CAPABILITY_NAMED_IAM]

CAPABILITY_NAMED_IAMとは

CAPABILITY_IAM and CAPABILITY_NAMED_IAM

Some stack templates might include resources that can affect permissions in your AWS account; for example, by creating new AWS Identity and Access Management (IAM) users. For those stacks, you must explicitly acknowledge this by specifying one of these capabilities.

The following IAM resources require you to specify either the CAPABILITY_IAM or CAPABILITY_NAMED_IAM

・If you have IAM resources, you can specify either capability.

・If you have IAM resources with custom names, you must specify CAPABILITY_NAMED_IAM.

・If you don’t specify either of these capabilities, AWS CloudFormation returns an InsufficientCapabilities error.

CloudFormationがスタックを作成するために、特定の機能が含まれていることを明示的に示す必要がある。

  • IAMリソースがある場合は、CAPABILITY_IAMCAPABILITY_NAMED_IAMが必要になる
  • カスタム名のIAMリソースがある場合はCAPABILITY_NAMED_IAMを指定する
  • 指定がないとAWSCloudFormationはInsufficientCapabilitiesエラーを返す

CloudformationでCAPABILITIESを指定する

--capabilitiesで指定するだけ。

1
$ aws cloudformation create-stack --stack-name $(STACK_NAME) --template-body $(TEMPLATE_FILE) --parameters $(PARAMETERS_FILE) --capabilities CAPABILITY_NAMED_IAM

カスタム名のIAMリソースがあるのに、CAPABILITY_NAMED_IAMがない場合

1
2
3
$ aws cloudformation create-stack --stack-name smbcnikko-iam --template-body "file://./iam.yml" --parameters "file://./parameters.json" --capabilities CAPABILITY_IAM

An error occurred (InsufficientCapabilitiesException) when calling the CreateStack operation: Requires capabilities : [CAPABILITY_NAMED_IAM]

コメント・シェア


nullpo

めも


募集中


Japan