Selenium Docker

docker-composeで公式サンプルに一部追記

appサービスとしてPython実行のシェルのためのContainerを用意。
tty: trueを忘れずに。

1
2
3
4
5
6
7
8
9
10
11
12
13
14
15
16
# To execute this docker-compose yml file use `docker-compose -f <file_name> up`
# Add the `-d` flag at the end for detached execution
version: "3"
services:
chrome:
image: selenium/standalone-chrome
volumes:
- /dev/shm:/dev/shm

app:
image: python:3-slim
working_dir: /app
command: /bin/bash
tty: true
volumes:
- ./app:/app

起動

1
2
3
4
5
6
7
8
9
10
11
12
13
14
15
16
17
18
19
20
21
22
23
24
25
26
27
PS > docker-compose up
selenium-standalone_app_1 is up-to-date
selenium-standalone_chrome_1 is up-to-date
Attaching to selenium-standalone_app_1, selenium-standalone_chrome_1
chrome_1 | 2020-04-18 03:04:17,638 INFO Included extra file "/etc/supervisor/conf.d/selenium.conf" during parsing
chrome_1 | 2020-04-18 03:04:17,639 INFO supervisord started with pid 7
chrome_1 | 2020-04-18 03:04:18,641 INFO spawned: 'xvfb' with pid 10
chrome_1 | 2020-04-18 03:04:18,642 INFO spawned: 'selenium-standalone' with pid 11
chrome_1 | 03:04:18.800 INFO [GridLauncherV3.parse] - Selenium server version: 3.141.59, revision: e82be7d358
chrome_1 | 2020-04-18 03:04:18,801 INFO success: xvfb entered RUNNING state, process has stayed up for > than 0 seconds (startsecs)
chrome_1 | 2020-04-18 03:04:18,801 INFO success: selenium-standalone entered RUNNING state, process has stayed up for > than 0 seconds (startsecs)
chrome_1 | 03:04:18.859 INFO [GridLauncherV3.lambda$buildLaunchers$3] - Launching a standalone Selenium Server on port 4444
chrome_1 | 2020-04-18 03:04:18.888:INFO::main: Logging initialized @240ms to org.seleniumhq.jetty9.util.log.StdErrLog
chrome_1 | 03:04:19.041 INFO [WebDriverServlet.<init>] - Initialising WebDriverServlet
chrome_1 | 03:04:19.122 INFO [SeleniumServer.boot] - Selenium Server is up and running on port 4444
chrome_1 | 03:05:29.991 INFO [ActiveSessionFactory.apply] - Capabilities are: {
chrome_1 | "browserName": "chrome",
chrome_1 | "version": ""
chrome_1 | }
chrome_1 | 03:05:29.993 INFO [ActiveSessionFactory.lambda$apply$11] - Matched factory org.openqa.selenium.grid.session.remote.ServicedSession$Factory (provider: org.openqa.selenium.chrome.ChromeDriverService)
chrome_1 | Starting ChromeDriver 81.0.4044.69 (6813546031a4bc83f717a2ef7cd4ac6ec1199132-refs/branch-heads/4044@{#776}) on port 27205
chrome_1 | Only local connections are allowed.
chrome_1 | Please protect ports used by ChromeDriver and related test frameworks to prevent access by malicious code.
chrome_1 | [1587179130.011][SEVERE]: bind() failed: Cannot assign requested address (99)
chrome_1 | 03:05:30.539 INFO [ProtocolHandshake.createSession] - Detected dialect: W3C
chrome_1 | 03:05:30.563 INFO [RemoteSession$Factory.lambda$performHandshake$0] - Started new session c7eb56f1ed116e861a77db2cbb3acd33 (org.openqa.selenium.chrome.ChromeDriverService)
chrome_1 | 03:05:31.362 INFO [ActiveSessions$1.onStop] - Removing session c7eb56f1ed116e861a77db2cbb3acd33 (org.openqa.selenium.chrome.ChromeDriverService)

テストスクリプト

appで実行するテストスクリプト

appで動かすこのスクリプト記述した接続先のchromeはdocker-composeによって名前解決される(docker-compose upで起動する必要がある)。

1
2
3
4
5
6
7
8
9
10
11
12
13
14
15
16
from selenium import webdriver
from selenium.webdriver.common.desired_capabilities import DesiredCapabilities

def test_access(driver):
driver.get('https://www.google.com')
driver.save_screenshot('test.png')
print(driver.title)
#driver.quit()

if __name__ == '__main__':
options = {
'command_executor': 'http://chrome:4444/wd/hub',
'desired_capabilities': DesiredCapabilities.CHROME,
}
with webdriver.Remote(**options) as driver:
test_access(driver)

テストスクリプトによるテスト

実行するapp上ではpip install seleniumでモジュールをインストール。
実行するとコンソール上にGoogleが表示され、画面キャプチャがtest.pngというファイル名で保存される。

1
2
3
4
5
6
7
8
9
10
11
12
13
14
15
16
17
18
19
PS > docker-compose up -d
Creating network "selenium_default" with the default driver
Creating selenium_app_1 ... done
Creating selenium-hub ... done
Creating selenium_firefox_1 ... done
Creating selenium_chrome_1 ... done
Creating selenium_opera_1 ... done
PS > docker-compose exec app bash
root@602dac150459:/app# pip install selenium
Collecting selenium
Downloading selenium-3.141.0-py2.py3-none-any.whl (904 kB)
|████████████████████████████████| 904 kB 2.6 MB/s
Collecting urllib3
Downloading urllib3-1.25.9-py2.py3-none-any.whl (126 kB)
|████████████████████████████████| 126 kB 11.3 MB/s
Installing collected packages: urllib3, selenium
Successfully installed selenium-3.141.0 urllib3-1.25.9
root@602dac150459:/app# python test_code.py
Google

Selenium Screenshot width=640

quit()の挙動

quit() すると、WebDriverException になる。

1
2
3
4
5
6
7
8
9
10
11
12
Traceback (most recent call last):
File "test_code.py", line 16, in <module>
test_access(driver)
File "/usr/local/lib/python3.8/site-packages/selenium/webdriver/remote/webdriver.py", line 170, in __exit__
self.quit()
File "/usr/local/lib/python3.8/site-packages/selenium/webdriver/remote/webdriver.py", line 698, in quit
self.execute(Command.QUIT)
File "/usr/local/lib/python3.8/site-packages/selenium/webdriver/remote/webdriver.py", line 321, in execute
self.error_handler.check_response(response)
File "/usr/local/lib/python3.8/site-packages/selenium/webdriver/remote/errorhandler.py", line 242, in check_response
raise exception_class(message, screen, stacktrace)
selenium.common.exceptions.WebDriverException: Message: No active session with ID d0110743cd1a9b2d4789ad493a9c805b

コメント・シェア

GitHubでダミーE-Mailアドレスを利用する

 
カテゴリー Git   タグ

GitHubのemail設定

Keep my email address private

settings -> emailsで設定を確認

ダミーE-mailアドレスを確認

Keep my email addresses privateはデフォルトで有効になっている。

1
We’ll remove your public profile email and use ID+アカウント名@users.noreply.github.com when performing web-based Git operations (e.g. edits and merges) and sending email on your behalf. If you want command line Git operations to use your private email you must set your email in Git.

ID+アカウント名@users.noreply.github.comを使うべきとなっている
このアドレスを設定するとアバターも表示される

git configで設定する

ユーザ共通

~/.gitconfigに保存される。Windowsの場合は%USERPROFILE%\.gitconfigに保存される

1
git config --global user.email "ID+アカウント名@users.noreply.github.com"

リポジトリ毎の設定(複数のGitリポジトリを使用する場合)

.git/configに保存される

1
git config --local user.email "ID+アカウント名@users.noreply.github.com"

コメント・シェア

Selenium Docker

docker-composeで公式サンプルに一部追記

appサービスとしてPython実行のシェルのためのContainerを用意。
tty: trueを忘れずに。

1
2
3
4
5
6
7
8
9
10
11
12
13
14
15
16
17
18
19
20
21
22
23
24
25
26
27
28
29
30
31
32
33
34
35
36
37
38
39
40
41
42
43
44
45
46
47
# To execute this docker-compose yml file use `docker-compose -f <file_name> up`
# Add the `-d` flag at the end for detached execution
version: "3"
services:
selenium-hub:
image: selenium/hub:3.141.59-20200326
container_name: selenium-hub
ports:
- "4444:4444"

chrome:
image: selenium/node-chrome:3.141.59-20200326
volumes:
- /dev/shm:/dev/shm
depends_on:
- selenium-hub
environment:
- HUB_HOST=selenium-hub
- HUB_PORT=4444

firefox:
image: selenium/node-firefox:3.141.59-20200326
volumes:
- /dev/shm:/dev/shm
depends_on:
- selenium-hub
environment:
- HUB_HOST=selenium-hub
- HUB_PORT=4444

opera:
image: selenium/node-opera:3.141.59-20200326
volumes:
- /dev/shm:/dev/shm
depends_on:
- selenium-hub
environment:
- HUB_HOST=selenium-hub
- HUB_PORT=4444

app:
image: python:3-slim
working_dir: /app
command: /bin/bash
tty: true
volumes:
- ./app:/app

起動

1
2
3
4
5
6
7
8
9
10
11
12
13
14
15
16
17
18
19
20
21
22
23
24
25
26
27
28
29
30
31
32
33
34
35
36
37
38
39
40
41
42
43
44
45
46
47
48
49
50
51
52
53
54
55
56
57
58
59
60
61
62
63
64
65
66
67
68
69
70
71
72
73
74
75
76
77
78
79
80
81
82
83
84
85
86
87
88
89
90
91
92
93
94
95
96
97
98
99
100
101
102
103
104
105
106
107
108
109
110
111
112
113
114
115
116
117
118
119
120
121
122
123
124
125
126
127
128
129
130
131
132
133
134
135
136
137
138
139
140
141
142
143
144
145
146
147
148
149
150
151
152
153
154
155
156
157
158
159
160
161
162
163
164
165
166
167
168
169
170
PS > docker-compose up
Creating network "selenium_default" with the default driver
Pulling selenium-hub (selenium/hub:3.141.59-20200326)...
3.141.59-20200326: Pulling from selenium/hub
7ddbc47eeb70: Pull complete
c1bbdc448b72: Pull complete
8c3b70e39044: Pull complete
45d437916d57: Pull complete
19f82ee05cd5: Pull complete
320494ffe513: Pull complete
37bf31601241: Pull complete
ff4462d9e211: Pull complete
56d14078f879: Pull complete
c524497381c0: Pull complete
713cd1a80bdc: Pull complete
f27f03ce7183: Pull complete
23c2a3478434: Pull complete
39d077d89173: Pull complete
Digest: sha256:f401d133c344a8ede3e987431224e0e565364dc8bd65204a811a4bd537c9a924
Status: Downloaded newer image for selenium/hub:3.141.59-20200326
Pulling chrome (selenium/node-chrome:3.141.59-20200326)...
3.141.59-20200326: Pulling from selenium/node-chrome
7ddbc47eeb70: Already exists
c1bbdc448b72: Already exists
8c3b70e39044: Already exists
45d437916d57: Already exists
19f82ee05cd5: Already exists
320494ffe513: Already exists
37bf31601241: Already exists
ff4462d9e211: Already exists
56d14078f879: Already exists
c524497381c0: Already exists
713cd1a80bdc: Already exists
a17229ca0b94: Pull complete
af50740d57b3: Pull complete
d765b18646a8: Pull complete
f5db115c40d5: Pull complete
56afc6231b00: Pull complete
768a071aba5c: Pull complete
1204ec367cb8: Pull complete
c54b2a66c3aa: Pull complete
8dbdd3292558: Pull complete
5154a257e987: Pull complete
412ac1592b70: Pull complete
aebae33acd52: Pull complete
Digest: sha256:eab11d28aa7d1fb5907b66168f6ba78b7ad59a28e3659707c91a07da450fb573
Status: Downloaded newer image for selenium/node-chrome:3.141.59-20200326
Pulling firefox (selenium/node-firefox:3.141.59-20200326)...
3.141.59-20200326: Pulling from selenium/node-firefox
7ddbc47eeb70: Already exists
c1bbdc448b72: Already exists
8c3b70e39044: Already exists
45d437916d57: Already exists
19f82ee05cd5: Already exists
320494ffe513: Already exists
37bf31601241: Already exists
ff4462d9e211: Already exists
56d14078f879: Already exists
c524497381c0: Already exists
713cd1a80bdc: Already exists
a17229ca0b94: Already exists
af50740d57b3: Already exists
d765b18646a8: Already exists
f5db115c40d5: Already exists
56afc6231b00: Already exists
768a071aba5c: Already exists
b1ebf7fa7db5: Pull complete
6de8b6349cdc: Pull complete
c5c4c2bb4918: Pull complete
0ad2361bb86d: Pull complete
c3ee03a93323: Pull complete
Digest: sha256:ed6dd678c4223251adaa01bd6d2e1ac99077595581065d1e55620661733f81d9
Status: Downloaded newer image for selenium/node-firefox:3.141.59-20200326
Pulling opera (selenium/node-opera:3.141.59-20200326)...
3.141.59-20200326: Pulling from selenium/node-opera
7ddbc47eeb70: Already exists
c1bbdc448b72: Already exists
8c3b70e39044: Already exists
45d437916d57: Already exists
19f82ee05cd5: Already exists
320494ffe513: Already exists
37bf31601241: Already exists
ff4462d9e211: Already exists
56d14078f879: Already exists
c524497381c0: Already exists
713cd1a80bdc: Already exists
a17229ca0b94: Already exists
af50740d57b3: Already exists
d765b18646a8: Already exists
f5db115c40d5: Already exists
56afc6231b00: Already exists
768a071aba5c: Already exists
f5936530da40: Pull complete
be9409772e25: Pull complete
f5eb1736be2c: Pull complete
984d18a0f01a: Pull complete
6ee0a766ad86: Pull complete
8c094c1d5599: Pull complete
Digest: sha256:ce92510cac73440669472f67d79ccdd2b9b6b7640f6963ad5882e6379b79426d
Status: Downloaded newer image for selenium/node-opera:3.141.59-20200326
Creating selenium-hub ... done
Creating selenium_firefox_1 ... done
Creating selenium_opera_1 ... done
Creating selenium_chrome_1 ... done
Attaching to selenium-hub, selenium_chrome_1, selenium_opera_1, selenium_firefox_1
selenium-hub | 2020-04-17 01:27:42,777 INFO Included extra file "/etc/supervisor/conf.d/selenium-hub.conf" during parsing
selenium-hub | 2020-04-17 01:27:42,779 INFO supervisord started with pid 7
chrome_1 | 2020-04-17 01:27:43,330 INFO Included extra file "/etc/supervisor/conf.d/selenium.conf" during parsing
chrome_1 | 2020-04-17 01:27:43,331 INFO supervisord started with pid 7
opera_1 | 2020-04-17 01:27:43,449 INFO Included extra file "/etc/supervisor/conf.d/selenium.conf" during parsing
opera_1 | 2020-04-17 01:27:43,451 INFO supervisord started with pid 7
firefox_1 | 2020-04-17 01:27:43,455 INFO Included extra file "/etc/supervisor/conf.d/selenium.conf" during parsing
firefox_1 | 2020-04-17 01:27:43,456 INFO supervisord started with pid 7
selenium-hub | 2020-04-17 01:27:43,781 INFO spawned: 'selenium-hub' with pid 10
selenium-hub | Starting Selenium Hub with configuration:
selenium-hub | 2020-04-17 01:27:43,791 INFO success: selenium-hub entered RUNNING state, process has stayed up for > than 0 seconds (startsecs)
selenium-hub | {
selenium-hub | "host": "0.0.0.0",
selenium-hub | "port": 4444,
selenium-hub | "role": "hub",
selenium-hub | "maxSession": 5,
selenium-hub | "newSessionWaitTimeout": -1,
selenium-hub | "capabilityMatcher": "org.openqa.grid.internal.utils.DefaultCapabilityMatcher",
selenium-hub | "throwOnCapabilityNotPresent": true,
selenium-hub | "jettyMaxThreads": -1,
selenium-hub | "cleanUpCycle": 5000,
selenium-hub | "browserTimeout": 0,
selenium-hub | "timeout": 1800,
selenium-hub | "debug": false
selenium-hub | }
selenium-hub | 01:27:43.953 INFO [GridLauncherV3.parse] - Selenium server version: 3.141.59, revision: e82be7d358
selenium-hub | 01:27:44.026 INFO [GridLauncherV3.lambda$buildLaunchers$5] - Launching Selenium Grid hub on port 4444
chrome_1 | 2020-04-17 01:27:44,333 INFO spawned: 'xvfb' with pid 10
chrome_1 | 2020-04-17 01:27:44,333 INFO spawned: 'selenium-node' with pid 11
selenium-hub | 2020-04-17 01:27:44.386:INFO::main: Logging initialized @589ms to org.seleniumhq.jetty9.util.log.StdErrLog
opera_1 | 2020-04-17 01:27:44,452 INFO spawned: 'xvfb' with pid 10
opera_1 | 2020-04-17 01:27:44,453 INFO spawned: 'selenium-node' with pid 11
firefox_1 | 2020-04-17 01:27:44,458 INFO spawned: 'xvfb' with pid 10
firefox_1 | 2020-04-17 01:27:44,459 INFO spawned: 'selenium-node' with pid 11
selenium-hub | 01:27:44.614 INFO [Hub.start] - Selenium Grid hub is up and running
selenium-hub | 01:27:44.614 INFO [Hub.start] - Nodes should register to http://172.18.0.2:4444/grid/register/
selenium-hub | 01:27:44.615 INFO [Hub.start] - Clients should connect to http://172.18.0.2:4444/wd/hub
chrome_1 | Connecting to the Hub using the host selenium-hub and port 4444
chrome_1 | 2020-04-17 01:27:44,745 INFO success: xvfb entered RUNNING state, process has stayed up for > than 0 seconds (startsecs)
chrome_1 | 2020-04-17 01:27:44,745 INFO success: selenium-node entered RUNNING state, process has stayed up for > than 0 seconds (startsecs)
opera_1 | Connecting to the Hub using the host selenium-hub and port 4444
opera_1 | 2020-04-17 01:27:44,895 INFO success: xvfb entered RUNNING state, process has stayed up for > than 0 seconds (startsecs)
opera_1 | 2020-04-17 01:27:44,895 INFO success: selenium-node entered RUNNING state, process has stayed up for > than 0 seconds (startsecs)
firefox_1 | Connecting to the Hub using the host selenium-hub and port 4444
firefox_1 | 2020-04-17 01:27:44,896 INFO success: xvfb entered RUNNING state, process has stayed up for > than 0 seconds (startsecs)
firefox_1 | 2020-04-17 01:27:44,896 INFO success: selenium-node entered RUNNING state, process has stayed up for > than 0 seconds (startsecs)
chrome_1 | 01:27:44.937 INFO [GridLauncherV3.parse] - Selenium server version: 3.141.59, revision: e82be7d358
chrome_1 | 01:27:45.092 INFO [GridLauncherV3.lambda$buildLaunchers$7] - Launching a Selenium Grid node on port 5555
opera_1 | 01:27:45.234 INFO [GridLauncherV3.parse] - Selenium server version: 3.141.59, revision: e82be7d358
chrome_1 | 2020-04-17 01:27:45.294:INFO::main: Logging initialized @545ms to org.seleniumhq.jetty9.util.log.StdErrLog
firefox_1 | 01:27:45.380 INFO [GridLauncherV3.parse] - Selenium server version: 3.141.59, revision: e82be7d358
opera_1 | 01:27:45.454 INFO [GridLauncherV3.lambda$buildLaunchers$7] - Launching a Selenium Grid node on port 5555
firefox_1 | 01:27:45.602 INFO [GridLauncherV3.lambda$buildLaunchers$7] - Launching a Selenium Grid node on port 5555
opera_1 | 2020-04-17 01:27:45.607:INFO::main: Logging initialized @708ms to org.seleniumhq.jetty9.util.log.StdErrLog
opera_1 | 01:27:46.445 INFO [SelfRegisteringRemote$1.run] - Starting auto registration thread. Will try to register every 5000 ms.
firefox_1 | 01:27:46.523 INFO [SelfRegisteringRemote$1.run] - Starting auto registration thread. Will try to register every 5000 ms.
chrome_1 | 01:27:46.582 INFO [SelfRegisteringRemote.registerToHub] - Registering the node to the hub: http://selenium-hub:4444/grid/register
chrome_1 | 01:27:46.706 INFO [SelfRegisteringRemote.registerToHub] - The node is registered to the hub and ready to use
selenium-hub | 01:27:46.707 INFO [DefaultGridRegistry.add] - Registered a node http://172.18.0.3:5555
firefox_1 | 01:27:46.831 INFO [SelfRegisteringRemote.registerToHub] - Registering the node to the hub: http://selenium-hub:4444/grid/register
firefox_1 | 01:27:46.863 INFO [SelfRegisteringRemote.registerToHub] - The node is registered to the hub and ready to use
selenium-hub | 01:27:46.863 INFO [DefaultGridRegistry.add] - Registered a node http://172.18.0.5:5555
opera_1 | 01:27:46.897 INFO [SelfRegisteringRemote.registerToHub] - Registering the node to the hub: http://selenium-hub:4444/grid/register
opera_1 | 01:27:46.913 INFO [SelfRegisteringRemote.registerToHub] - The node is registered to the hub and ready to use
selenium-hub | 01:27:46.912 INFO [DefaultGridRegistry.add] - Registered a node http://172.18.0.4:5555

Selenium Gridの管理画面

localhost:4444にアクセス。

SeleniumGridCosole width=640

SeleniumGridCosole width=640

テストスクリプト

appで実行するテストスクリプト

appで動かすこのスクリプト記述した接続先のselenium-hubはdocker-composeによって名前解決される(docker-compose upで起動する必要がある)。

1
2
3
4
5
6
7
8
9
10
11
12
13
14
15
16
17
from selenium import webdriver
from selenium.webdriver.common.desired_capabilities import DesiredCapabilities

def test_access(driver):
driver.get('https://www.google.com')
driver.save_screenshot('test.png')
print(driver.title)
#driver.quit()

if __name__ == '__main__':
options = {
'command_executor': 'http://selenium-hub:4444/wd/hub',
'desired_capabilities': DesiredCapabilities.FIREFOX,
#'desired_capabilities': DesiredCapabilities.CHROME,
}
with webdriver.Remote(**options) as driver:
test_access(driver)

テストスクリプトによるテスト

実行するapp上ではpip install seleniumでモジュールをインストール。
実行するとコンソール上にGoogleが表示され、画面キャプチャがtest.pngというファイル名で保存される。

1
2
3
4
5
6
7
8
9
10
11
12
13
14
15
16
17
PS > docker-compose up -d
Creating network "selenium_default" with the default driver
Creating selenium_app_1 ... done
Creating selenium-hub ... done
Creating selenium_firefox_1 ... done
Creating selenium_chrome_1 ... done
Creating selenium_opera_1 ... done
PS m> docker-compose exec app bash
root@9ca8831c0042:/app# pip install selenium
Collecting selenium
Downloading selenium-3.141.0-py2.py3-none-any.whl (904 kB)
|████████████████████████████████| 904 kB 2.6 MB/s
Collecting urllib3
Downloading urllib3-1.25.9-py2.py3-none-any.whl (126 kB)
|████████████████████████████████| 126 kB 11.3 MB/s
root@9ca8831c0042:/app# python test_code.py
Google

Selenium Screenshot width=640

quit()の挙動

quit() すると、WebDriverException になる。

1
2
3
4
5
6
7
8
9
10
11
12
13
14
15
16
17
18
19
20
21
22
23
24
25
26
27
28
29
30
31
32
33
34
35
36
37
38
39
40
41
42
43
44
45
46
47
48
49
50
51
Traceback (most recent call last):
File "test_code.py", line 31, in <module>
title(driver, query)
File "/usr/local/lib/python3.8/site-packages/selenium/webdriver/remote/webdriver.py", line 170, in __exit__
self.quit()
File "/usr/local/lib/python3.8/site-packages/selenium/webdriver/remote/webdriver.py", line 698, in quit
self.execute(Command.QUIT)
File "/usr/local/lib/python3.8/site-packages/selenium/webdriver/remote/webdriver.py", line 321, in execute
self.error_handler.check_response(response)
File "/usr/local/lib/python3.8/site-packages/selenium/webdriver/remote/errorhandler.py", line 242, in check_response
raise exception_class(message, screen, stacktrace)
selenium.common.exceptions.WebDriverException: Message: Session [b3855f5e070d99082bcccd2a32bd9e7c] was terminated due to CLIENT_STOPPED_SESSION
Stacktrace:
at org.openqa.grid.internal.ActiveTestSessions.getExistingSession (ActiveTestSessions.java:115)
at org.openqa.grid.internal.DefaultGridRegistry.getExistingSession (DefaultGridRegistry.java:387)
at org.openqa.grid.web.servlet.handler.RequestHandler.getSession (RequestHandler.java:241)
at org.openqa.grid.web.servlet.handler.RequestHandler.process (RequestHandler.java:123)
at org.openqa.grid.web.servlet.DriverServlet.process (DriverServlet.java:85)
at org.openqa.grid.web.servlet.DriverServlet.doDelete (DriverServlet.java:75)
at javax.servlet.http.HttpServlet.service (HttpServlet.java:713)
at javax.servlet.http.HttpServlet.service (HttpServlet.java:790)
at org.seleniumhq.jetty9.servlet.ServletHolder.handle (ServletHolder.java:865)
at org.seleniumhq.jetty9.servlet.ServletHandler.doHandle (ServletHandler.java:535)
at org.seleniumhq.jetty9.server.handler.ScopedHandler.handle (ScopedHandler.java:146)
at org.seleniumhq.jetty9.security.SecurityHandler.handle (SecurityHandler.java:548)
at org.seleniumhq.jetty9.server.handler.HandlerWrapper.handle (HandlerWrapper.java:132)
at org.seleniumhq.jetty9.server.handler.ScopedHandler.nextHandle (ScopedHandler.java:257)
at org.seleniumhq.jetty9.server.session.SessionHandler.doHandle (SessionHandler.java:1595)
at org.seleniumhq.jetty9.server.handler.ScopedHandler.nextHandle (ScopedHandler.java:255)
at org.seleniumhq.jetty9.server.handler.ContextHandler.doHandle (ContextHandler.java:1340)
at org.seleniumhq.jetty9.server.handler.ScopedHandler.nextScope (ScopedHandler.java:203)
at org.seleniumhq.jetty9.servlet.ServletHandler.doScope (ServletHandler.java:473)
at org.seleniumhq.jetty9.server.session.SessionHandler.doScope (SessionHandler.java:1564)
at org.seleniumhq.jetty9.server.handler.ScopedHandler.nextScope (ScopedHandler.java:201)
at org.seleniumhq.jetty9.server.handler.ContextHandler.doScope (ContextHandler.java:1242)
at org.seleniumhq.jetty9.server.handler.ScopedHandler.handle (ScopedHandler.java:144)
at org.seleniumhq.jetty9.server.handler.HandlerWrapper.handle (HandlerWrapper.java:132)
at org.seleniumhq.jetty9.server.Server.handle (Server.java:503)
at org.seleniumhq.jetty9.server.HttpChannel.handle (HttpChannel.java:364)
at org.seleniumhq.jetty9.server.HttpConnection.onFillable (HttpConnection.java:260)
at org.seleniumhq.jetty9.io.AbstractConnection$ReadCallback.succeeded (AbstractConnection.java:305)
at org.seleniumhq.jetty9.io.FillInterest.fillable (FillInterest.java:103)
at org.seleniumhq.jetty9.io.ChannelEndPoint$2.run (ChannelEndPoint.java:118)
at org.seleniumhq.jetty9.util.thread.strategy.EatWhatYouKill.runTask (EatWhatYouKill.java:333)
at org.seleniumhq.jetty9.util.thread.strategy.EatWhatYouKill.doProduce (EatWhatYouKill.java:310)
at org.seleniumhq.jetty9.util.thread.strategy.EatWhatYouKill.tryProduce (EatWhatYouKill.java:168)
at org.seleniumhq.jetty9.util.thread.strategy.EatWhatYouKill.run (EatWhatYouKill.java:126)
at org.seleniumhq.jetty9.util.thread.ReservedThreadExecutor$ReservedThread.run (ReservedThreadExecutor.java:366)
at org.seleniumhq.jetty9.util.thread.QueuedThreadPool.runJob (QueuedThreadPool.java:765)
at org.seleniumhq.jetty9.util.thread.QueuedThreadPool$2.run (QueuedThreadPool.java:683)
at java.lang.Thread.run (Thread.java:748)

コメント・シェア

Netlifyをnetlify-cliで管理する

 
カテゴリー SaaS   タグ

netlify-cli

GitのWebHookを使ってCI/CDパイプラインでデプロイする、netlify-cliでデプロイした方が速い。NetlifyのWeb管理画面上ではWebHookならGitHubのCommitメッセージが表示されているが、 netlify-cliでデプロイする場合は--messageオプションで指定したメッセージを表示する。

netlify-cliのインストール

以下はWindowsでのインストールの場合。事前にNodeとnpmのインストールが必要。npm install netlify-cli -gでインストールする。

1
2
3
4
5
6
7
8
9
10
11
12
13
14
15
16
17
18
19
20
21
22
PS> npm --version
6.12.1

PS> npm install netlify-cli -g

Success! Netlify CLI has been installed!

Your device is now configured to use Netlify CLI to deploy and manage your Netlify sites.

Next steps:

netlify init Connect or create a Netlify site from current directory
netlify deploy Deploy the latest changes to your Netlify site

For more information on the CLI run netlify help
Or visit the docs at https://cli.netlify.com

npm WARN optional SKIPPING OPTIONAL DEPENDENCY: fsevents@2.1.2 (node_modules\netlify-cli\node_modules\fsevents):
npm WARN notsup SKIPPING OPTIONAL DEPENDENCY: Unsupported platform for fsevents@2.1.2: wanted {"os":"darwin","arch":"any"} (current: {"os":"win32","arch":"x64"})

+ netlify-cli@2.24.0
added 965 packages from 472 contributors in 45.944s

環境変数

NetlifyのWeb管理画面からNETLIFY_AUTH_TOKENを取得し、環境変数として設定。

netlifyコマンドによる管理

コマンドの概要

1
2
3
4
5
6
7
8
9
10
11
12
13
14
15
16
17
18
19
20
21
22
23
24
25
26
$netlify --help
Netlify command line tool

VERSION
netlify-cli/2.37.0 linux-x64 node-v12.16.1

USAGE
$ netlify [COMMAND]

COMMANDS
addons (Beta) Manage Netlify Add-ons
api Run any Netlify API method
deploy Create a new deploy from the contents of a folder
dev Local dev server
functions Manage netlify functions
help display help for netlify
init Configure continuous deployment for a new or existing site
link Link a local repo or project folder to an existing site on Netlify
login Login to your Netlify account
open Open settings for the site linked to the current folder
plugins list installed plugins
sites Handle various site operations
status Print status information
switch Switch your active Netlify account
unlink Unlink a local folder from a Netlify site
watch Watch for site deploy to finish

アカウントの設定

環境変数を設定していない場合は netlify link でアカウントをリンクする。

1
2
3
4
5
6
7
8
9
10
11
12
13
14
15
16
17
$netlify link

netlify link will connect this folder to a site on Netlify

? How do you want to link this folder to a site? Search by full or partial site name
? Enter the site name (or just part of it): <NETLIFY_USERNAME>
Looking for sites with names containing '<NETLIFY_USERNAME>'...


Directory Linked

Admin url: https://app.netlify.com/sites/<NETLIFY_USERNAME>
Site url: https://<NETLIFY_USERNAME>.netlify.com

Site id saved to /netlify-work/public/.netlify/state.json

You can now run other `netlify` cli commands in this directory

対話式で入力しないために、.netlify/state.jsonを作成する。

1
2
3
{
"siteId": "XXXXXXXXXXXXXXXXXXXXXXXXXXXXXXXXXXXX"
}

サイト一覧の表示

現在リンク中のアカウントのサイト一覧は netlify sites:list で取得する。

1
2
3
4
5
6
7
8
9
10
11
12
13
14
$netlify sites:list
Loading your sites... done

────────────────────────────┐
Current Netlify Sites │
────────────────────────────┘

Count: 1

sitename-xxxxxxx - xxxxxxxx-xxxx-xxxx-xxxx-xxxxxxxxxxxxxxx
url: https://www.example.com
repo: https://github.com/xxxxxx/reporepo
account:<NETLIFY_USERNAME>
─────────────────────────────

プレビュー環境へのデプロイ

プレビュー環境へのデプロイは netlify deploy で行う。
Live Draft URL で出力されたURLにアクセスしてプレビュー。

1
2
3
4
5
6
7
8
9
10
11
12
13
$netlify deploy --message "deploy message"
Deploy path: /netlify-work/public
Deploying to draft URL...
✔ Finished hashing 126 files
✔ CDN requesting 0 files
✔ Finished uploading 0 assets
✔ Draft deploy is live!

Logs: https://app.netlify.com/sites/<NETLIFY_USERNAME>/deploys/XXXXXXXXXXXXXXXXXXXXXXX
Live Draft URL: https://XXXXXXXXXXXXXXXXXXXXXXX--<NETLIFY_USERNAME>.netlify.com

If everything looks good on your draft URL, take it live with the --prod flag.
netlify deploy --prod

本番環境へのデプロイ

本番環境へのデプロイは netlify deploy --prod で行う。
本番環境は Live URL

1
2
3
4
5
6
7
8
9
10
11
$netlify deploy --prod --message "deploy message"
Deploy path: /netlify-work/public
Deploying to live site URL...
✔ Finished hashing 126 files
✔ CDN requesting 0 files
✔ Finished uploading 0 assets
✔ Deploy is live!

Logs: https://app.netlify.com/sites/<NETLIFY_USERNAME>/deploys/XXXXXXXXXXXXXXXXXXXXXXX
Unique Deploy URL: https://XXXXXXXXXXXXXXXXXXXXXXX--<NETLIFY_USERNAME>.netlify.com
Live URL: https://<URL>

publish directoryの指定が求められる場合

Netlifyのサイト上でpublishフォルダーを指定していない場合、netlify deployで以下のプロンプトが表示され、入力を促される。

1
Please provide a publish directory (e.g. "public" or "dist" or "."):

その場合は、netlify deploy --dir=<DIR>のように指定が可能。

コメント・シェア

CloudinaryをWebAPIで操作する

 
カテゴリー Python SaaS   タグ

インストール

pip install cloudinaryでPythonモジュールをインストール。

環境変数

CloudinaryのWeb管理画面からCLOUDINARY_URLを取得し、環境変数として設定。

Upload API

1
result = cloudinary.uploader.upload(file=upload_file_path, folder=upload_folder_name, use_filename="true", unique_filename="false", overwrite="false")

file でアップロードするファイルを指定する。
アップロード先のフォルダー名はfolderで指定し、アップロード先のファイル名はuse_filename="true"で元ファイルのファイル名を使うことができる。
デフォルトではランダムなファイル名にされるので、元のファイル名を維持したい場合はunique_filename="false"とする。

Admin API

Admin APIの制限

500 call/hourの制限があるので、大量のリソースを扱う場合は一度のAPIコールで処理する数を適切な数にする必要がある。

1
2
3
4
5
6
7
result = cloudinary.api.resources()
result.rate_limit_allowed
>>>500
result.rate_limit_remaining
>>>499
result.rate_limit_reset_at
>>>(2019, 10, 3, 08, 0, 0, 0, 1, -1)

アップロード済の画像ファイルの一覧

1
res = cloudinary.api.resources(max_results=max_results, next_cursor=next_cursor)

1回のAPIコールでmax_results(デフォルト:10、最大:500)まで返される。取得したリソースにnext_cursorが含まれるので、次のAPIコールではこれを引数として渡すことで、続きのリソースを取得できる。繰り返し実行することですべてのリソースを取得することができる。
リソースは public_id で識別する。

リソースの削除

1
cloudinary.api.delete_resources(delete_resrouces)

複数のpublic_idを指定して、まとめて削除する(最大:100)。

コメント・シェア

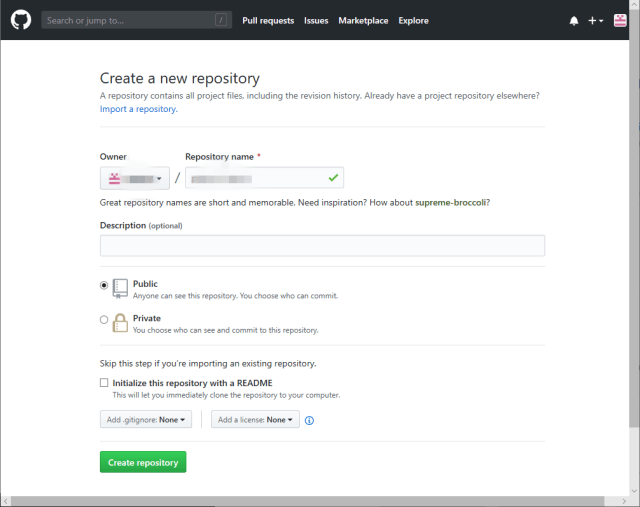
リポジトリの作成

GitHubリポジトリ作成

Step1: Create repositoryをクリックしてリポジトリを作成

GitHub リポジトリ作成 width=640

Step2: リポジトリ名とPublic/Privateを選択Create repository

GitHub リポジトリ作成 width=640

DockerHubリポジトリ作成

  • イメージ名はdockerアカウント名/dockerリポジトリ名:タグ名になる
  • pushはdocker push dockerアカウント名/dockerリポジトリ名:タグ名
  • pullはdocker pull dockerアカウント名/リポジトリ名

Step1: DockerアカウントでDockerHUBにログイン

DockerHub ログイン width=640

Step2: Create Repositoryを選択してリポジトリを作成

DockerHub リポジトリ作成 width=640

Step3: リポジトリ名とvisibility(public or private)を選択してCreate

DockerHub リポジトリ作成 width=640

Step4: 生成されたリポジトリページ

DockerHub リポジトリ作成 width=640

GitHubへのPushをトリガーに自動ビルドする

GitHubとの連携

Step1: BuildsタブのAutomated Buildを選択

DockerHub ビルド設定 width=640

Step2: GitHubにログイン

DockerHub GitHubとの連携 width=640

Step3: Authorized Dockerを選択

DockerHub GitHubとの連携 width=640

step4: Linked Accountが設定される

DockerHub GitHubとの連携 width=640

DockerHub GitHubとの連携 width=640

GitHubに対象のDockerfileをPush

作成したリポジトリにDockerfileをPush

1
2
3
4
5
6
7
8
9
10
11
12
13
14
15
16
17
18
19
20
21
22
23
24
25
26
27
28
29
PS > git init
Initialized empty Git repository in <REPOSITORY_NAME>/.git/
PS > git add README.md
PS > git commit -m "first commit"
[master (root-commit) 0d0ba66] first commit
1 file changed, 0 insertions(+), 0 deletions(-)
create mode 100644 README.md
PS > git remote add origin https://github.com/XXXXXX/<REPOSITORY_NAME>.git
PS > git push -u origin master
Counting objects: 3, done.
Writing objects: 100% (3/3), 243 bytes | 243.00 KiB/s, done.
Total 3 (delta 0), reused 0 (delta 0)
To https://github.com/XXXXXX/<REPOSITORY_NAME>.git
* [new branch] master -> master
Branch 'master' set up to track remote branch 'master' from 'origin'.
PS > git add Dockerfile
PS > git commit -m "first Dockerfile"
[master 34db485] first Dockerfile
1 file changed, 1 insertion(+)
create mode 100644 Dockerfile
PS > git push -u origin master
Counting objects: 3, done.
Delta compression using up to 4 threads.
Compressing objects: 100% (2/2), done.
Writing objects: 100% (3/3), 306 bytes | 102.00 KiB/s, done.
Total 3 (delta 0), reused 0 (delta 0)
To https://github.com/XXXXXX/<REPOSITORY_NAME>.git
0d0ba66..34db485 master -> master
Branch 'master' set up to track remote branch 'master' from 'origin'.

DockerHubのAutomated Buildsを設定する

連携したGitHubに対するPushイベントをトリガーにDockerHubでビルドを実行する。

Step1: BuildsタブのAutomated BuildLink to GitHubを選択

DockerHub GitHubとの連携 width=640

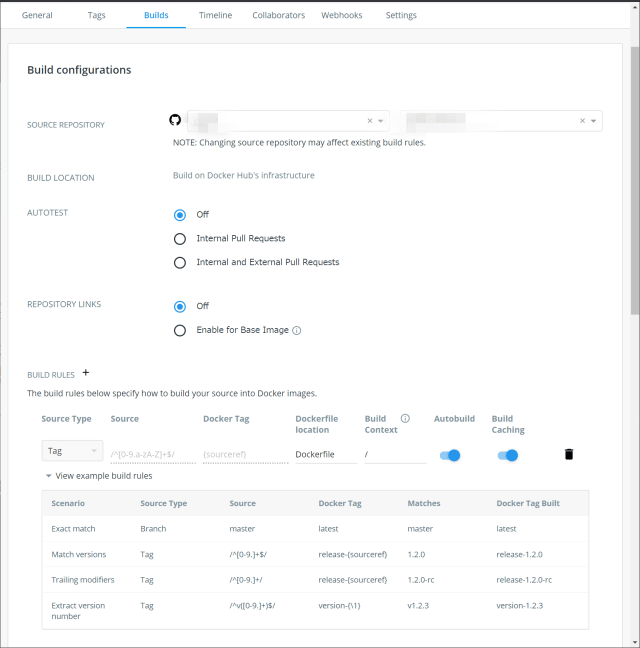
Step2: Build ConfigurationでGitHubアカウントとGitHubリポジトリ名を選択し、Save and Build

DockerHub ビルド設定 width=640

Step3: Automated Buildsの状態を確認できる

DockerHub 自動ビルド width=640

Step4: PENDINGがSUCESSに変われば終了

DockerHub 自動ビルド width=640

Step5: Tagsタブで生成されたタグを確認

DockerHub 自動ビルド width=640

Step6: Generalタブでリポジトリの情報が確認できる

DockerHub 自動ビルド width=640

自動ビルドの動作

Step1: GitHubのリポジトリを更新する

1
2
3
4
5
6
7
8
9
10
11
12
13
PS > git add -u
PS > git commit -m "update Dockerfile"
[master e8f6211] update Dockerfile
1 file changed, 2 insertions(+)
PS > git push -u origin master
Counting objects: 3, done.
Delta compression using up to 4 threads.
Compressing objects: 100% (3/3), done.
Writing objects: 100% (3/3), 334 bytes | 83.00 KiB/s, done.
Total 3 (delta 0), reused 0 (delta 0)
To https://github.com/XXXXXX/<REPOSITORY_NAME>.git
34db485..e8f6211 master -> master
Branch 'master' set up to track remote branch 'master' from 'origin'.

Step2: 処理が開始される

DockerHub 自動ビルド width=640

Step3: SUCESSになれば終了

DockerHub 自動ビルド width=640

Gitで付与したタグを使用したAutomated Builds

Step1: GitのタグをもとにDockerのタグを付与してビルドする例

DockerHub 自動ビルド width=640

Step2: タグ名を付与してPushする。

1
2
3
4
PS > git tag -a タグ名 -m 'コメント'
PS > git tag
タグ名
PS > git push origin --tags

コメント・シェア

GitHubの複数アカウントでSSH接続を使用する

 
カテゴリー Git   タグ

OpenSSHでKey-Pairを生成

ssh-keygenコマンドでキーペアを生成する。

1
2
3
4
5
6
7
8
9
10
11
12
13
14
15
16
17
18
19
20
PS > ssh-keygen -t rsa -C XXXXXXX@XXXXXXX -f XXXXXXX.key
Generating public/private rsa key pair.
Enter passphrase (empty for no passphrase):
Enter same passphrase again:
Your identification has been saved in XXXXXXX.key.
Your public key has been saved in XXXXXXX.key.pub.
The key fingerprint is:
SHA256:XXXXXXXXXXXXXXXXXXXXXXXXXX XXXXXXX@XXXXXXX
The key's randomart image is:
+---[RSA 2048]----+
| oo ...o=+B|
| . . ox=ox*|
| o ...X+++ |
| xxxxx+ |
| oSxxx=o |
| . = =.+. |
| . .o |
| . . |
| .. |
+----[SHA256]-----+

GitHubへ公開鍵を登録

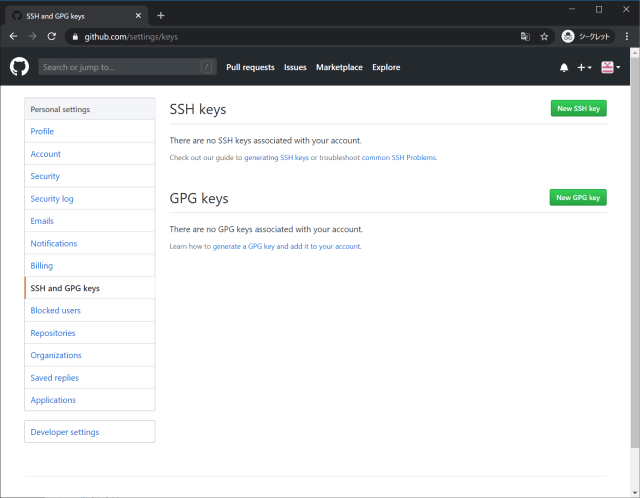
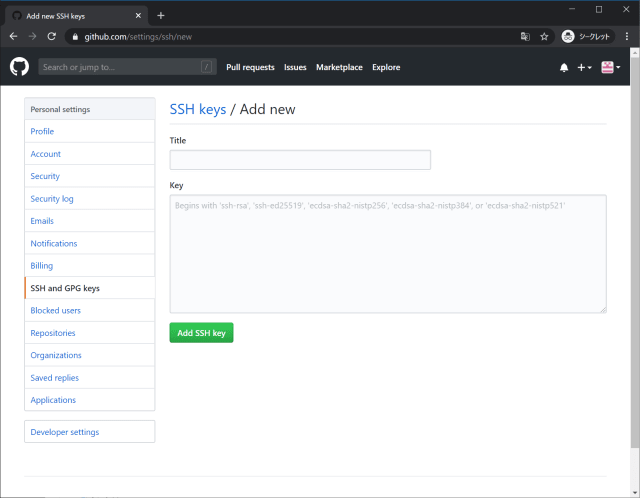
SSH and GPG keys - SSH Keys - New SSH Key

GitHub SSH-key width=640

作成した公開鍵XXXXXXX.key.pubの内容を登録する。

GitHub SSH-key width=640

ここでは他のアカウントで使用している公開鍵を登録できない。

OpenSSHで複数のGitHubに接続する設定

sshのconfigファイルを修正

Windowsの標準のssh設定フォルダー(C:\Users\ログインユーザ名\.ssh)にあるconfigファイルを以下のように構成する

1
2
3
4
5
6
7
8
9
10
11
12
13
Host github-USER_X
HostName github.com
User git
IdentityFile ~/.ssh/USER_X/priv.key
IdentitiesOnly yes
AddKeysToAgent yes

Host github-USER_Y
HostName github.com
User git
IdentityFile ~/.ssh/USER_Y/priv.key
IdentitiesOnly yes
AddKeysToAgent yes

キーペアの接続テスト

デフォルトパスで1つのみ使用する場合はssh -T git@github.comで接続確認ができるがエラーになる
デバッグはssh -vT git@github.comのようにvを付けることで詳細が出力される

1
2
PS > ssh -T git@github.com
git@github.com: Permission denied (publickey).

使用するアカウントを指定する必要があるのでconfigで指定したHostに接続する

1
2
PS > ssh -T github-USER_X
Hi USER_X! You've successfully authenticated, but GitHub does not provide shell access.

set-urlで接続先を変更

このままではgitコマンドコマンドを使用した際に接続エラーとなるため、接続先の切替を行う。

1
2
3
4
5
6
7
PS > git remote -v
origin https://github.com/XXXXXXXX/app-repo.git (fetch)
origin https://github.com/XXXXXXXX/app-repo.git (push)
PS > git remote set-url origin git@github-USER_X:USER_X/app-repo.git
PS > git remote -v
origin git@github-USER_X:USER_X/app-repo.git (fetch)
origin git@github-USER_X:USER_X/app-repo.git (push)

新しいリポジトリ作成時の初期設定

新しリポジトリ作成時は以下の設定を行う

1
2
3
4
5
6
7
8
9
10
PS > git clone https://github.com/<GIT_ACCOUNT>/<GIT_REPOSITORY_NAME>
Cloning into '<GIT_REPOSITORY_NAME>'...
remote: Enumerating objects: 3, done.
remote: Counting objects: 100% (3/3), done.
remote: Compressing objects: 100% (2/2), done.
remote: Total 3 (delta 0), reused 0 (delta 0), pack-reused 0
Unpacking objects: 100% (3/3), done.
PS <GIT_REPOSITORY_NAME>> git config --local user.name <GIT_ACCOUNT>
PS <GIT_REPOSITORY_NAME>> git config --local user.email <E-Mail>
PS <GIT_REPOSITORY_NAME>> git remote set-url origin git@github-<GIT_ACCOUNT>:<GIT_ACCOUNT>/<GIT_REPOSITORY_NAME>

コメント・シェア

aws-cliのアップデート

sudo pip install -U awscliでアップデートできるが…

1
2
3
4
5
6
7
8
9
10
11
12
13
14
15
16
17
18
19
20
21
22
23
24
25
26
27
28
29
30
31
32
33
34
35
36
37
38
39
40
41
42
43
44
45
46
47
48
49
50
51
52
53
54
55
56
57
58
59
60
61
62
63
64
65
66
67
68
$ aws --version
aws-cli/1.16.273 Python/2.7.15+ Linux/4.15.0-1058-aws botocore/1.13.17

$ sudo pip install -U awscli
The directory '/home/ubuntu/.cache/pip/http' or its parent directory is not ownd by the current user and the cache has been disabled. Please check the permissons and owner of that directory. If executing pip with sudo, you may want sudo' -H flag.
The directory '/home/ubuntu/.cache/pip' or its parent directory is not owned bythe current user and caching wheels has been disabled. check the permissions an owner of that directory. If executing pip with sudo, you may want sudo's -H flg.
Collecting awscli
Downloading https://files.pythonhosted.org/packages/fb/3b/7b5db1f1b153971fc5cbb2102547a1dd1cf21556eacd80cc6c029939b9a/awscli-1.18.2-py2.py3-none-any.whl (2.MB)
100% |????????????????????????????????| 2.9MB 395kB/s
Collecting PyYAML<5.3,>=3.10 (from awscli)
Downloading https://files.pythonhosted.org/packages/8d/c9/e5be955a117a1ac548cd31e37e8fd7b02ce987f9655f5c7563c656d5dcb/PyYAML-5.2.tar.gz (265kB)
100% |????????????????????????????????| 266kB 3.1MB/s
Collecting botocore==1.15.2 (from awscli)
Downloading https://files.pythonhosted.org/packages/0b/44/906ebd1df90c435bdee5cbca6bae7a14d94c5b33c7517fddf540dbc6823/botocore-1.15.2-py2.py3-none-any.whl (.9MB)
100% |????????????????????????????????| 5.9MB 207kB/s
Requirement already up-to-date: rsa<=3.5.0,>=3.1.2 in ./.local/lib/python2.7/sie-packages (from awscli)
Collecting s3transfer<0.4.0,>=0.3.0 (from awscli)
Downloading https://files.pythonhosted.org/packages/69/79/e6afb3d8b0b4e96cefbc690f741d7dd24547ff1f94240c997a26fa908d3/s3transfer-0.3.3-py2.py3-none-any.whl 69kB)
100% |????????????????????????????????| 71kB 10.7MB/s
Requirement already up-to-date: docutils<0.16,>=0.10 in ./.local/lib/python2.7/ite-packages (from awscli)
Collecting colorama<0.4.4,>=0.2.5; python_version != "3.4" (from awscli)
Downloading https://files.pythonhosted.org/packages/c9/dc/45cdef1b4d119eb9631b3117e6d5708a08029992b2fee2c143c7a0a5cc5/colorama-0.4.3-py2.py3-none-any.whl
Requirement already up-to-date: jmespath<1.0.0,>=0.7.1 in ./.local/lib/python2./site-packages (from botocore==1.15.2->awscli)
Collecting python-dateutil<3.0.0,>=2.1 (from botocore==1.15.2->awscli)
Downloading https://files.pythonhosted.org/packages/d4/70/d60450c3dd48ef8758624207ae8907090de0b306af2bce5d134d78615cb/python_dateutil-2.8.1-py2.py3-none-anywhl (227kB)
100% |????????????????????????????????| 235kB 5.3MB/s
Collecting urllib3<1.26,>=1.20; python_version != "3.4" (from botocore==1.15.2-awscli)
Downloading https://files.pythonhosted.org/packages/e8/74/6e4f91745020f967d0932bb2b8b9b10090957334692eb88ea4afe91b77f/urllib3-1.25.8-py2.py3-none-any.whl (15kB)
100% |????????????????????????????????| 133kB 8.6MB/s
Collecting pyasn1>=0.1.3 (from rsa<=3.5.0,>=3.1.2->awscli)
Downloading https://files.pythonhosted.org/packages/62/1e/a94a8d635fa3ce4cfc7506003548d0a2447ae76fd5ca53932970fe3053f/pyasn1-0.4.8-py2.py3-none-any.whl (77k)
100% |????????????????????????????????| 81kB 10.9MB/s
Requirement already up-to-date: futures<4.0.0,>=2.2.0; python_version == "2.7" n ./.local/lib/python2.7/site-packages (from s3transfer<0.4.0,>=0.3.0->awscli)
Collecting six>=1.5 (from python-dateutil<3.0.0,>=2.1->botocore==1.15.2->awscli
Downloading https://files.pythonhosted.org/packages/65/eb/1f97cb97bfc2390a27669c6fae16075da282f5058082d4cb10c6c5c1dba/six-1.14.0-py2.py3-none-any.whl
Installing collected packages: PyYAML, six, python-dateutil, urllib3, botocore,s3transfer, colorama, awscli, pyasn1
Found existing installation: PyYAML 5.1.2
Uninstalling PyYAML-5.1.2:
Successfully uninstalled PyYAML-5.1.2
Running setup.py install for PyYAML ... done
Found existing installation: six 1.13.0
Uninstalling six-1.13.0:
Successfully uninstalled six-1.13.0
Found existing installation: python-dateutil 2.8.0
Uninstalling python-dateutil-2.8.0:
Successfully uninstalled python-dateutil-2.8.0
Found existing installation: urllib3 1.25.7
Uninstalling urllib3-1.25.7:
Successfully uninstalled urllib3-1.25.7
Found existing installation: botocore 1.13.17
Uninstalling botocore-1.13.17:
Successfully uninstalled botocore-1.13.17
Found existing installation: s3transfer 0.2.1
Uninstalling s3transfer-0.2.1:
Successfully uninstalled s3transfer-0.2.1
Found existing installation: colorama 0.4.1
Uninstalling colorama-0.4.1:
Successfully uninstalled colorama-0.4.1
Found existing installation: awscli 1.16.273
Uninstalling awscli-1.16.273:
Successfully uninstalled awscli-1.16.273
Found existing installation: pyasn1 0.4.7
Uninstalling pyasn1-0.4.7:
Successfully uninstalled pyasn1-0.4.7
Successfully installed PyYAML-5.2 awscli-1.18.2 botocore-1.15.2 colorama-0.4.3 yasn1-0.4.8 python-dateutil-2.8.1 s3transfer-0.3.3 six-1.14.0 urllib3-1.25.8

$ /usr/local/bin/aws --version
aws-cli/1.18.2 Python/2.7.15+ Linux/4.15.0-1058-aws botocore/1.15.2

謎のエラー発生

アップデート後にaws-cliを実行するとImportError: No module named rsaが発生。

1
2
3
4
5
6
7
8
9
10
11
12
13
14
15
16
17
18
Traceback (most recent call last):
File "/usr/local/bin/aws", line 27, in <module>
sys.exit(main())
File "/usr/local/bin/aws", line 23, in main
return awscli.clidriver.main()
File "/usr/local/lib/python2.7/dist-packages/awscli/clidriver.py", line 68, in main
driver = create_clidriver()
File "/usr/local/lib/python2.7/dist-packages/awscli/clidriver.py", line 78, in create_clidriver
event_hooks=session.get_component('event_emitter'))
File "/usr/local/lib/python2.7/dist-packages/awscli/plugin.py", line 44, in load_plugins
modules = _import_plugins(plugin_mapping)
File "/usr/local/lib/python2.7/dist-packages/awscli/plugin.py", line 61, in _import_plugins
module = __import__(path, fromlist=[module])
File "/usr/local/lib/python2.7/dist-packages/awscli/handlers.py", line 28, in <module>
from awscli.customizations.cloudfront import register as register_cloudfront
File "/usr/local/lib/python2.7/dist-packages/awscli/customizations/cloudfront.py", line 17, in <module>
import rsa
ImportError: No module named rsa

対応策

Exceptions with the latest release #641を参考に、sudo pip install awscli --force-reinstall --upgradeで再インストールによって復旧

コメント・シェア

CI/CDワークフローGitOps

 
カテゴリー CI/CD   タグ

GitOps

Operations by Pull Request

GitをSingle Source of Truthとして扱い、ほぼすべての操作をGitを介して行う。

  • 宣言的なリソースプロビジョニングとデプロイ
  • システム全体が単一のGitリポジトリで管理される
  • 運用上の変更はPull Requestを介して行う
  • diffツールで差異を検知しアラートを通知。syncツールで収束することが可能
  • ロールバックや監査ログもGit経由で行う

What exactly is GitOps? By using Git as our source of truth, we can operate almost everything. For example, version control, history, peer review, and rollback happen through Git without needing to poke around with tools like kubectl.

  • Our provisioning of AWS resources and deployment of k8s is declarative
  • Our entire system state is under version control and described in a single Git repository
  • Operational changes are made by pull request (plus build & release pipelines)
  • Diff tools detect any divergence and notify us via Slack alerts; and sync tools enable convergence
  • Rollback and audit logs are also provided via Git
    GitOps width=640

Continuous Delivery and GitOps Workflows

開発者はGitを扱える前提のPull Requestベースのソフトウェアデリバリーフローになっている。

  1. 新機能のレビューのためPull RequestがGitHubにPushされる
  2. Pull Requestはレビューと承認の後、GitにMergeされる
  3. GitのMergeをトリガーにCIとBuild Pipelineが実行され、コンテナイメージがレジストリにPushされる
  4. ‘Deployment Automator’ がコンテナイメージレジストリの変更を検知し、構成リポジトリのマニフェストファイルを更新
  5. ‘Deployment Synchronizer’ がクラスター(稼働中のクラスター)が古いことを検知し、変更されたマニフェストファイルを構成リポジトリから取得し、クラスターにデプロイする
  1. A pull request for a new feature is pushed to GitHub for review.
  2. The code is reviewed and approved by a colleague. After the code is revised, and re-approved it is merged to Git.
  3. The Git merge triggers the CI and build pipeline, runs a series of tests and then eventually builds a new image and deposits to the new image to a registry.
  4. The Weave Cloud ‘Deployment Automator’ watches the image registry, notices the image, pulls the new image from the registry and updates its YAML in the config repo.
  5. The Weave Cloud ‘Deployment Synchronizer’ (installed to the cluster), detects that the cluster is out of date. It pulls the changed manifests from the config repo and deploys the new feature to production.
    GitOps width=640

Pull pipeline & Push pipleline

一般的なCI/CDツールはPushベースのモデルで、CIをトリガーにデプロイまで行う。このモデルの問題点は本番クラスターの外部に認証情報を公開する必要があるということ。一方、GitOpsではPullベースのモデルで、クラスターが変更を検知して自動的に同期するため、外部に認証情報を持つ必要がない。
(ここはWeaveWorksの宣伝ポイント)

Most CI/CD tools available today use a push-based model. A push-based pipeline means that code starts with the CI system and may continue its path through a series of encoded scripts or uses ‘kubectl’ by hand to push any changes to the Kubernetes cluster.
The reason you don’t want to use your CI system as the deployment impetus or do it manually on the command line is because of the potential to expose credentials outside of your cluster. While it is possible to secure both your CI/CD scripts and the command line, you are working outside the trust domain of your cluster. This is generally not good practice and is why CI systems can be known as attack vectors for production.
GitOps width=640
GitOps width=640

GitOps Tools

CloudGenesis

GitOps with Weave Flux

Atlantis

コメント・シェア


nullpo

めも


募集中


Japan