GitHub APIでSecretを同期する

 
カテゴリー CI/CD Git Python   タグ

.envファイルとGitHub Secretの同期

環境変数を記述した.envファイルの内容とGitHUbのSecretを同期する。

GitHub APIでSecretsを操作する

  • REST API v3 Secrets

  • 一覧取得 GET /repos/:owner/:repo/actions/secrets

  • Secret取得 GET /repos/:owner/:repo/actions/secrets/:secret_name

  • Secret更新 PUT /repos/:owner/:repo/actions/secrets/:secret_name

Name Type Description
encrypted_value string Value for your secret, encrypted with LibSodium using the public key retrieved from the Get a repository public key endpoint.
key_id string ID of the key you used to encrypt the secret.

暗号化した値を作成する必要がある。

Pythonの例は以下だが、GET /repos/:owner/:repo/actions/secrets/public-keyからpublic-keyを取得する必要がある。

1
2
3
4
5
6
7
8
9
from base64 import b64encode
from nacl import encoding, public

def encrypt(public_key: str, secret_value: str) -> str:
"""Encrypt a Unicode string using the public key."""
public_key = public.PublicKey(public_key.encode("utf-8"), encoding.Base64Encoder())
sealed_box = public.SealedBox(public_key)
encrypted = sealed_box.encrypt(secret_value.encode("utf-8"))
return b64encode(encrypted).decode("utf-8")

登録/削除

シークレットの登録~削除の流れは以下。secret_value.pyは前述のスクリプトをコマンドライン引数を受けて実行するようにしたもの。

1
2
3
4
5
6
7
8
9
10
11
12
13
14
15
16
17
18
19
20
21
22
23
24
25
26
27
28
29
30
31
32
33
34
35
36
37
38
39
40
41
42
43
44
45
46
47
48
49
50
51
52
53
PUBLIC_KEY=$(curl --silent -H "Authorization: token ${GITHUB_TOKEN}" "https://api.github.com/repos/${GITHUB_USER}/${REPO_NAME}/actions/secrets/public-key" | jq '.key')
PUBLIC_KEYID=$(curl --silent -H "Authorization: token ${GITHUB_TOKEN}" "https://api.github.com/repos/${GITHUB_USER}/${REPO_NAME}/actions/secrets/public-key" | jq '.key_id')
ENCRYPTED_VALUE=$(python secret_value.py ${PUBLIC_KEY} ${SECRET_VALUE})

$ curl -H "Authorization: token ${GITHUB_TOKEN}" -X PUT -d "{ \"encrypted_value\": \"${ENCRYPTED_VALUE}\", \"key_id\": \"${PUBLIC_KEYID}\" }" -i "https://api.github.com/repos/${GITHUB_USER}/${REPO_NAME}/actions/secrets/testkey"
HTTP/1.1 201 Created
…略…

$ curl -H "Authorization: token ${GITHUB_TOKEN}" -i "https://api.github.com/repos/${GITHUB_USER}/${REPO_NAME}/actions/secrets"
HTTP/1.1 200 OK
…略…

{
"total_count": 1,
"secrets": [
{
"name": "testkey",
"created_at": "2020-05-21T03:30:27Z",
"updated_at": "2020-05-21T03:30:27Z"
}
]
}

$ curl -H "Authorization: token ${GITHUB_TOKEN}" -i "https://api.github.com/repos/${GITHUB_USER}/${REPO_NAME}/actions/secrets/testkey"
HTTP/1.1 200 OK
…略…
{
"name": "testkey",
"created_at": "2020-05-21T03:30:27Z",
"updated_at": "2020-05-21T03:30:27Z"
}

$ curl -H "Authorization: token ${GITHUB_TOKEN}" -X DELETE -i "https://api.github.com/repos/${GITHUB_USER}/${REPO_NAME}/actions/secrets/testkey"
HTTP/1.1 204 No Content
…略…

$ curl -H "Authorization: token ${GITHUB_TOKEN}" -i "https://api.github.com/repos/${GITHUB_USER}/${REPO_NAME}/actions/secrets/testkey"
HTTP/1.1 404 Not Found
…略…
{
"message": "Not Found",
"documentation_url": "https://developer.github.com/v3/actions/secrets/#get-a-secret"
}

$ curl -H "Authorization: token ${GITHUB_TOKEN}" -i "https://api.github.com/repos/${GITHUB_USER}/${REPO_NAME}/actions/secrets"
HTTP/1.1 200 OK
…略…
{
"total_count": 0,
"secrets": [

]
}

コメント・シェア

OneDriveが同期に失敗してクラッシュ

同期しようとして…クラッシュ。
何度再起動してもクラッシュするようになってしまった。

OneDrive width=320

1
2
3
4
5
6
7
8
9
10
11
障害が発生しているアプリケーション名: OneDrive.exe、バージョン: 20.52.311.11、タイム スタンプ: 0x95f7bd77
障害が発生しているモジュール名: SyncEngine.DLL、バージョン: 20.52.311.11、タイム スタンプ: 0x12301d0c
例外コード: 0xc0000005
障害オフセット: 0x0010080e
障害が発生しているプロセス ID: 0x1ee8
障害が発生しているアプリケーションの開始時刻: 0x01d62f0647ccdb4b
障害が発生しているアプリケーション パス: C:\Users\XXXX\AppData\Local\Microsoft\OneDrive\OneDrive.exe
障害が発生しているモジュール パス: C:\Users\XXXX\AppData\Local\Microsoft\OneDrive\20.052.0311.0011\SyncEngine.DLL
レポート ID: 56XXXXfd-XXXX-XXXX-a9c3-9360XXXXf3e7
障害が発生しているパッケージの完全な名前:
障害が発生しているパッケージに関連するアプリケーション ID:

状態をリセットする

コマンドプロンプトでOneDriveをリセットする。

1
C:\Users\ユーザ名\AppData\Local\Microsoft\OneDrive\OneDrive.exe /reset

Ctrl+Rのコマンド実行から%localappdata%を使用して省略実行。

1
%localappdata%\Microsoft\OneDrive\OneDrive.exe /reset

大量のファイルが再チェックされる。

OneDrive width=320

うまくマージできなかったファイルはコピーが残り、通知される。

OneDrive width=320

コメント・シェア

Windows Power Toys

 
カテゴリー Windows   タグ

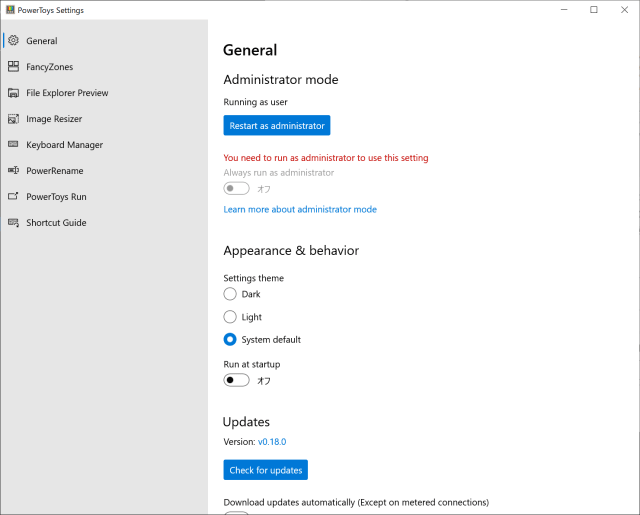
Windows Power Toys v0.18

GitHubで公開されている。

PowerToys width=640

FancyZones

シフトキー押しながらWindowを移動すると、設定したレイアウトに配置できる。

PowerToys width=640

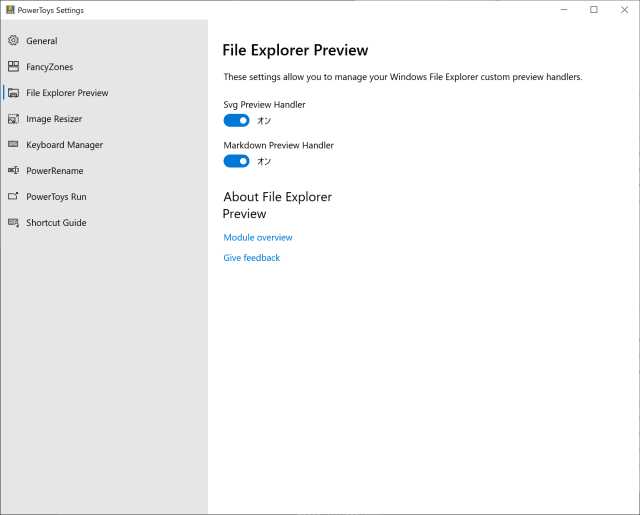
File Explorer Preview

エクスプローラーのプレビュー機能にSVGとMarkdownを追加。

PowerToys width=640

Image Resizer

画像ファイルリサイズ機能。

PowerToys width=640

Keyboard Manager

キーボードのショートカットリマッピング。

PowerToys width=640

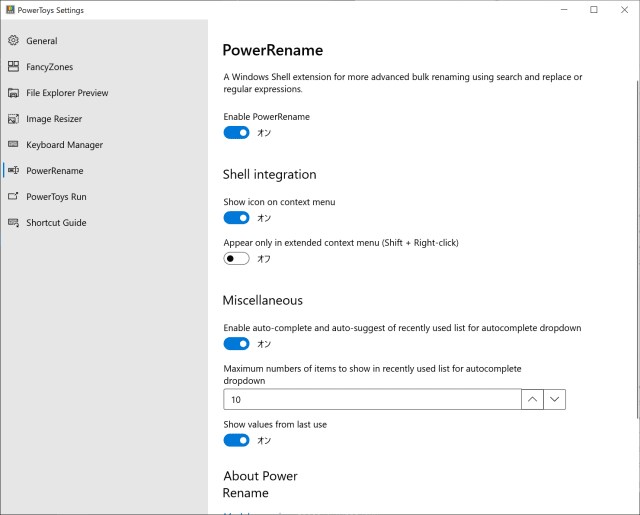
PowerRename

正規表現を使ったファイルリネーム。

PowerToys width=640

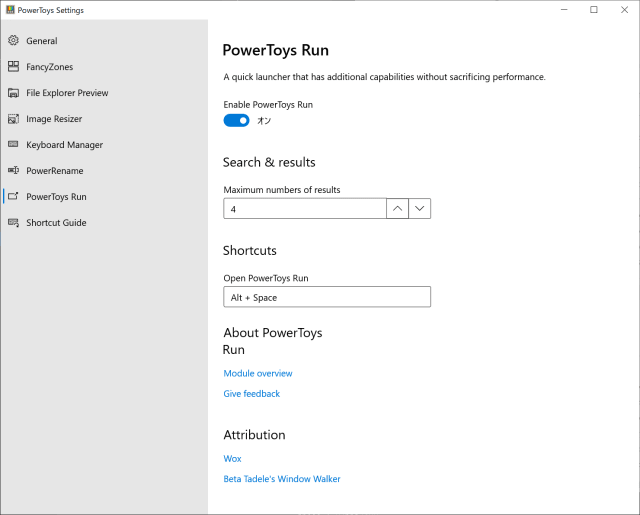
PowerToys Run

ランチャー機能。

PowerToys width=640

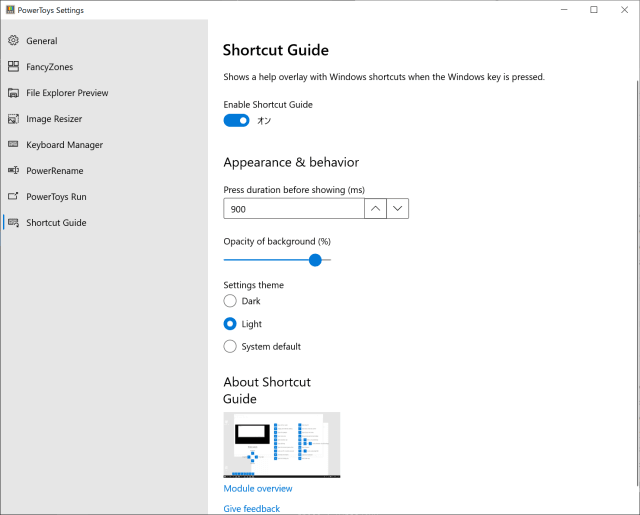
Shortcut Guide

ショートカットガイド機能。

PowerToys width=640

コメント・シェア

GitHub API

 
カテゴリー CI/CD Git   タグ

GitHub API

GitHub APIを使えば、GitHUbのWeb UI上で行っていた操作を自動化することができる。

Personal access token

APIの操作では認証にアクセストークを使用するので、あらかじめ作成しておく。

GitHubユーザのSettings -> Developer settings -> Personal access tokensで生成

GitHub PersonalAccessToken width=640

GitHub PersonalAccessToken width=640

認証とレートリミット

Basic authentication

ベーシック認証。

1
curl -u "username" https://api.github.com

OAuth2 token (sent in a header)

OAuth2認証。GitHubはトークンを使った認証を推奨。

1
curl -H "Authorization: token OAUTH-TOKEN" https://api.github.com

レートリミット

For unauthenticated requests, the rate limit allows for up to 60 requests per hour. Unauthenticated requests are associated with the originating IP address, and not the user making requests.

未認証の場合、60req/hourのレートリミットがある。

For API requests using Basic Authentication or OAuth, you can make up to 5000 requests per hour. Authenticated requests are associated with the authenticated user, regardless of whether Basic Authentication or an OAuth token was used. This means that all OAuth applications authorized by a user share the same quota of 5000 requests per hour when they authenticate with different tokens owned by the same user.

認証した場合は、5000req/hourまで利用できる。

認証なしの場合

認証なしで実行した場合、X-RateLimit-Limit: 60となっている。

1
2
3
4
5
6
7
$curl -i https://api.github.com/users/octocat/orgs
HTTP/1.1 200 OK
…略…
X-Ratelimit-Limit: 60
X-Ratelimit-Remaining: 58
X-Ratelimit-Reset: 1589977195
…略…

認証ありの場合

認証ありで実行した場合、X-RateLimit-Limit: 5000となっている。

ベーシック認証の場合、curl -uでユーザ名を指定。

1
2
3
4
5
6
7
8
$curl -u ${GITHUB_USER} -i "https://api.github.com/users/${GITHUB_USER}/orgs"
Enter host password for user 'XXXXXX':
HTTP/1.1 200 OK
…略…
X-RateLimit-Limit: 5000
X-RateLimit-Remaining: 4998
X-RateLimit-Reset: 1589977514
…略…

アクセストークンを使う場合、Authorizationヘッダーでトークンを指定。
アクセストークン等は何度も使用するので、環境変数で設定する。

1
2
3
4
5
6
7
$curl -H "Authorization: token ${GITHUB_TOKEN}" -i "https://api.github.com/users/${GITHUB_USER}/orgs"
HTTP/1.1 200 OK
…略…
X-RateLimit-Limit: 5000
X-RateLimit-Remaining: 4999
X-RateLimit-Reset: 1590012456
…略…

リポジトリ操作

トークンの権限

アクセストークンの権限でrepoを許可しておく必要がある。

1
2
3
4
5
6
7
repo Full control of private repositories
repo:status Access commit status
repo_deployment Access deployment status
public_repo Access public repositories
repo:invite Access repository invitations
security_events Read and write security events
delete_repo Delete repositories

リポジトリ作成

リポジトリ作成ではJSON形式で設定を行い、https://api.github.com/user/reposにPOSTする。

1
2
3
4
5
6
7
8
9
10
11
12
13
14
15
16
17
18
19
20
21
22
23
24
25
26
27
$ curl -H "Authorization: token ${GITHUB_TOKEN}" \
-X POST -H "Content-type: application/json" \
-d "{
\"name\": \"${REPO_NAME}\",
\"description\": \"This is ${REPO_NAME}\",
\"homepage\": \"https://github.com\",
\"private\": false,
\"has_issues\": true,
\"has_wiki\": true,
\"has_downloads\": true
}" \
-i "https://api.github.com/user/repos"
HTTP/1.1 201 Created
…略…
X-Accepted-OAuth-Scopes: public_repo, repo
Location: https://api.github.com/repos/<GITHUBUSER>/test_repo
X-GitHub-Media-Type: github.v3; format=json
…略…

{
"id": 26XXXXX770,
"node_id": "MDEwOlXXXXXXXXXXXXjU2OTU3NzA=",
"name": "test_repo",
"full_name": "<GITHUBUSER>/test_repo",
"private": false,
…略…
}

エラーの場合

1
2
3
4
5
6
HTTP/1.1 400 Bad Request
…略…
{
"message": "Problems parsing JSON",
"documentation_url": "https://developer.github.com/v3/repos/#create"
}

リポジトリ情報取得

1
2
3
4
5
6
7
8
9
10
11
$ curl -H "Authorization: token ${GITHUB_TOKEN}" -i "https://api.github.com/repos/${GITHUB_USER}/test_repo"
HTTP/1.1 200 OK
…略…

{
"id": 26XXXXX770,
"node_id": "MDEXXXXXXXXXXXXXXOTU3NzA=",
"name": "test_repo",
"full_name": "<GITHUBUSER>/test_repo",
"private": false,
…略…

リポジトリ削除

アクセストークンの権限でdelete_repoを許可しておく必要がある。

1
2
3
$ curl -H "Authorization: token ${GITHUB_TOKEN}" -X DELETE -i "https://api.github.com/repos/${GITHUB_USER}/test_repo"
HTTP/1.1 204 No Content
…略…

権限がない場合は以下のエラーに。

1
2
3
4
5
6
7
8
9
$ curl -H "Authorization: token ${GITHUB_TOKEN}" -i "https://api.github.com/repos/${GITHUB_USER}/test_repo"
curl -H "Authorization: token ${GITHUB_TOKEN}" -X DELETE -i "https://api.github.com/repos/${GITHUB_USER}/test_repo"
HTTP/1.1 403 Forbidden
…略…

{
"message": "Must have admin rights to Repository.",
"documentation_url": "https://developer.github.com/v3/repos/#delete-a-repository"
}

コメント・シェア

self-hosted runner

Self-hosted runners:

  • Receive automatic updates for the self-hosted runner application only. You are responsible updating the operating system and all other software.
  • Can use cloud services or local machines that you already pay for.
  • Are customizable to your hardware, operating system, software, and security requirements.
  • Don’t need to have a clean instance for every job execution.
  • Are free to use with GitHub Actions, but you are responsible for the cost of maintaining your runner machines.
  • Self-hosted runnnerアプリのみ自動アップデート。OS等は自身でメンテナンス。
  • クラウドサービスやローカルマシン上で実行できる
  • OSやハードウェアを自由にカスタマイズ
  • ジョブ実行のたびにクリーンなインスタンスとする必要はない
  • GitHub Actionsと組み合わせて無料で利用できるが、Runnnerマシンのメンテナスは自分で行う

A self-hosted runner is automatically removed from GitHub if it has not connected to GitHub Actions for more than 30 days.

30日以上接続されない場合はGitHubから削除される。

The self-hosted runner application communicates with GitHub using the HTTPS protocol for inbound and outbound traffic. You must ensure that the machine has the appropriate network access to communicate with the GitHub URLs listed below.

1
2
3
github.com
api.github.com
*.actions.githubusercontent.com

GitHubとの通信はHTTPSで行われる。

RunnnerホストでLISTENするわけではないので、NAPTを介してもOK。

self-hosted runnerを登録する

Settings -> Actions -> Self-hosted runnesAdd Runnerをクリック

GitHub Actions Runner width=640

Runnerホスト上で実行するコマンドが表示されるので、順次実行する。

GitHub Actions Runner width=640

Runnerホストでコマンド実行する

表示されたコマンドを実行していく。./run.shを実行すると待機状態になる。

1
2
3
4
5
6
7
8
9
10
11
12
13
14
15
16
17
18
19
20
21
22
23
24
25
26
27
28
29
30
31
32
33
34
35
36
37
38
39
40
41
42
43
local-ubuntu:~$ mkdir actions-runner && cd actions-runner
local-ubuntu:~/actions-runner$ curl -O -L https://github.com/actions/runner/releases/download/v2.169.0/actions-runner-linux-x64-2.169.0.tar.gz
% Total % Received % Xferd Average Speed Time Time Time Current
Dload Upload Total Spent Left Speed
100 652 100 652 0 0 1684 0 --:--:-- --:--:-- --:--:-- 1684
100 72.0M 100 72.0M 0 0 3492k 0 0:00:21 0:00:21 --:--:-- 6134k
local-ubuntu:~/actions-runner$ tar xzf ./actions-runner-linux-x64-2.169.0.tar.gz
local-ubuntu:~/actions-runner$ ./config.sh --url https://github.com/XXXXXXX/XXXXXXX --token XXXXXXXXXXXXXXXXXXXXXX

--------------------------------------------------------------------------------
| ____ _ _ _ _ _ _ _ _ |
| / ___(_) |_| | | |_ _| |__ / \ ___| |_(_) ___ _ __ ___ |
| | | _| | __| |_| | | | | '_ \ / _ \ / __| __| |/ _ \| '_ \/ __| |
| | |_| | | |_| _ | |_| | |_) | / ___ \ (__| |_| | (_) | | | \__ \ |
| \____|_|\__|_| |_|\__,_|_.__/ /_/ \_\___|\__|_|\___/|_| |_|___/ |
| |
| Self-hosted runner registration |
| |
--------------------------------------------------------------------------------

# Authentication


√ Connected to GitHub

# Runner Registration

Enter the name of runner: [press Enter for local-ubuntu]

√ Runner successfully added
√ Runner connection is good

# Runner settings

Enter name of work folder: [press Enter for _work]

√ Settings Saved.

local-ubuntu:~/actions-runner$ ./run.sh

√ Connected to GitHub

2020-05-19 07:48:19Z: Listening for Jobs

登録された状態を確認する

登録されたホストが表示され、Idle状態となっている。

GitHub Actions Runner width=640

runs-on: self-hostedを設定し、ジョブを実行する。
この例ではdocker-composeが入っていないホストのためエラーになっているが、Runnerホストの作成した_workディレクトリ上で実行されていることを確認することができる。

GitHub Actions Runner width=640

Runnerホストを終了する

Runnerホスト側で.run.shを停止する。

1
2
3
4
2020-05-19 07:48:19Z: Listening for Jobs
2020-05-19 07:53:38Z: Running job: XXXXXXXXXXX
2020-05-19 07:53:52Z: Job XXXXXXXXXXX completed with result: Failed
^CExiting...

GitHub側ではOfflineとなる。

GitHub Actions Runner width=640

実行後のRunnerホストでは、_workに実行時の状態が残っている。

1
2
3
4
5
local-ubuntu:~/actions-runner$ ls
_diag _work actions-runner-linux-x64-2.169.0.tar.gz bin config.sh env.sh externals run.sh svc.sh
local-ubuntu:~/actions-runner$ cd _work
local-ubuntu:~/actions-runner/_work$ ls
_PipelineMapping _actions _temp _tool <XXXXXXXXXXX>

コメント・シェア

GitHub Actionsの実行結果を確認する

GitHubのWebUIで確認する

Actionsタブから実行結果を確認できる。
WebUIの画面で対象のワークフローを選択すると、過去の実行履歴が表示される。履歴を選択すると詳細を確認できる。

GitHub Actions Result width=640

バッジで確認する

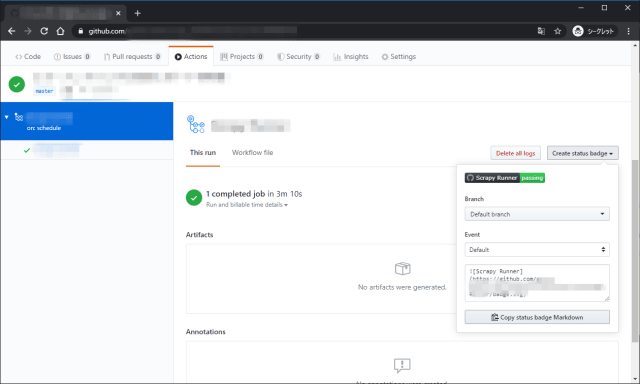
バッジで最終実行結果の状態を見ることができる。
Markdownが表示されるのでREADME.mdに貼っておけば、リポジトリのトップページで確認できる。

GitHub Actions Result width=640

通常のログ

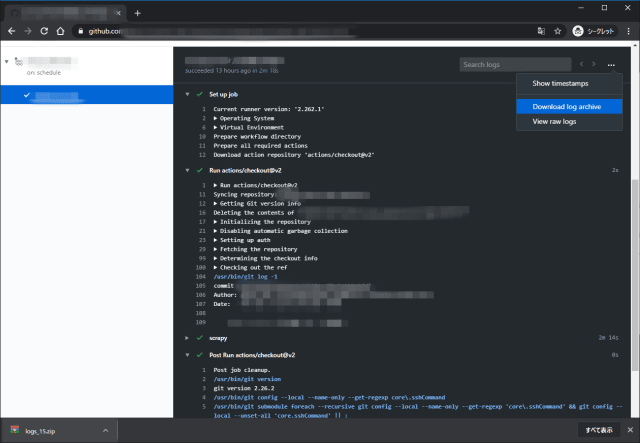
ワークフローのを選択すると詳細を確認できる。各ステップのログがそれぞれ表示され、ログの閲覧やダウンロードなどが可能。

生ログの閲覧。

GitHub Actions Log width=640

ログのダウンロード。

GitHub Actions Log width=640

GitHub Actionsのワークフローデバッグ

デバッグログを出力して実行の詳細を記録することができる。

Enabling debug logging

Runner diagnostic logging provides additional log files that contain information about how a runner is executing a job. Two extra log files are added to the log archive:

  • The runner process log, which includes information about coordinating and setting up runners to execute jobs.
  • The worker process log, which logs the execution of a job.
  1. To enable runner diagnostic logging, set the following secret in the repository that contains the workflow: ACTIONS_RUNNER_DEBUG to true.
  2. To download runner diagnostic logs, download the log archive of the workflow run. The runner diagnostic logs are contained in the runner-diagnostic-logs folder. For more information on downloading logs, see “Downloading logs.”
  1. secretでACTIONS_RUNNER_DEBUGtrueで設定する。
  2. 作成されたログはダウンロードしたZIPファイル内のrunner-diagnostic-logsにある。

runner-diagnostic-logs内にはBuild UnknownBuildNumber-<リポジトリ名>.zipのアーカイブがあり、以下のファイルがある。

1
2
3
4
5
Mode                LastWriteTime         Length Name
---- ------------- ------ ----
-a---- 2020/05/19 17:07 11424 Runner_20200519-170525-utc.log
-a---- 2020/05/19 17:05 1338 Worker_20200519-170519-utc.log
-a---- 2020/05/19 17:07 61565 Worker_20200519-170530-utc.log

Enabling step debug logging

Step debug logging increases the verbosity of a job’s logs during and after a job’s execution.

  1. To enable step debug logging, you must set the following secret in the repository that contains the workflow: ACTIONS_STEP_DEBUG to true.
  2. After setting the secret, more debug events are shown in the step logs. For more information, see “Viewing logs to diagnose failures”.
  1. secretでACTIONS_STEP_DEBUGtrueで設定する。
  2. 設定後ステップログでデバッグイベントが出力される。

ログに[debug]の付いた行が追加されている。画面上ではパープルでハイライトされ、より詳細なステップログになっている。

GitHub Actions Log width=640

1
2
3
4
5
6
7
8
9
10
11
12
13
##[debug]Starting: Complete job
Uploading runner diagnostic logs
##[debug]Starting diagnostic file upload.
##[debug]Setting up diagnostic log folders.
##[debug]Creating diagnostic log files folder.
##[debug]Copying 2 worker diagnostic logs.
##[debug]Copying 1 runner diagnostic logs.
##[debug]Zipping diagnostic files.
##[debug]Uploading diagnostic metadata file.
##[debug]Diagnostic file upload complete.
Completed runner diagnostic log upload
Cleaning up orphan processes
##[debug]Finishing: Complete job

コメント・シェア

Scrapyで処理を中断して例外をスローする

 
カテゴリー Lua Python   タグ

Scrapyを中断するには

Scrapyのクローリングは失敗があっても統計情報に記録しつつ最後まで実行する。ページの取得失敗やパイプラインでの処理失敗などで処理を中断したい場合は適切な例外をスローする必要がある。
例外はBuilt-in Exceptions referenceで示されている。

Spiderでの例外

典型的なサンプルがExceptionsのリファレンスに記載されている。response.bodyに帯域超過を示すメッセージがあれば、CloseSpiderをスローして終了するサンプル。

1
2
3
def parse_page(self, response):
if 'Bandwidth exceeded' in response.body:
raise CloseSpider('bandwidth_exceeded')

ItemPipelineでの例外

典型的なサンプルがItemPipelineのリファレンスに記載されている。Itemにpriceという項目が無ければDropItemをスローして終了するサンプル。

1
2
3
4
5
6
7
8
9
10
11
12
13
from scrapy.exceptions import DropItem

class PricePipeline:

vat_factor = 1.15

def process_item(self, item, spider):
if item.get('price'):
if item.get('price_excludes_vat'):
item['price'] = item['price'] * self.vat_factor
return item
else:
raise DropItem("Missing price in %s" % item)

例外を発生させたときの挙動

公式チュートリアルのQuotesSpiderをカスタマイズして、Spiderを中断する例外をスローする。
コールバックのparser()はただ中断される。

1
2
3
4
5
6
7
8
9
10
11
12
13
14
15
16
17
18
19
20
21
22
import scrapy
from scrapy.exceptions import CloseSpider

class QuotesSpider(scrapy.Spider):
name = "quotes"
start_urls = [
'http://quotes.toscrape.com/page/1/',
]

def parse(self, response):
raise CloseSpider("Force Close!!!!!!")
for quote in response.css('div.quote'):
yield {
'text': quote.css('span.text::text').get(),
'author': quote.css('small.author::text').get(),
'tags': quote.css('div.tags a.tag::text').getall(),
}

next_page = response.css('li.next a::attr(href)').get()
if next_page is not None:
next_page = response.urljoin(next_page)
yield scrapy.Request(next_page, callback=self.parse)

中断された場合、finish_reasonに指定したエラーメッセージが設定される。

1
2
3
4
5
6
7
8
9
10
11
12
13
14
15
16
17
18
19
20
21
22
23
24
25
26
27
28
29
30
31
2020-05-18 XX:XX:XX [scrapy.core.engine] INFO: Spider opened
2020-05-18 XX:XX:XX [scrapy.extensions.logstats] INFO: Crawled 0 pages (at 0 pages/min), scraped 0 items (at 0 items/min)
2020-05-18 XX:XX:XX [scrapy.extensions.telnet] INFO: Telnet console listening on 127.0.0.1:6023
2020-05-18 XX:XX:XX [scrapy.core.engine] DEBUG: Crawled (404) <GET http://quotes.toscrape.com/robots.txt> (referer: None)
2020-05-18 XX:XX:XX [scrapy.core.engine] DEBUG: Crawled (200) <GET http://quotes.toscrape.com/page/1/> (referer: None)
2020-05-18 XX:XX:XX [scrapy.core.engine] INFO: Closing spider (Force Close!!!!!!)
2020-05-18 XX:XX:XX [scrapy.statscollectors] INFO: Dumping Scrapy stats:
{'downloader/request_bytes': 455,
'downloader/request_count': 2,
'downloader/request_method_count/GET': 2,
'downloader/response_bytes': 2719,
'downloader/response_count': 2,
'downloader/response_status_count/200': 1,
'downloader/response_status_count/404': 1,
'elapsed_time_seconds': 1.21889,
'finish_reason': 'Force Close!!!!!!',
'finish_time': datetime.datetime(2020, 5, 18, xx, xx, xx, XXXXXX),
'log_count/DEBUG': 2,
'log_count/INFO': 10,
'memusage/max': 55631872,
'memusage/startup': 55631872,
'response_received_count': 2,
'robotstxt/request_count': 1,
'robotstxt/response_count': 1,
'robotstxt/response_status_count/404': 1,
'scheduler/dequeued': 1,
'scheduler/dequeued/memory': 1,
'scheduler/enqueued': 1,
'scheduler/enqueued/memory': 1,
'start_time': datetime.datetime(2020, 5, 18, xx, xx, xx, XXXXXX)}
2020-05-18 XX:XX:XX [scrapy.core.engine] INFO: Spider closed (Force Close!!!!!!)

Using errbacks to catch exceptions in request processing

Requestプロセスの中で発生した例外はerrbackでその挙動を定義することができる。
ネットワークに関する典型的な例外をトラップする例が記載されている。サンプルではログ出力のみだが、前述の例外をスローして中断する処理を記述することができる。

1
2
3
4
5
6
7
8
9
10
11
12
13
14
15
16
17
18
19
20
21
22
23
24
25
26
27
28
29
30
31
32
33
34
35
36
37
38
39
40
41
42
43
44
45
46
47
import scrapy

from scrapy.spidermiddlewares.httperror import HttpError
from twisted.internet.error import DNSLookupError
from twisted.internet.error import TimeoutError, TCPTimedOutError

class ErrbackSpider(scrapy.Spider):
name = "errback_example"
start_urls = [
"http://www.httpbin.org/", # HTTP 200 expected
"http://www.httpbin.org/status/404", # Not found error
"http://www.httpbin.org/status/500", # server issue
"http://www.httpbin.org:12345/", # non-responding host, timeout expected
"http://www.httphttpbinbin.org/", # DNS error expected
]

def start_requests(self):
for u in self.start_urls:
yield scrapy.Request(u, callback=self.parse_httpbin,
errback=self.errback_httpbin,
dont_filter=True)

def parse_httpbin(self, response):
self.logger.info('Got successful response from {}'.format(response.url))
# do something useful here...

def errback_httpbin(self, failure):
# log all failures
self.logger.error(repr(failure))

# in case you want to do something special for some errors,
# you may need the failure's type:

if failure.check(HttpError):
# these exceptions come from HttpError spider middleware
# you can get the non-200 response
response = failure.value.response
self.logger.error('HttpError on %s', response.url)

elif failure.check(DNSLookupError):
# this is the original request
request = failure.request
self.logger.error('DNSLookupError on %s', request.url)

elif failure.check(TimeoutError, TCPTimedOutError):
request = failure.request
self.logger.error('TimeoutError on %s', request.url)

SplashのLuaスクリプトの例外を処理する

SplashRequestから実行したLuaスクリプト内でerror()を使って強制的にエラーを発生させている。Luaスクリプト内のエラーはSplashからHTTPのエラーコード400による応答でScrapyへ返却される。

ScrapyはSplashRequestに設定したerrbackでこのエラーをトラップし、CloseSpider例外を発生させてSpiderを中断する。

1
2
3
4
5
6
7
8
9
10
11
12
13
14
15
16
17
18
19
20
21
22
23
24
25
26
27
28
29
30
31
32
33
34
35
36
37
38
39
40
41
42
43
44
45
46
47
48
49
50
51
52
53
54
55
56
57
58
# -*- coding: utf-8 -*-
import scrapy
from scrapy_splash import SplashRequest
from scrapy_splash_tutorial.items import QuoteItem
from scrapy.spidermiddlewares.httperror import HttpError
from scrapy.exceptions import CloseSpider

_login_script = """
function main(splash, args)
assert(splash:go(args.url))
assert(splash:wait(0.5))

-- 例外発生
error("Force Splash Error")

return {
url = splash:url(),
html = splash:html(),
}
end
"""

class QuotesjsSpider(scrapy.Spider):
name = 'quotesjs'
allowed_domains = ['quotes.toscrape.com']
start_urls = ['http://quotes.toscrape.com/js/']

def start_requests(self):
for url in self.start_urls:
yield SplashRequest(
url,
callback=self.parse,
errback=self.errback_httpbin,
endpoint='execute',
cache_args=['lua_source'],
args={ 'timeout': 60, 'wait': 5, 'lua_source': _login_script, },
)

def parse(self, response):
for q in response.css(".container .quote"):
quote = QuoteItem()
quote["author"] = q.css(".author::text").extract_first()
quote["quote"] = q.css(".text::text").extract_first()
yield quote

def errback_httpbin(self, failure):
# log all failures
self.logger.error(repr(failure))

# in case you want to do something special for some errors,
# you may need the failure's type:

if failure.check(HttpError):
# these exceptions come from HttpError spider middleware
# you can get the non-200 response
response = failure.value.response
self.logger.error('HttpError on %s', response.url)
raise CloseSpider("Force Close!!!!!!")

Splashで400 Bad request to Splashエラーなり、errbackCloseSpider例外を発生させ終了している。

1
2
3
4
5
6
7
8
9
10
11
12
13
14
15
16
17
18
19
20
21
22
23
24
25
26
27
28
29
30
31
32
33
34
35
36
37
2020-05-18 XX:XX:XX [scrapy.core.engine] DEBUG: Crawled (404) <GET http://quotes.toscrape.com/robots.txt> (referer: None)
2020-05-18 XX:XX:XX [scrapy.core.engine] DEBUG: Crawled (404) <GET http://splash:8050/robots.txt> (referer: None)
2020-05-18 XX:XX:XX [scrapy_splash.middleware] WARNING: Bad request to Splash: {'error': 400, 'type': 'ScriptError', 'description': 'Error happened while executing Lua script', 'info': {'source': '[string "..."]', 'line_number': 7, 'error': 'Force Splash Error', 'type': 'LUA_ERROR', 'message': 'Lua error: [string "..."]:7: Force Splash Error'}}
2020-05-18 XX:XX:XX [scrapy.core.engine] DEBUG: Crawled (400) <GET http://quotes.toscrape.com/js/ via http://splash:8050/execute> (referer: None)
2020-05-18 XX:XX:XX [quotesjs] ERROR: <twisted.python.failure.Failure scrapy.spidermiddlewares.httperror.HttpError: Ignoring non-200 response>
2020-05-18 XX:XX:XX [quotesjs] ERROR: HttpError on http://quotes.toscrape.com/js/
2020-05-18 XX:XX:XX [scrapy.core.engine] INFO: Closing spider (Force Close!!!!!!)
2020-05-18 XX:XX:XX [scrapy.statscollectors] INFO: Dumping Scrapy stats:
{'downloader/request_bytes': 1282,
'downloader/request_count': 3,
'downloader/request_method_count/GET': 2,
'downloader/request_method_count/POST': 1,
'downloader/response_bytes': 1134,
'downloader/response_count': 3,
'downloader/response_status_count/400': 1,
'downloader/response_status_count/404': 2,
'elapsed_time_seconds': 2.439215,
'finish_reason': 'Force Close!!!!!!',
'finish_time': datetime.datetime(2020, 5, 18, xx, xx, xx, XXXXXX),
'log_count/DEBUG': 3,
'log_count/ERROR': 2,
'log_count/INFO': 10,
'log_count/WARNING': 2,
'memusage/max': 56270848,
'memusage/startup': 56270848,
'response_received_count': 3,
'robotstxt/request_count': 2,
'robotstxt/response_count': 2,
'robotstxt/response_status_count/404': 2,
'scheduler/dequeued': 2,
'scheduler/dequeued/memory': 2,
'scheduler/enqueued': 2,
'scheduler/enqueued/memory': 2,
'splash/execute/request_count': 1,
'splash/execute/response_count/400': 1,
'start_time': datetime.datetime(2020, 5, 18, 6, 5, xx, xx, xx, XXXXXX)}
2020-05-18 XX:XX:XX [scrapy.core.engine] INFO: Spider closed (Force Close!!!!!!)

コメント・シェア

Scrapyのイベントドリブンで処理を実行する

 
カテゴリー Python   タグ

Signals

Scrapy uses signals extensively to notify when certain events occur. You can catch some of those signals in your Scrapy project (using an extension, for example) to perform additional tasks or extend Scrapy to add functionality not provided out of the box.

Scrapyはイベント発生時にシグナルを使って処理を拡張することができる。
リファレンスに示された以下のサンプルコードは、signals.spider_closedシグナルをキャッチしたときにspider_closed()メソッドを実行する例だ。

1
2
3
4
5
6
7
8
9
10
11
12
13
14
15
16
17
18
19
20
21
22
23
24
25
26
from scrapy import signals
from scrapy import Spider


class DmozSpider(Spider):
name = "dmoz"
allowed_domains = ["dmoz.org"]
start_urls = [
"http://www.dmoz.org/Computers/Programming/Languages/Python/Books/",
"http://www.dmoz.org/Computers/Programming/Languages/Python/Resources/",
]


@classmethod
def from_crawler(cls, crawler, *args, **kwargs):
spider = super(DmozSpider, cls).from_crawler(crawler, *args, **kwargs)
crawler.signals.connect(spider.spider_closed, signal=signals.spider_closed)
return spider


def spider_closed(self, spider):
spider.logger.info('Spider closed: %s', spider.name)


def parse(self, response):
pass

クロール終了時に統計情報を通知する

公式チュートリアルのQuotesSpiderをカスタマイズして、クロール終了時に統計情報へアクセスする例。
signals.spider_closedシグナルをキャッチしたときに統計情報を通知するなどの処理を実装することができる。

1
2
3
4
5
6
7
8
9
10
11
12
13
14
15
16
17
18
19
20
21
22
23
24
25
26
27
28
29
30
31
import scrapy
from scrapy import signals

class QuotesSpider(scrapy.Spider):
name = "quotes"
start_urls = [
'http://quotes.toscrape.com/page/1/',
]

@classmethod
def from_crawler(cls, crawler, *args, **kwargs):
spider = super(QuotesSpider, cls).from_crawler(crawler, *args, **kwargs)
crawler.signals.connect(spider.spider_closed, signal=signals.spider_closed)
return spider

def spider_closed(self, spider):
spider.logger.info('Spider closed!!!!!!!!!: %s', spider.name)
spider.logger.info(spider.crawler.stats.get_stats())

def parse(self, response):
for quote in response.css('div.quote'):
yield {
'text': quote.css('span.text::text').get(),
'author': quote.css('small.author::text').get(),
'tags': quote.css('div.tags a.tag::text').getall(),
}

next_page = response.css('li.next a::attr(href)').get()
if next_page is not None:
next_page = response.urljoin(next_page)
yield scrapy.Request(next_page, callback=self.parse)

シグナル処理によって出力された結果は以下。

1
2
3
4
5
6
7
8
9
10
11
12
2020-05-18 XX:XX:XX [scrapy.core.engine] INFO: Closing spider (finished)
2020-05-18 XX:XX:XX [scrapy.extensions.feedexport] INFO: Stored json feed (100 items) in: quotes.json
2020-05-18 XX:XX:XX [quotes] INFO: Spider closed!!!!!!!!!: quotes
2020-05-18 XX:XX:XX [quotes] INFO: {'log_count/INFO': 13, 'start_time': datetime.datetime(2020, 5, 18, xx, xx, xx, xxxxxx), 'memusage/startup': 55676928, 'memusage/max': 55676928, 'scheduler/enqueued/memory': 10, 'scheduler/enqueued': 10, 'scheduler/dequeued/memory': 10, 'scheduler/dequeued': 10, 'downloader/request_count': 11, 'downloader/request_method_count/GET': 11, 'downloader/request_bytes': 2895, 'robotstxt/request_count': 1, 'downloader/response_count': 11, 'downloader/response_status_count/404': 1, 'downloader/response_bytes': 24911, 'log_count/DEBUG': 111, 'response_received_count': 11, 'robotstxt/response_count': 1, 'robotstxt/response_status_count/404': 1, 'downloader/response_status_count/200': 10, 'item_scraped_count': 100, 'request_depth_max': 9, 'elapsed_time_seconds': 8.22286, 'finish_time': datetime.datetime(2020, 5, 18, xx, xx, xx, xxxxxx), 'finish_reason': 'finished'}
2020-05-18 XX:XX:XX [scrapy.statscollectors] INFO: Dumping Scrapy stats:
{'downloader/request_bytes': 2895,
'downloader/request_count': 11,
'downloader/request_method_count/GET': 11,
'downloader/response_bytes': 24911,
'downloader/response_count': 11,
'downloader/response_status_count/200': 10,
'downloader/response_status_count/404': 1,

コメント・シェア

Scrapyで統計情報を記録する

 
カテゴリー Python   タグ

Stats Collection

Scrapy provides a convenient facility for collecting stats in the form of key/values, where values are often counters. The facility is called the Stats Collector, and can be accessed through the stats attribute of the Crawler API, as illustrated by the examples in the Common Stats Collector uses section below.

統計情報は常に有効なので、Crawler APIの属性値を介してstatsにアクセスすることができる。

Spiderの中で統計情報を使う

公式チュートリアルのQuotesSpiderをカスタマイズして、統計情報を設定する。
SpiderはCrawlerを属性値として持つのでself.crawler.statsでStats Collectionにアクセスできる。

操作はStats Collector APIで行う。

1
2
3
4
5
6
7
8
9
10
11
12
13
14
15
16
17
18
19
20
21
22
23
import scrapy

class QuotesSpider(scrapy.Spider):
name = "quotes"
start_urls = [
'http://quotes.toscrape.com/page/1/',
]

def parse(self, response):
#print(self.crawler.stats.get_stats())
self.crawler.stats.inc_value('crawled_pages')
for quote in response.css('div.quote'):
self.crawler.stats.inc_value('crawled_items')
yield {
'text': quote.css('span.text::text').get(),
'author': quote.css('small.author::text').get(),
'tags': quote.css('div.tags a.tag::text').getall(),
}

next_page = response.css('li.next a::attr(href)').get()
if next_page is not None:
next_page = response.urljoin(next_page)
yield scrapy.Request(next_page, callback=self.parse)

実行終了時に標準の統計情報の結果と共にSpiderの中で設定したcrawled_pagescrawled_itemsが表示されている。

1
2
3
4
5
6
7
8
9
10
11
12
13
14
15
16
17
18
19
20
21
22
23
24
25
26
27
28
29
30
31
2020-05-18 XX:XX:XX [scrapy.core.engine] INFO: Closing spider (finished)
2020-05-18 XX:XX:XX [scrapy.extensions.feedexport] INFO: Stored json feed (100 items) in: quotes.json
2020-05-18 XX:XX:XX [scrapy.statscollectors] INFO: Dumping Scrapy stats:
{'crawled_items': 100,
'crawled_pages': 10,
'downloader/request_bytes': 2895,
'downloader/request_count': 11,
'downloader/request_method_count/GET': 11,
'downloader/response_bytes': 24911,
'downloader/response_count': 11,
'downloader/response_status_count/200': 10,
'downloader/response_status_count/404': 1,
'elapsed_time_seconds': 7.113748,
'finish_reason': 'finished',
'finish_time': datetime.datetime(2020, 5, 18, xx, xx, xx, XXXXXX),
'item_scraped_count': 100,
'log_count/DEBUG': 111,
'log_count/INFO': 11,
'memusage/max': 55717888,
'memusage/startup': 55717888,
'request_depth_max': 9,
'response_received_count': 11,
'robotstxt/request_count': 1,
'robotstxt/response_count': 1,
'robotstxt/response_status_count/404': 1,
'scheduler/dequeued': 10,
'scheduler/dequeued/memory': 10,
'scheduler/enqueued': 10,
'scheduler/enqueued/memory': 10,
'start_time': datetime.datetime(2020, 5, 18, xx, xx, xx, XXXXXX)}
2020-05-18 XX:XX:XX [scrapy.core.engine] INFO: Spider closed (finished)

コメント・シェア

Boto3でDynamoDBにまとめてアイテム登録

 
カテゴリー AWS Python   タグ

Boto3

Boto3でDynamoDBに登録する

dbインスタンスでAWSのアクセスキーを指定して初期化。

1
2
3
4
5
6
7
db = boto3.resource(
'dynamodb',
aws_access_key_id=os.environ['AWS_ACCESS_KEY_ID'],
aws_secret_access_key=os.environ['AWS_SECRET_ACCESS_KEY'],
region_name=os.environ['AWS_DEFAULT_REGION'],
)
table = db.Table(table_name)

itemに格納するデータをハッシュで入れていた場合、JSON形式にして格納すればいい。

1
table.put_item({k: v for k, v in item.items()})

Creates a new item, or replaces an old item with a new item. If an item that has the same primary key as the new item already exists in the specified table, the new item completely replaces the existing item. You can perform a conditional put operation (add a new item if one with the specified primary key doesn’t exist), or replace an existing item if it has certain attribute values. You can return the item’s attribute values in the same operation, using the ReturnValues parameter.

存在しない場合は追加され、既存のレコードがある場合はレコードが置き換えられる。置き換えたくない場合は条件付き操作で制御する。

batch_writer

複数のレコードを効率的に書き込むbatch_writer()がある。batch_writer()を使用すると、バッファリングと再送を自動的に行うことができる。エラーの場合に適宜待ち時間を挟んでリトライする。

1
2
3
4
def batch_put_table(table, records):
with table.batch_writer() as batch:
for record in records:
batch.put_item({k: v for k, v in record.items()})

Create a batch writer object.

This method creates a context manager for writing objects to Amazon DynamoDB in batch.

The batch writer will automatically handle buffering and sending items in batches. In addition, the batch writer will also automatically handle any unprocessed items and resend them as needed. All you need to do is call put_item for any items you want to add, and delete_item for any items you want to delete.

バッチライターは未処理のアイテムも自動的に再送を行う。追加の場合put_item()、削除の場合delete_item()を呼べばよい。

キャパシティを超えた時の動作

DynamoDBにput_item()で書き込んだ場合に、キャパシティユニットの上限値を超えるとHTTPステータスコード400のThrottlingException (Message: Rate of requests exceeds the allowed throughput.)を発生させる。

batch_writerを使用している場合、一時的な超過であればリトライによってリカバリーされるが、書き込み量に対してキャパシティユニットが知さすぎる場合は、リトライアウトしてしまい、書き込みエラーとなる。

DynamoDBのCloudWatchによる統計情報

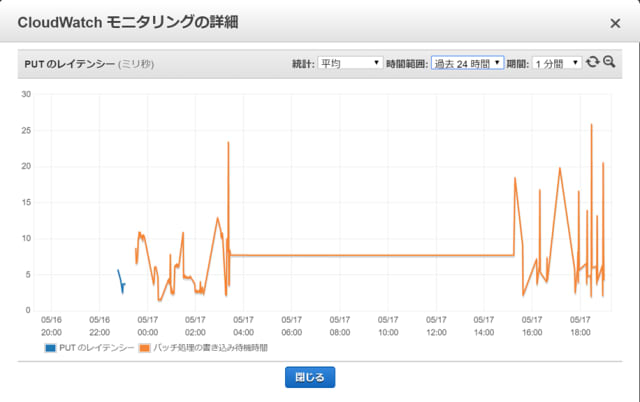
  • 中央より左側が書き込み量の調整をせずbatch_writer()によって大量投入した場合の動作
  • 中央より右側が書き込むレコード数を適当な数毎に区切ってbatch_writer()に渡して処理した場合の動作

書き込みキャパシティーをみると、左側は割り当てた1を大きく超えて消費していることがわかる。
右側では統計情報上は1を超えているが、ThrottlingExceptionは発生しなかった。

AWS DynamoDB Statistics width=640

PUTのレイテンシーは平均値としてはばらつきが大きいが、似たような値である。

AWS DynamoDB Statistics width=640

合計値はリトライが減ったことにより右側が少なくなっている。

AWS DynamoDB Statistics width=640

スロットル書き込みはThrottlingExceptionが発生している状態である。左側は多発していることがわかる。

AWS DynamoDB Statistics width=640

AWS DynamoDB Statistics width=640

コメント・シェア


nullpo

めも


募集中


Japan